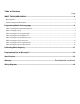
Table of Contents Page WHAT THE GAUGE CAN DO .............................................................................................................. 3 Basic Features:.................................................................................................................................................................... 3 Advanced Programmable Features:....................................................................................................................................
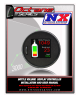
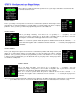
WARNING TO AVOID DAMAGING THE DISPLAY, NEVER PUSH ON THE SCREEN. DO NOT PUSH ON THE SCREEN WHILE PLUGGING IN THE HARNESS, AS YOU WILL DAMAGE THE UNIT. THE CONTROL BUTTON CAN ONLY BE MOVED UP, DOWN, AND INWARD. NONE OF THOSE DIRECTIONS IN COMBINATION FOR IT WILL DAMAGE THE GAUGE AND VOID THE WARRANTY The Nitrous Express Bottle Volume Display Controller gauge will control many aspects of your nitrous oxide system. This device is the world’s first all-in-one full color controller with integrated display.
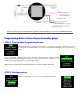
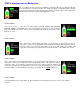
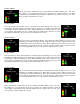
DO NOT PUSH ON THE SCREEN WHILE PLUGGING IN THE HARNESS, AS YOU WILL DAMAGE THE UNIT. Programming Bottle Volume Display Controller gauge. STEP 1. Entering Main Programming Screen After properly wiring your gauge turn the power on. You will see a couple of splash screens come up. Now push the control button in. You will see the Main Programming Screen. Toggle down one space. This is your Enable or Disable heater control.
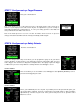
STEP 3. Configure set up--Stage Setups. This is where you will set up the Horsepower levels of your stages and tell the controller how the solenoids are turned on/off. SCROLL DOWN: This is your Stage 1 Horsepower level. Push the control button (numbers will change to blue) and adjust up or down until it matches your HP jetting. Use the HP rating your nitrous company publishes. Once you have your HP level programmed, push the control button in. SCROLL DOWN: This is your Stage 1 Polarity.
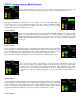
STEP 4. Configure set up--Bottle Level. This is your Bottle Level Screen. Because EMPTY is subjective, different users will have different levels at which they consider the bottle to be empty. The gauge is programmed with a default empty level and may not accurately display the true level in your tank until you have calibrated it. This will be discussed at the end of the programming section.
STEP 5. Configure set up--Bottle Pressure. This is your Bottle pressure set up screen. It is used to set the pressure sensor type, and customize the color shift points for the Nitrous pressure data on the Main Viewing screen. SCROLL DOWN: Push your control button in and match your sensor rating. Your choices are 1500, 1600, and none. If you choose none you will have NO nitrous pressure reading on the Main viewing screen, and loose some accuracy on the volume used.
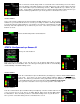
This is the Red to Yellow change which is a visual aid for the main viewing screen. The nitrous pressure display on the Main Viewing screen will change from red to yellow at this point. Push your control button in (the text will change to blue). Make adjustments up or down to fit your needs. If you hold the control button in the up or down position the numbers will scroll. Once you have the number programmed for your needs, push the control button in to save it.
SCROLL DOWN: This is your hi-side scaling which sets the upper limit of the Main Viewing screen. The closer this number is to your actual hi-side the more accurate your scaling resolution is. Push the control button in (text will turn blue) and make adjustments up or down to fit your needs. Once done, push the control button in to save it. SCROLL DOWN: This is the Yellow to Red change. This is a visual aid for the main viewing screen.
STEP 7. Configure set up--Target Pressure. Push your control button in. This screen allows you to set the target pressure for the bottle heater control. Scroll up or down to set your target pressure. This screen only has one adjustment so you can scroll up or down without pushing the control button in. To save your setting, push the control button in and you will return to the Exit & Save Screen.
SCROLL DOWN: This is your HI bottle pressure set point. If your bottle pressure rises above this point your cutoff relay will be activated. Push the control button in (text will change to blue) and make adjustments up or down to fit your needs. Once your hi side pressure is set, push the control button in to save it. SCROLL DOWN: This is the delay for the nitrous pressure.
Once you reach the level that you consider your empty level, go to the bottle level configuration screen, select Set Empty and press the control button in to save. NOW every time you refill your bottle you must press the control button and scroll to Reset Full Bottle. Press the control button in and the gauge will now be set to full, and you will return to the main screen. Now use you nitrous system as you would normally.
Warranty DISCLAIMER: Nitrous Express Inc. may not be held responsible for any damages, how so ever caused, to any persons or equipment during the installation and or operation of this product. Nitrous Express Inc. are meant for OFF-ROAD use only, and make no claims as to this products ability to meet local safety or emissions laws. WARRANTY: Nitrous Express Inc. warrants the material and workmanship of the equipment, components and parts manufactured by Nitrous Express Inc.
Wiring Diagrams