BAR STOOL Caution : You must read this before you proceed CAUTION : This Barstool is NOT a TOY. Keep your child / children at bay in the process of assembly. For turning the Barstool and to prevent damage to the Barstool, 02 persons may be needed to execute this action.
B Leg 4 C Leg Support Rail 1 Description QTY Label Picture Bolt (M8x20mm) 13 Flat Washer (M8.
Before Beginning Assembly:
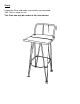
Overview This Barstool has multiple parts and may require up to 30 minutes to assemble. To give you an overview of the Barstool parts, the above picture is to help you put the various parts into perspective. Please read through the instructions below to familiarise yourself with the parts and steps before assembly. Seat panel (A) Leg (B) Leg Support Rail (C) FRONT FACING Step 1 Unpack and place all parts on a clean, non-marring surface.
Step 2 2.1) Place the Seat panel (A) onto the side of a table or a box as shown in picture. You will have the bar chair bottom and legs facing skywards. Attach one of the Legs (B) into the Seat panel (A) by using Bolts (①), Flat Washer (②) and Allen Key (⑤) as shown in picture. 2.2) Repeat same process as Step 2.1 to attach 2 Legs (B) into Seat panel (A) as shown in picture. but left one leg unassembled. Do not fully tighten the Bolts. B A Step 2.1 Step 2.
Step 3 3.1) Attach the Leg support rail (C) into the Legs (B) as shown in picture. Note: the welded bolt on Leg Support rail (C) must match pre-drilled mounting position on the legs (B). 3.2) Affix the Leg support rail (C) with the Legs (B) by using Bolt nut (③) and Wrench (④) as shown in picture. Do not fully tighten the Bolts. C Step 3.2 Step 3.
Step 4 4.1) Attach the remaining leg (C) into the assembled frame as shown in picture. 4.2) Repeat the same process as Step 2.1 to affix Leg (B) with Table top (A). 4.3) Repeat the same process as Step 3.2 to affix Leg (B) with Leg support rail (C). Do not fully tighten the Bolts. B C Step 4.3 A Step 4.1 Step 4.
Step 7 Place the Chair right side up on a LEVEL SURFACE to see if it wobbles. If it wobbles, lift the Chair some 30cm to 50cm height from the ground. Keep your feet and toes well away from the drop zone. Drop the Chair freely and vertically with all four legs, hitting the ground at the same time. This Drop Test will help to ensure that all the Bolts, Screws and gaps reach full alignment status. Test again for evenness on a LEVEL SURFACE. If no wobbles are found, proceed to tighten all the Screws, and Bolts.
Step 8 Inspect the Chair and make sure all parts are connected. Your Chair is ready for use. This Chair can only be used on a flat, level surface.
Caution : You must read this before you proceed BAR TABLE CAUTION : This Bar Table is NOT a TOY. Keep your child / children at bay in the process of assembly. For turning the Bar Table and to prevent damage to the Bar Table, 02 people may be needed to execute this action.
Label Description QTY A Table Top 1 B Legs 4 Description QTY Label Picture Picture Bolt (M8x20mm) 13 Flat Washer (M8.
Before beginning assembly:
Overview This Table has multiple parts and may require up to 30 minutes to assemble. To give you an overview of the Table parts, the above picture is to help you put the various parts into perspective. Please read through the instructions below to familiarise yourself with the parts and steps before assembly.
Step 1 Unpack and place all parts on a clean, non-marring surface. Step 2 With the assistance of an adult, lay the Table top (A) facedown onto a clean, flat surface to avoid any scratches or damage to the product.
Step 3 Insert one of legs (B) into the table top (A), put the flat washer (②) and bolt ( ①) as above picture. Affix leg (B) and table top (A) by using Allen key (③). Repeat the same process with the other 3 Legs (B) Do not fully tighten the Bolts.
Step 4 With assistance from your partners, turn the Table back to normal flat ground EXERT pressure, floorwards, onto the Table. This pressure will help the Legs and Table Top reach alignment at all joints. Check for wobbles. In a sequential manner, gradually tighten all Bolts until evenly secured. Inspect the Table and make sure all parts are adequately connected. Your Table is ready for use. This Table can only be used on a flat, level surface.