Warnings: You must read this before you proceed.
Part NO.
Before Beginning Assembly: Unpack and place all parts for clear visibility. Pack A for locking the back panel of the seat to the horizontal panel of the backrest: Four Dia.M8 Bolt:90mm(b)+one Dia.M8 Bolt:60mm(a)+five spring washer(c)+five flat washer(d) Pack B for Locking the front legs to the front corner blocks of the seat: Four Dia.
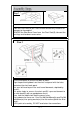
Step 1 A B Place the Chair Back(A) on a soft surface to avoid any scratches or damages to the product. REMOVE the Seat Base Cover from the Chair Seat(B), take out the front legs and hardware accessories. Step 2 Put the chair back( A) onto a flat table or panel. Align the positioning dowels on the chair seat panel with the holes located on the chair back panel. Use your left hand to push the seat frame floorwards, depicted by Arrow 1.
Step 3 Next, place the chair onto the side of a table as seen in Picture 1. You will now have the chair bottom and all 4-legs facing skywards. Insert each front leg completely vertically into each seat frame corner. PRESS FIRMLY DOWN with your hand until there is no gap. WARNING!! DO NOT POSITION THE FRONT LEG AS SHOWN IN PICTURE 2 . THIS PICTURE SHOWS THE CHAIR BACK STAYS AGAINST THE GROUND and THE FRONT LEGS HORIZONTAL IN MIDAIR.
Step 4 Place the chair on a LEVEL SURFACE to see if it wobbles. If it wobbles, lift the chair to some 30cm to 50cm height from the ground. Keep your feet and toes well away from the drop zone. Drop the chair freely and vertically with the four legs, hitting the ground, at the same time. This Drop Test will help to ensure that all the bolts and gaps to all reach full alignment status. Test again for evenness on a LEVEL SURFACE. If no wobbles found, proceed to tighten all the bolts.
OF 7