Assembly Instructions CAUTION : You must read this before you proceed Shelf Cabinet CAUTION : This is NOT a TOY. Keep your child / children at bay during the assembly process.
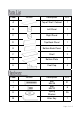
Label Description QTY A Top of Shelf Cabinet 1 B Left Panel 1 C Right Panel 1 D Top Back Panel 1 E Bottom Back Panel 1 F Shelf 2 G Bottom Plate 1 H Feet Cap 4 Description QTY Label I J K M Picture Picture Bolt M6*45 Bolt M6*20 Spring Washer Allen Key 21 5 25 1 Page 2 of 8
Before Beginning Assembly: Page 3 of 8
Step 1 Open the carton and place all the parts onto a clean and soft surface. Unpack all packages of hardware. Then place Shelf Top(A) facedown on a clean, non-marring surface. Attach the Left Panel(B) to the Table Top(A) using hardware(K,J) with Allen Key(M). DO NOT OVERTIGHTEN. Step 2 Repeat Step 1 attaching the Right Panel(C) to the Shelf Top(A). DO NOT OVERTIGHTEN.
Step 3 Attach the Top Back Panel(D) between the side panels using hardware(K, I) with Allen Key(M). DO NOT OVERTIGHTEN Step 4 Attach the Bottom Back Panel(E) between the side panels using hardware (K, I) with Allen Key(M).
Step 5 NOTE: Please have a second adult help you perform the next two steps Attach the Bottom Plate(G) to the Bottom Back Panel(E) using hardware(K, I) with Allen Key(M). DO NOT OVERTIGHTEN Step 6 Attach the Feet Cap(H) to the Bottom Plate(G) using hardware(K, I) with Allen Key(M). Now, in a gradual and sequential manner, proceed to fully and securely tighten all Bolts at all joints.
Step 7 To install the Shelves(F), first place the loop attached to the left side of the shelf into the metal peg on the inside of the Left Side Panel(B) as shown in the picture above. Then lower the right side until the loops fit into the pegs on the right side. Step 8 Repeat Step 7 to install the second Shelf(F). The Shelf Cabinet is ready for use.
Page 8 of 8