CAUTION : You must read this before you proceed Love Seat CAUTION : This Love Seat is NOT a TOY. Keep your child / children at bay during the assembly process.
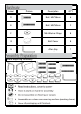
Label Picture Description QTY D Bolt M6*35mm 6 E Bolt M6*50mm 2 F M6 Washer Rings 8 G Bolt Cover 8 H Allen Key 1 Before Beginning Assembly: 第 2 页
Step 1 Open the carton and place all the parts onto a clean, non-marring surface. Put the Love Seat(C) against the Right Armrest(B) and line up the three mounting positions of both. Attach the Love Seat(C) to the Right Armrest(B) using Bolts(D) and Washers(F) with Allen Key(H). LOOSELY TIGHTEN. Step 2 Turn the Love Seat over, and attach Bolt(E) and Washer(F) using Allen Key(H) as pictured above. LOOSELY TIGHTEN.
Step 3 Put the Love Seat(C) against the Left Armrest(A) and line up the three mounting positions of both. Attach the Love Seat(C) to the Left Armrest(A) using Bolts(D) and Washers(F) with Allen Key(H). LOOSELY TIGHTEN. Step 4 Turn the Love Seat over, and attach Bolt(E) and Washer(F) using Allen Key(H) as pictured above. Now tighten all Bolts at all joints. Put the Bolt Covers(G) over all the Bolts.
Step 5 Your Love Seat is ready for use.
CAUTION : You must read this before you proceed Single Chair CAUTION : This Chair is NOT a TOY. Keep your child / children at bay during the assembly process.
Label Picture Description QTY D Bolt M6*35mm 6 E Bolt M6*50mm 2 F M6 Washer Rings 8 G Bolt Cover 8 H Allen Key 1 Before Beginning Assembly: 第 2 页
Step 1 Open the carton and place all the parts onto a clean, non-marring surface. Put the Seat(C) against the Right Armrest(B) and line up the three mounting positions of both. Attach the Seat(C) to the Right Armrest(B) using Bolts(D) and Washers(F) with Allen Key(H). LOOSELY TIGHTEN. Step 2 Turn the chair over, and attach Bolt(E) and Washer(F) using Allen Key(H) as pictured above. LOOSELY TIGHTEN.
Step 3 Put the Seat(C) against the Left Armrest(A) and line up the three mounting positions of both. Attach the Seat(C) to the Left Armrest(A) using Bolts(D) and Washers(F) with Allen Key(H). LOOSELY TIGHTEN. Step 4 Turn the Chair over, and attach Bolt(E) and Washer(F) using Allen Key(H) as pictured above. Now tighten all Bolts at all joints. Put the Bolt Covers(G) over all the Bolts.
Step 5 Your Chair is ready for use.
CAUTION : You must read this before you proceed Table CAUTION : This Table is NOT a TOY. Keep your child / children at bay during the assembly process.
Label Picture Description QTY C Bolt Cover 8 D Bolt M6*20mm 8 E M6 Washer Ring 8 F Allen Key 1 Before Beginning Assembly: 第 2 页
Step 1 Open the carton and place all the parts onto a clean, non-marring surface. Attach Leg(B) onto the Tabletop(A) with Bolt(D) and Washer(E) using Allen Key(F). Caution: The Tabletop is heavy, always be sure to use two or more adults whenever lifting or moving it. Step 2 Repeat Step 1 with the remaining three Legs(B). Ensure all Legs are tightly and securely attached. Put the Bolt Covers(C) over all of the Bolts(D).
Step 3 Carefully turn the table over. Your Table is ready for use.