Assembly Instructions Caution : You must read this before you proceed CHAIR CAUTION : This chair is NOT a TOY. Keep your child / children at bay during the assembly process.
Hardware Label Picture Description QTY ① Bolt(M8*35mm) 9 ② Washer(8mm) 9 ③ Spring Washer(8mm) 9 ④ Nut(8mm) 9 ⑤ Rubber Cap 9 ⑥ Spanner 1 ⑦ Screwdriver 1 Assembly Preparation Before beginning assembly: Page 2 OF 6
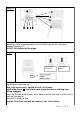
Overview Backrest Panel(A) Left Leg with Arm (with preattached Right Leg with Arm (with pre-attached Levellers)(C) Chair Seat Panel (B) FRONT FACING This Chair has multiple parts and may require up to some 30 minutes to assemble. To give you an overview of the Chair parts, the above picture is to help you put the various parts into perspective. Please read through the instructions below to familiarise yourself with the parts and steps before assembly.
Step 2 Place the Left Leg with Arm (D) on the floor and lock the mounting positions with four bolts(①) by using Screwdriver(⑥) DO NOT fully tighten at this stage. Step 3 ② ① ④ ③ ⑦ Step 3.1 Attach Backrest Panel (A) to the Left Leg with Arm (with pre-attached Levellers)(D) using Bolt(①),Washer(②) Spring Washers(③) and Nuts(④) with Screwdriver(⑦) Step 3.
Step 4 ⑦ ① ②③④ Repeat the same assembly process for the Right Leg with Arm (with preattached Levellers)(C). DO NOT fully tighten at this stage. Step 5 Adjust height for balance Adjust low for balance Stand the chair rightside up. Now, fully and securely, tighten all nuts, at all joints. Add Rubber Caps( ⑤ ) on all bolt ends to protect skin or clothing from getting snagged. Adjust the Pre-attached levellers at the bottoms of the chair legs until the chair is level with the ground.
Page 6 OF 6