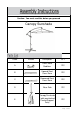
Caution : You must read this before you proceed Canopy Sunshade Label Picture Description QTY A Cross Base Stabilizer 1PC B Upward Steel Cross Base 1PC C Downward Steel Cross Base 1PC D Base Pole 1PC E Canopy Sunshade ( with preattached Curved Support Pole) 1PC Page 1 OF 7
Label Picture Description QTY ① Bolt(M8X45MM) 3PCS ② Bolt(M8X17MM) 3PCS ③ Washer 5PCS ④ Screw With Acrylic Cap 1PC ⑤ Wrench 1PC Before Beginning Assembly: Page 2 OF 7
Overview Canopy Sunshade (E) Base Pole (D) Steel Cross Base(A)+(C) FRONT FACING This Canopy Sunshade has multiple parts and may require up to some 30 minutes to assemble. To give you an overview of the Canopy Sunshade parts, the above picture is to help you put the various parts into perspective. Please read through the instructions below to familiarise yourself with the parts and steps before assembly.
Step 3 Align the mounting positions of the Base Pole(D) with Upward Steel Cross Base(B) and Downward Steel Cross Base(C). Step 4 Attach the Base Pole(D) and Steel Cross Base(B) using Washers(E) andBolts(F) with Wrench(J) and Base Pole (D) to Steel Cross Base(C) usingWashers(E) and Bolts(G) with Wrench(J). Note: Make sure all four bolts are in place before tightening completely, in asequential manner. Step 5 Reel-in the Canopy Sunshade by rotating the Crank clockwise until it touchesthe Frame.
Step 6 Insert the pole of the Canopy Sunshade(H) into the Base Pole(D) aligning themounting positions of (H) and (D).Screw in by hand the Screw With Acrylic Cap(I) in the mounting positions of (H)and (D) to ensure that the pole is tightly secured to the base.Your Canopy Sunshade is fully assembled.Caution: It is recommended that weights ( ≥ 45kg), be placed at the base toachieve stability during use of the Canopy Sunshade. Step 1 To use the Canopy Sunshade, you need to apply a 3 step process.
Step 2 Push the Bend Pole upwards until it is aligned to the Tube.Push down the Locking Device until it covers the Tube.This action locks the Curved Support Pole in position. Step 3 Open the Canopy Sunshade by rotating the Crank clockwise.To close, rotate the Crank counterclockwise. Step 4 Your Canopy Sunshade is ready for use.Caution: Always close the Canopy Sunshade when not in use and neveruse the Canopy Sunshade during strong windy conditions.
Do not put hot items directly on furniture surface Do not clean furniture with harsh cleansers or polish. To obtain the longest lifespan of your outdoor prodcts, minimizing exposure to direct sunlight is recommended. Children should not climb or jump on the furniture. Do not write on furniture without a padded barrier to protect the surface. To obtain the longest lifespan of your outdoor products, avoid extended and lengthy exposure to rain, snow, and direct sunshine.