Caution : You must read this before you proceed CHAIR Picture Label Picture Description QTY A Backrest Panel 1 B Left Arm Panel 1 C Right Arm Panel 1 Page 1 OF 27
D Seat Panel 1 E Back Panel 1 F Front Panel 1 Description QTY Label Picture ① Long Screws (M7x130mm) 4 ② Medium Screws (M7x60mm) 2 ③ Short Screws (M6x50mm) 2 ④ Allen Key 1 Before Beginning Assembly: Page 2 OF 27
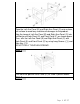
Overview FRONT FACING This Chair has multiple parts and may require up to some 30 minutes to assemble. To give you an overview of the Chair parts, the above picture is to help you put the various parts into perspective. Please read through the instructions below to familiarise yourself with the parts and steps before assembly. Step 1 Unpack and place all parts on a clean, non-marring surface.
Place the Left Arm Panel (B) and Right Arm Panel (C) onto a clean, soft surface to avoid any scratches or damages to the product. Align the tenon of Left Arm Panel (B) and Right Arm Panel (C) into the Mortise of Back Panel (E) and Front Panel (F) as shown above. Then, affix the Left Arm Panel (B) and Right Arm Panel (C) with Back Panel (E) and Front Panel (F) by using Long Screws (①) and Allen Key (④). DO NOT FULLY TIGHTHEN SCREWS.
Position the Backrest Panel (A) as show in picture above. Then, affix Backrest Panel (A) with Left Arm Panel (B) and Right Arm Panel (C) by using Medium Screws (②) and Allen Key (④) DO NOT FULLY TIGHTHEN SCREWS. Step 5 Insert the Tenons from Back Panel (E) into the Mortises of the Backrest Panel (A) then attach using Short Screws (③) and Allen Key (④). DO NOT FULLY TIGHTHEN SCREWS.
Place the Chair on a LEVEL SURFACE. Inspect it and make sure all parts are adequately connected. Gently and gracefully, sit into to the Chair. This will help to align all the parts at all the joint areas. Then get off the Chair, and proceed to tighten all Screws in a sequential manner. You may be required to turn the Chair to gain easy access to the secure points. Turn the Chair in a synchronised manner. CAUTION 1: When tightening these Screws, tighten sequentially.
Questions & Answers about Proposition 65 • What is Proposition 65? Proposition 65 requires businesses to provide warnings to Californians about significant exposures to chemicals that cause cancer, birth defects or other reproductive harm. These chemicals can be in the products that Californians purchase, in their homes or workplaces, or that are released into the environment.
Page 8 OF 27
Caution : You must read this before you proceed LOVESEAT Picture Label Picture Description QTY A Backrest Panel 1 B Left Arm Panel 1 C Right Arm Panel 1 Page 9 OF 27
D Seat Panel 1 E Back Panel 1 F Front Panel 1 Description QTY Label Picture ① Long Screws (M7x130mm) 4 ② Medium Screws (M7x60mm) 2 ③ Short Screws (M6x50mm) 4 ④ Allen Key 1 Before Beginning Assembly: Page 10 OF 27
Overview FRONT FACING This Chair has multiple parts and may require up to 30 minutes to assemble. To give you an overview of the Chair parts, the above picture is to help you put the various parts into perspective. Please read through the instructions below to familiarise yourself with the parts and steps before assembly.
Unpack and place all parts on a clean, non-marring surface. Step 2 Place the Left Arm Panel (B) and Right Arm Panel (C) onto a clean, soft surface to avoid any scratches or damages to the product. Align the tenon of Left Arm Panel (B) and Right Arm Panel (C) into the Mortise of Back Panel (E) and Front Panel (F) as shown above. Then, affix the Left Arm Panel (B) and Right Arm Panel (C) with Back Panel (E) and Front Panel (F) by using Long Screws (①) and Allen Key (④). DO NOT FULLY TIGHTHEN SCREWS.
Position Seat Panel (D) as shown above. Step 4 Position the Backrest Panel (A) as show in picture above. Then, affix Backrest Panel (A) with Left Arm Panel (B) and Right Arm Panel (C) by using Medium Screws (②) and Allen Key (④) DO NOT FULLY TIGHTHEN SCREWS.
Step 5 Position Backrest Panel (A) as show in picture above. Insert the Tenons from Back Panel (E) into the Mortises of the Backrest Panel (A) then attach using Short Screws (③) and Allen Key (④). DO NOT FULLY TIGHTHEN SCREWS.
Place the Loveseat on a LEVEL SURFACE. Inspect it and make sure all parts are adequately connected. Gently and gracefully, sit into to the Loveseat. This will help to align all the parts at all joint areas. Then get off the Loveseat and proceed to tighten the Bolts and Screws in a sequential manner. When tightening the Bolts and Screws tighten sequentially. DO NOT tighten any Bolt or Screw fully and then move on towards the next one.
Questions & Answers about Proposition 65 • What is Proposition 65? Proposition 65 requires businesses to provide warnings to Californians about significant exposures to chemicals that cause cancer, birth defects or other reproductive harm. These chemicals can be in the products that Californians purchase, in their homes or workplaces, or that are released into the environment.
Page 17 OF 27
Caution : You must read this before you proceed TABLE Picture Label Picture Description A Table Top B Leg Page 18 OF 27
Label Picture Description ① Bolt (M8x70mm) ② Washer (M8 mm) ③ Allen Key Before Beginning Assembly: Page 19 OF 27
Overview FRONT FACING This Table has multiple parts and may require up to 30 minutes to assemble. T give you an overview of the Table parts, the above picture is to help you put th various parts into perspective. Please read through the instructions below to familiarise yourself with the parts and steps before assembly. Step 1 Unpack and place all parts on a clean, non-marring surface.
2.1) With assistance from your adult partners, turn the Table Top (A) up side down as picture shown 2.2) Attach the Leg (B) to Table Top (A) by using Bolt (1) and Allen Key (3) Repeat the same process with the other Legs (B) DO NOT FULLY TIGHTHEN BOLTS. Step 3 With assistance from your adult partners, turn the Table back to normal flat ground EXERT pressure, floorwards, onto the Table. This pressure will help the Legs and Table Top reach alignment at all joints. Check for wobbles.
Questions & Answers about Proposition 65 • What is Proposition 65? Proposition 65 requires businesses to provide warnings to Californians about significant exposures to chemicals that cause cancer, birth defects or other reproductive harm.
You must read this before you proceed TABLE Picture QTY 1 4 Page 23 OF 27
QTY 9 9 1 bly: Page 24 OF 27
parts and may require up to 30 minutes to assemble. To he Table parts, the above picture is to help you put the ctive. Please read through the instructions below to he parts and steps before assembly. ts on a clean, non-marring surface.
m your adult partners, turn the Table Top (A) up side o Table Top (A) by using Bolt (1) and Allen Key (3) s with the other Legs (B) HEN BOLTS. ur adult partners, turn the Table back to normal flat ards, onto the Table. e Legs and Table Top reach alignment at all joints. gradually tighten all Bolts until evenly secured. ake sure all parts are adequately connected. se. sed on a flat, level surface.
osition 65 es to provide warnings to Californians about significant exposures to h defects or other reproductive harm. These chemicals can be in the se, in their homes or workplaces, or that are released into the environment. be provided, Proposition 65 enables Californians to make informed o these chemicals. ornia businesses from knowingly discharging significant amounts of listed g water.