Caution : You must read this before you proceed Single Chair Label Picture Description QTY A Seat 1 B Left Armrest 1 C Right Armrest 1 D Backrest 1 E Seat Cushion 1 F Back Cushion 1 Noble house Home Furnishings LLC Page 1 OF 5
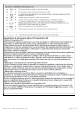
Label Picture Description QTY ① Bolt (M6*20MM) 5 ② Bolt (M6*25MM) 7 ③ Allen Key 1 Before Beginning Assembly: Overview Back Cushion(F) Backrest(D) Right Armrest(C) Seat Cushion(E) Left Armrest(B) FRONT FACING Seat(A) This Single Chair has multiple parts and may require up to 30 minutes to assemble. To give you an overview of the Single Chair parts, the above picture is to help you put the various parts into perspective.
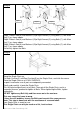
Step 1 ③ A Open the carton and place all the parts onto a clean, non-marring surface. Take out the silders in the four ends of the Seat(A ) using Allen Key( ③). Step 2 B B A A setp2.2 ② setp2.1 ③ ③ ① Place the Left Armrest (B) facedown. Step2.1:Attach Seat(A) to Left Armrest(B) using Bolts(②) with Allen Key(③) as shown above. Step2.2:Attach Seat(A) to Left Armrest(B) using Bolts(①)with Allen Key(③) as shown above. Do not fully tighten the Bolts.
Step4 D B B C C A setp4.1 setp4.2 B D D C A A setp4.3 ② ③ ② ③ ① ③ Step4.1:Attach Seat(A) and Backrest (D)to Right Armrest(C) using Bolts(②) with Allen Key(③) as shown above. Step4.2:Attach Seat(A) and Backrest (D)to Right Armrest(C) using Bolts(①) with Allen Key(③) as shown above. Step4.3:Attach Seat(A) and Backrest (D)to Right Armrest(C) using Bolts(②) with Allen Key(③) as shown above. Do not fully tighten the Bolts. Step5 F E Stand the Single Chair up.
Noble house Home Furnishings LLC Page 5 OF 5