LOUNGER Caution: This Lounger is NOT a TOY. Keep your child/children at bay during the assembly process.
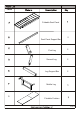
Label Foldable Seat Panel 2 Seat Panel Support Bar First Leg 2 Second Leg 2 Leg Support Bar 2 Middle Leg G Foldable Cushion 2 OF 10
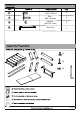
Hardware Bolt (M6 x 20mm) Bolt (M6 x 35mm) 9 9 Washer (M6/16x 1mm) 9 Allen Key 1 x9 x9 x9 3 OF 10
Assembly Steps OVERVIEW Foldable Seat Panel (A) Foldable Cushion (G) Seat Panel Support Bar(B) Middle Leg (F) Second Leg(D) Leg Support Bar(E) First Leg(C) This Lounger has multiple parts and may require up to 30 minutes to assemble. To give you an overview of the Lounger parts, the above picture is to help you put the various parts into perspective. Please read through the instructions below to familiarise yourself with the parts and steps before assembly.
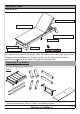
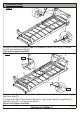
Assembly Steps Step 2 A A Unfold the Foldable Seat Panel(A) as indicated by the arrows. Caution: Be careful when opening the Foldable Seat Panel(A) to avoid fingers getting trapped or pinched. Step 3 A 3 1 C Attach the Frist Leg© to the Foldable Seat Panel(A) using Bolt(①) and Washer(③) with Allen Key(④) as shown in the picture. Do not fully tighten the Bolt.
Assembly Steps Step 4 4 2 E C Attach the Leg Support Bar(E) to First Leg(C) using Bolt(②) with Allen Key(④) as shown in the picture. Do not fully tighten the Bolt. Step 5 4 2 D 3 4 1 Repeat the same processes in Step 3 and Step 4 to attach Second Leg(D). Do not fully tighten the Bolts.
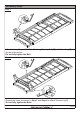
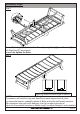
Assembly Steps Step 6 4 D E 2 C 3 4 1 Repeat the same processes in Step 3 and Step 4 to attach First Leg (C), Second Leg(D) and Leg Support Bar(E). Do not fully tighten the Bolts. Step 7 4 7.1 E B 2 B E A 4 2 7.2 7.1) Attach the Seat Panel Support Bars(B) to Foldable Seat Panel(A) using Bolts(②) with Allen Key(④). 7.2) Attach the Seat Panel Support Bars(B) to Leg Support Bars(E) using Bolts(②) with Allen Key(④) as shown in the picture. Do not fully tighten the Bolts.
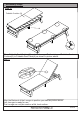
Assembly Steps Step 8 F 3 1 4 Attach Middle Leg(F) to Foldable Seat Panel(A) using Bolts(①) and Washers(③) with Allen Key(④) as pictured. Do not fully tighten the Bolts. Step 9 F Adjust height for balance Adjust low for balance Adjust Pre-installed Levellers height for balance EXERT pressure, floorwards, onto the Seat Panel. This pressure will help the Legs and Seat Panel reach alignment at all joints. In a sequential manner, gradually tighten all Bolts at all joints until evenly secured.
Assembly Steps Step 10 Foldable Cushion (G) Place Foldable Seat Cushion(G) on to the Lounge. Tie the strings of Foldable Seat Cushion(G) to Foldable Seat Panel(A) as shown in picture above. Step 11 Align the Backrest of the Lounger in position you want as picture above. Your Lounger is ready for use. This Lounge can only be used on a flat, level surface.
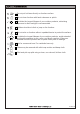
Do not put hot items directly on furniture surface. Do not clean furniture with harsh cleansers or polish. ü To obtain the longest lifespan of your outdoor products, minimizing exposure to direct sunlight is recommended. Children should not climb or jump on the furniture. Do not write on furniture without a padded barrier to protect the surface. ü To obtain the longest lifespan of your outdoor products, avoid extended and lengthy exposure to rain, snow , and direct sunshine.