WARNING!! Furniture Tipping Risk. Serious risk of severe or fatal crush injuries can occur from furniture tipping over if not secured. Children like to climb on furniture and Unsecured furniture can pose a serious danger. Please follow all instructions and install the tip-over restraints provided. In addition to installing the restraints, to help prevent tip-over: 1. Place heaviest items in the lowest drawers; 2.
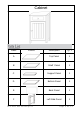
Cabinet Label Picture Description QTY A Top Panel 1 B Shelf Panel 1 C Support Panel 1 D Bottom Panel 1 E Back Panel 1 F Left Side Panel 1 Noble House Home Furnishings LLC Page 2 OF 14
G Door Panel 1 H Right Side Panel 1 I Drawer Left Side Panel 1 J Drawer Right Side Panel 1 K Drawer Front Panel 1 L Drawer Back Panel 1 M Drawer Base Panel 1 Description QTY ① Dowel (M6x30mm) 11 ② Cam Bolt 11 ③ Cam Nut 11 ④ Door Knob 2 Label Picture Noble House Home Furnishings LLC Page 3 OF 14
⑤ Screw (M4x16mm) 3 ⑥ Shelf Support 4 ⑦ Magnet 1 ⑧ Screw (M3x14mm) 3 ⑨ Magnet Strip 1 ⑩ Screw (M2.
⑲ Hammer (Not Provided) 1 ⑳ Power Drill (Not Provided) 1 ㉑ Restraint Strap 3 ㉒ Wall Anchor 3 Before Beginning Assembly: *4 *13 Noble House Home Furnishings LLC *5 Page 5 OF 14
Overview Top Panel(A) Drawer Front Pane(K) Left Side Panel(F) Right SidePanel(H) Door Panel(G) FRONT FACING This Cabinet has multiple parts and may require up to 30 minutes to assemble. To give you an overview of the Cabinet parts, the above picture is to help you put the various parts into perspective. Please read through the instructions below to familiarise yourself with the parts and steps before assembly. Step 1 Unpack and place all parts on a clean, non-marring surface.
Step 2 ⑭ ⑭ 2.1) Attach Door Knob(④) to the mounting positions on Drawer Front Panel(K) using Screw(⑤) with Screwdriver(⑭). Attach Drawer Left Side Panel(I) and Drawer Right Side Panel(J) to the Drawer Front Panel(K) using Screw(⑪) with Screwdriver(⑭) as shown. 2.
Step 4 ⑭ Insert Support Panel(C) into the Dowel and Cam Bolt on Left Side Panel(F), then insert Cam Nut(③) into Support Panel(C) using Screwdriver(⑭) as shown. Step 5 ⑭ ⑭ Attach Bottom Panel(D) to the Dowel and Cam Bolt on Left Side Panel(F), insert Cam Nut(③) into the Bottom Panel(D) using Screwdriver(⑭) as shown.
Step 6 Attach Door Panel(G) to the mounting positions on Support Panel(C) and Bottom Panel(D) with Door Pin(⑫) to connect them. Step 7 ⑭ ⑭ ⑭ Attach Right Side Panel(H) to the mounting positions on Support Panel(C) and Bottom Panel(D) using Cam Nut(③) with Screwdriver(⑭).
Step 8 ⑯ 8.1)Insert Dowel(①) into the mounting positions on Top Panel(A), then attach Cam Bolt(②) to the mounting positions on Top Panel(A) using Screwdriver(⑭) as shown. Attach Stoper(⑬) to the Top Panel(A) using Screw(⑯) with Screwdriver(⑭). 8.2)Attach Top Panel(A) to the mounting positions on Left Side Panel(F) and Right Side Panel(H) using Cam Nut(③) with Screwdriver(⑭). Attach Shelf Support(⑥) to the mounting positions on Left Side Panel(F) and Right Side Panel(H).
Step 10 ⑧ ⑧ ⑭ ⑯ G Attach Door Knob(④) to the Door Panel(G) using Screw(⑤) with Screwdriver(⑭). Attach Magnet Strip(⑨) the Door Panel(G) using Screw(⑯) with Screwdriver(⑭), then attach Magnet(⑦) the Left Side Panel(F) using Screw(⑧) with Screwdriver(⑭). Place Shelf Panel(B) onto the Shelf Support(⑥) on Left Side Panel(F) and Right Side Panel(H). Carefully insert the drawer into the Cabinet along the Runners and Runner Tracks.
Usage For Cabinet Restraint Device: Step 11 ㉑ ㉑ ⑭ Attach Restraint Strap(㉑) to the Back Panel(E) using Screw(⑰) with Screwdriver(⑭).
Step 12 ⑳ Drill two mounting positions on the wall with Power Drill(⑳),insert Wall Anchor(㉒)into drilled mounting position on the wall with Hammer(⑲). Move the cabinet back to the wall, lock by Screw(⑱) with Screwdriver(⑭).
Noble House Home Furnishings LLC Page 14 OF 14