™ S11E DLP Projector User Manual ACCO Europe www.accoeurope.
TA B L E O F C O N T E N T S Usage Notice • Precautions . . . . . . . . . . . . . . . . . . . . . . . . . . . . . . . . . . . . . . . . . . . . . . . . . . . . . . . . . . . . . . . . . . . . . . . . . . . . . . . . . 4 Introduction • Product Features . . . . . . . . . . . . . . . . . . . . . . . . . . . . . . . . . . . . . . . . . . . . . . . . . . . . . . . . . . . . . . . . . . . . . . . . . . . 5 • Package Overview . . . . . . . . . . . . . . . . . . . . . . . . . . . . . . . . . . . . . . . . . . . .
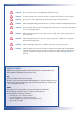
USAGE NOTICE ! ! ! ! ! ! ! ! ! WARNING Do not look into the lens. The bright light may hurt your eyes. WARNING To reduce the risk of fire or electric shock, do not expose the product to rain or moisture. WARNING Please do not open or disassemble the product as this may cause electric shock. WARNING When changing the lamp, please allow unit to cool down, and follow all changing instructions. WARNING This product will detect the life of the lamp itself.
INTRODUCTION PRODUCT FEATURES This product is an SVGA single chip 0.55"DLP™ projector. The outstanding features of it are listed as follows: ■ True SVGA, 800 x 600 addressable pixels ■ 1.8 kgs (4 lbs) compact design ■ Single chip DLP™ technology ■ Independent white-balance adjustment, for natural picture quality ■ Digital zoom features ■ PureProgressive™ processing technology for artifact-free film materials ■ Full HDTV compatibility (480i/P, 1080i, 720P) ■ NTSC/NTSC4.
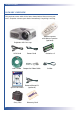
INTRODUCTION PACKAGE OVERVIEW This projector comes with all the items shown below. Please ensure your unit is complete. Contact your dealer immediately if anything is missing.
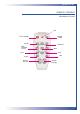
INTRODUCTION PRODUCT OVERVIEW MAIN UNIT Panel Control Power Connector Focus Ring Zoom Lens Elevator Button Elevator Foot 7
INTRODUCTION PANEL CONTROL Source Menu / On / Off / Enter Re-sync Four Directional Select Keys Lamp Warning LED Power / Standby Power Indicator Light Temperature Warning LED CONNECTION PORTS Connector for computer/component signal input Remote Control Receiver Composite Video Input Connector USB Mouse Output (optional) Computer Output S-Video Input Connector 8
INTRODUCTION REMOTE CONTROL WITH MOUSE FUNCTION LED Optimum Setting Power / Stand By Page Up MultiDirectional Selector Page Down Menu Source Freeze Hide Re-Sync Keystone Correction Zoom In / Zoom Out 9
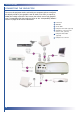
I N S TA L L AT I O N CONNECTING THE PROJECTOR To ensure the projector works well with your computer, please configure the display mode of your graphics card to make it less than, or equal to, SVGA (800 x 600) resolution. Also ensure the refresh rate of the graphics card is compatible with the projector. Refer to the “Compatibility Modes” section on page 28 for more information.
I N S TA L L AT I O N POWERING ON THE PROJECTOR Turn on the projector first and then the computer. If the screen displays “No Signal”, please ensure the signal cables are securely connected. 1 Remove the lens cap. 2 Ensure that the power cord and signal cables are securely connected. 3 Turn on the lamp by pressing “Power/Standby” button on the control panel. The startup screen will be displayed for 20 seconds and the Power/Standby indicator will light solid green.
I N S TA L L AT I O N POWERING OFF THE PROJECTOR 1 Press the “Power/Standby” button to turn off the projector lamp. The projector will display the message “Power off the lamp?” 2 Press the “Power/Standby” button again to confirm. Otherwise the message will disappear after 5 seconds. 3 “Power/Standby” indicator will turn green for approximatly 90 seconds. When the green light begins flashing, the projector has entered standby mode.
I N S TA L L AT I O N ADJUSTING THE PROJECTOR HEIGHT The projector is equipped with an elevator foot for adjusting the projector height. To raise the projector 1 Press the Elevator Button. 2 Raise the projector to the desired display angle, then release the button to lock the elevator foot into position. 3 Use the Height Adjuster Button to fine-tune height adjustment. To lower the projector 1 Press the Elevator Button.
I N S TA L L AT I O N ADJUSTING THE PROJECTOR FOCUS To adjust the focus, simply rotate the focus ring until the image is clear. The projector will focus at distances from 4.0 feet to 39.4 feet (1.2m to 12m) Focus Ring ADJUSTING THE PROJECTOR IMAGE SIZE 289.7” 237.5” 185.3” 133.8” 81.6” 29.4” (4) (11.1) (18.2) (25.2) (32.3) (39.4) Screen (Diagonal) 29.4” 81.6” Screen Size (WxH) 23.5 x 17.7” 65.3 x 48.9” 4.0’ 11.1’ Distance 14 133.8” 185.3” 237.5” 289.7” 107.1 x 80.3” 148.2 x 111.2” 190.
USER CONTROLS PANEL CONTROL & REMOTE CONTROL There are two ways for you to control the functions: Remote Control or Panel Control. Remote Control 7 1 8 2 9 3 10 4 11 5 12 6 13 Panel Control 6 5 3 1. Power / Standby 2. Page Up 3. Multi-Directional Selector 4. Source 5. Re-sync 6. Keystone Correction 4 7. LED 8. Optimum Setting 9. PageDown 10.Menu 7 11. Freeze 12.Hide 13.Zoom In / Zoom Out 8 2 1 1. Power Indicator Light 5. Four Directional Select Keys 2. Power / Standby 6.
USER CONTROLS Multi-Directional Selector ■ These keys are used to control the direction operation on the OSD display. Page Up (Computer Mode only) ■ Use this button to page up. This function is only available when the projector is connected to a computer via a USB cable. Page Down (Computer mode only) ■ Use this button to page down. This function is only available when the projector is connected to a computer via a USB cable. Menu ■ Press “Menu” to open the OSD menu and press key to select menu items.
USER CONTROLS ON-SCREEN DISPLAY MENUS How to Operate ■ The projector has multilingual OSD menus that allow you to make image adjustments and change a variety of settings. With a computer source, the OSD displayed is the “Computer OSD”. With a video source, the OSD display is the “Video OSD” The projector will automatically detect the source. ■ To open the OSD menu, press the “Menu” button on the remote control or panel control. ■ When the OSD is displayed, press key to select main items. E.g.
USER CONTROLS Computer Mode IMAGE-I (COMPUTER MODE) Brightness Adjusting the brightness of the image. ■ Press the key to darken the image. ■ Press the key to lighten the image. Contrast The contrast controls the degree of difference between the lightest and darkest parts of the picture. Adjusting the contrast changes the amount of black and white in the image. ■ Press the key to decrease the contrast. ■ Press the key to increase the contrast. Colour Temperature Adjust the colour temperature.
USER CONTROLS Video Mode IMAGE-I (VIDEO MODE) Brightness Adjusting the brightness of the image. ■ Press the key to darken the image. ■ Press the key to lighten the image. Contrast The contrast controls the degree of difference between the lightest and darkest parts of the picture. Adjusting the contrast changes the amount of black and white in the image. ■ Press the key to decrease the contrast. ■ Press the key to increase the contrast.
USER CONTROLS Computer Mode IMAGE-II (COMPUTER MODE) Frequency “Frequency” is for changing the display data frequency to match the frequency of your computer’s graphic card. When you experience a vertical flickering bar, use this function to make an adjustment. Tracking Choose “Tracking” item to synchronise the signal timing of the display with that of the graphic card. When you experience an unstable or flickering image, use this function to correct it.
USER CONTROLS Video Mode IMAGE-II (VIDEO MODE) Keystone Correction Adjust image distortion caused by tilting the projector (±16 degrees). Aspect Ratio You can use this function to fit your desired aspect ratio type. Zoom You can use this function to adjust the screen to the most appropriate size or to enlarge a particular area. You can also use the buttons to change the area you want to enlarge. Colour Temperature Adjusts the colour temperature. The range is from “0” to “4” The factory default is “2”.
USER CONTROLS Computer / Video Mode LANGUAGE You can display the multi-lingual OSD menu. ■ Use the language.
USER CONTROLS Computer / Video Mode MANAGEMENT Menu Location Choose the Menu location on the display screen. Projection ■ Front-Desktop : The factory default setting. ■ Rear-Desktop : When you select this function, the projector reverses the image so you can project behind a translucent screen. ■ Front-Ceiling : When you select this function, the projector turns the image upside down for ceiling-mounted projection.
APPENDICES TROUBLESHOOTING If you experience trouble with the projector, refer to the following. If the problem persists, please contact your local reseller or service center. PROBLEM No image appears on the screen ■ Ensure all the cables and power connections are correctly and securely connected as described in the Installation Section. ■ Ensure the pins of connectors are not crooked or broken. ■ Check if the projection lamp has been securely installed. Please refer to the Changing the Lamp Section.
APPENDICES PROBLEM The screen of the Notebook or PowerBook computer is not displaying your presentation ■ If you are using a Notebook PC: Some Notebook PCs may deactivate their own computers’ screen when a second display device is in use. Each of them has a different way to be re-activated. Refer to your computer’s documentation for detailed information. ■ If you are using an Apple PowerBook: In “Control Panels”, open the PowerBook Display to select “Video Mirroring ON”.
APPENDICES CHANGING THE LAMP The projector will detect the lamp life itself. It will show you a warning message “Lamp may fail soon! Replacement Suggested!”. When you see this message, change the lamp as soon as possible. Make sure the projector has cooled down for at least 30 minutes before changing the lamp. ■ Lamp Changing Procedure 1 Turn off the power to the projector by pressing the “Power / Standby” button. 2 Allow the projector to cool down for at least 30 minutes. 3 Disconnect the power cord.
APPENDICES SPECIFICATIONS Light Valve Lamp Number of Pixels Displayable Colour Projection Lens Projection Screen Size Projection Distance Video Compatibility H. Frequency V. Frequency Power Supply Power Consumption Noise level I/O Connectors Weight Dimensions (W x H x D) Environmental Safety Regulations Single Chip DLP™ Technology 150W User Replaceable Lamp 800 pixels(H) X 600 lines(V) 16.7M colours F/2.4 f=22.4mm with Electronic Reduction /Enlargement 29.4"~289.7" Diagonal 4.0~39.4 ft (1.
APPENDICES COMPATIBILITY MODES MODE RESOLUTION VGA V-Sync [Hz] H-Sync [KHz] 640x350 70 31.5 VGA 640x350 85 37.9 VGA 640x400 85 37.9 VGA 640x480 60 31.5 VGA 640x480 72 37.9 VGA 640x480 75 37.5 VGA 640x480 85 43.3 VGA 720x400 70 31.5 VGA 720x400 85 37.9 SVGA 800x600 56 35.2 SVGA 800x600 60 37.9 SVGA 800x600 72 48.1 SVGA 800x600 75 46.9 SVGA 800x600 85 53.7 XGA *1024x768 43.4 35.5 XGA *1024x768 60 48.4 XGA *1024x768 70 56.