User Guide
DANGER Risk of SERIOUS INJURY OR DEATH. ELECTRICAL SHOCK, EXPLOSION, FIRE, AND EYE INJURY HAZARDS. PROTECT YOURSELF AND OTHERS. Before use, READ AND UNDERSTAND Owner’s Manual and User Guide. Failure to read and understand this information could result in SERIOUS INJURY or DEATH. DO NOT REMOVE OR COVER THIS INFORMATION. Welcome! Thank you for buying a NOCO Genius® GEN Mini Series On-Board Battery Charger. SAVE THESE INSTRUCTIONS. This User Guide contains important safety and operating instructions. www.no.
DANGER ELECTRICAL SHOCK HAZARD CHARGER IS AN ELECTRICAL DEVICE THAT CAN SHOCK AND CAUSE SERIOUS INJURY. DO NOT CUT POWER CORDS. EXPLOSION HAZARD UNMONITORED, INCOMPATIBLE, OR DAMAGED BATTERIES CAN EXPLODE IF USED WITH CHARGER. DO NOT LEAVE CHARGER UNATTENDED WHILE IN USE. DO NOT ATTEMPT TO CHARGE DAMAGED OR FROZEN BATTERIES. USE CHARGER ONLY WITH BATTERIES OF RECOMMENDED VOLTAGE. OPERATE CHARGER ONLY IN WELL-VENTILATED AREAS. WARNING FIRE HAZARD CHARGER IS AN ELECTRICAL DEVICE THAT EMITS HEAT AND CAN BURN.
WARNING EYE INJURY HAZARD BATTERIES CAN EXPLODE AND CAUSE FLYING DEBRIS. BATTERY ACID CAN CAUSE EYE IRRITATION. WEAR EYE PROTECTION WHEN OPERATING CHARGER. AVOID CONTACT WITH EYES AND WASH HANDS AFTER USING CHARGER. IN CASE OF EYE CONTACT, FLUSH AFFECTED AREA WITH PLENTY OF WATER. WARNING RISK OF EXPLOSIVE GASES WORKING IN VICINITY OF A LEAD-ACID BATTERY IS DANGEROUS. BATTERIES GENERATE EXPLOSIVE GASES DURING NORMAL BATTERY OPERATION.
Do not disassemble charger; take it to a qualified service facility when service or repair is required. Incorrect reassembly may result in a risk of electric shock or fire. To reduce risk of electric shock, unplug charger from outlet before attempting any maintenance or cleaning. Turning off controls will not reduce this risk. EXTERNAL CONNECTIONS TO CHARGER SHALL COMPLY WITH THE UNITED STATED COAST GUARD ELECTRICAL REGULATIONS (33CFR183, SUB PART I) DO NOT USE EXTENSION CORDS unless absolutely necessary.
Use The Following Precautions When You Work Near Lead-Acid Batteries: • Someone should be within range of your voice or close enough to come to your aid if you have an accident. • Have plenty of fresh water and soap nearby in case battery acid contacts skin, clothing, or eyes. • Wear complete eye protection and protective clothing. Avoid touching your eyes while working near a battery. If battery acid contacts your skin or clothing, wash immediately with soap and water.
• If using an extension cord, always connect to the battery charger first, before connecting to an electrical outlet. When disconnecting, always disconnect from the electrical outlet first. Make sure the electrical outlet is a 120VAC GFCI (Ground Fault Circuit Interrupt) outlet. Locating Battery Charger. • Locate the battery charger as far away from the battery as possible. • Never place the battery charger directly above the battery; gases from battery will corrode and damage battery charger.
Connecting To The Battery. Before you connect to the battery(s), make sure that the AC power plug is not connected to an electrical outlet. DO NOT CONNECT THE BATTERY CHARGER AC POWER PLUG TO THE ELECTRICAL OUTLET UNTIL ALL OTHER CONNECTIONS ARE MADE. Make sure you have identified the correct polarity of the battery terminals on the battery(s). The POSITIVE battery terminal is typically marked by these letters or symbols (POS,P,+).
Understanding The LED. Each battery bank contains two (2) LEDs - a CHARGE LED and an ERROR LED. The CHARGE LED indicates the charging process (Red when charging, Green when charged) and the ERROR LED displays a Reverse Polarity or Error Condition. To understand the LED Light configuration better, see the chart below: LED Explanation When Charging RED When the battery is charging, the CHARGE LED will be illuminated RED.
Firewall. Multi-level safety barrier prevents unsafe and abnormal conditions. Optimization. Stabilizes internal battery chemistry for increased performance and longevity. Maintenance Plus.™ Keeps the battery fully charged without overcharging, indefinitely. Energy-Save. Minimizes energy consumption when full power is not needed. Interactive. Alters the charging process based on organic battery feedback. Safe.
Recovery. Applies a high-voltage pulse charge when low-voltage, sulfation or lost capacity is detected. Rugged. Dirt, water, UV, impact and crush resistant. Ignition Protected. Non-igniting and temperature controlled for safe and worry-free operation. Charging Times. The time required for the GEN Mini Series to charge a normally discharged battery is shown below. Deeply discharged batteries may take longer to charge depending on the depth of discharge (DOD).
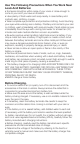
Charging Steps. Voltage (V) Step 1 2 3 4 5 6 7 8 D An al yz e ia gn os R e ec ov er y In i ti al iz e Bu Ab lk so rp O ti o pt n im iz at M io ai n nt en an ce Current (A) Step 1 & 2: Analyze & Diagnose Checks the battery’s initial condition, including voltage, stateof-charge and health, to determine if the battery is stable before charging. Step 3: Recovery Initializes the Recovery desulfation process (if needed) for deeply discharged or sulfated batteries by pulsing small amounts of current.
Battery Testing And Diagnostics. The battery charger will not begin delivering any current to the battery(s) until the battery charger detects a ‘stable’ battery. A ‘stable’ battery means the eyelet terminal connectors are connected to the battery with the correct polarity (POSITIVETO-POSITIVE, NEGATIVE-TO-NEGATIVE) and have a tight, clean connection to the battery being charged.
Troubleshooting. When Flashing Leds Illuminate. When the battery charger detects an ERROR condition, the CHARGE LED and ERROR LED will flash. If you are seeing this ERROR condition, it could be the result of one of the following situations: • Battery Voltage Incompatibility. Check to make sure you have a 12V battery. This battery charger is for 12V batteries only. If you attempting to charge a battery that is other than 12V, it could cause this ERROR condition.
When No Lights Come On When The Battery Charger Is Plugged Into An Electrical Outlet. • Weak AC Connection. Check if the AC outlet has power. If the AC outlet has no or limited power, it could cause this condition. Plug a light into the AC outlet to check if the outlet has power. If the light is extremely dim, this could be the result of limited AC power. The battery charger is designed for use at 70-130VAC.
DANGER Risques de BLESSURES GRAVES OU MORTELLES. RISQUES DE DÉCHARGE ÉLECTRIQUE, D’EXPLOSION, DE FEU ET DE BLESSURES AUX YEUX. PROTÉGEZ-VOUS ET PROTÉGEZ LES AUTRES Avant d’utiliser ce produit, LISEZ ET COMPRENEZ le Guide de démarrage rapide, le Manuel du propriétaire et le Guide de l’utilisateur. Omettre de lire et de comprendre ces informations pourrait entraîner des BLESSURES GRAVES OU MORTELLES. NE PAS ENLEVER OU COUVRIR CES INFORMATIONS.
DANGER LE CHARGEUR EST UN APPAREIL ÉLECTRIQUE QUI PEUT ÉLECTROCUTER ET PRODUIRE DES BLESSURES GRAVES. NE COUPEZ PAS LES CÂBLES D’ALIMENTATION RISQUE D’EXPLOSION DES BATTERIES ÉTANT SANS SURVEILLANCE, INCOMPATIBLE OU ENDOMMAGÉE, POURRONT EXPLOSER SI ELLES SONT UTILISÉES AVEC LE CHARGEUR. NE PAS LAISSER LE CHARGEUR SANS SURVEILLANCE PENDANT L’USAGE. NE TENTEZ PAS DE CHARGER DES BATTERIES ENDOMMAGÉES OU GELÉES. N’UTILISEZ LE CHARGEUR QU’AVEC DES BATTERIES DE TENSION RECOMMANDÉE.
AVERTISSEMENT RISQUE DE BLESSURES AUX YEUX LES BATTERIES PEUVENT EXPLOSER ET CAUSER DES DÉBRIS VOLANTS. L’ACIDE DE BATTERIE PEUT CAUSER UNE IRRITATION AUX YEUX. PORTEZ DES LUNETTES DE PROTECTION LORSQUE LE CHARGEUR FONCTIONNE. ÉVITEZ TOUT CONTACT AVEC LES YEUX ET LAVEZ LES MAINS APRÈS AVOIR UTILISÉ LE CHARGEUR. EN CAS DE CONTACT AVEC LES YEUX, RINCEZ LA ZONE AFFECTÉE À GRANDE EAU. AVERTISSEMENT RISQUE DE GAZ EXPLOSIFS TRAVAILLER DANS L’ENCEINTE D’UNE BATTERIE PLOMB-ACIDE EST DANGEREUX.
Ne pas démonter le chargeur; apportez-le dans un établissement de service qualifié lorsqu’une réparation est requise. Un remontage incorrect peut entraîner des risques de décharge électrique ou d’incendie. Pour réduire les risques de décharge électrique, débranchez le chargeur de la prise avant de tenter tout entretien ou nettoyage. La mise des commandes en position d’arrêt ne réduit pas le risque.
Utilisez Les Précautions Suivantes Lorsque Vous Travaillez Près De Batteries Plomb-Acide : • Lorsque vous travaillez à proximité d’une batterie plomb-acide, quelqu’un doit toujours être à la portée de votre voix ou suffisamment près pour vous venir en aide si vous avez un accident. • Ayez toujours de l’eau douce en abondance et du savon près de vous dans le cas où l’acide de la batterie venait en contact avec la peau, les vêtements ou les yeux.
à chaque cellule (si nécessaire) jusqu’à ce que la solution acide de la batterie atteigne le niveau spécifié par le fabricant de la batterie. Ne pas faire déborder. Pour une batterie sans bouchon de cellule, telle une batterie au plomb-acide régulée par soupape (VRLA), suivre soigneusement les instructions du fabricant pour le chargement de la batterie. • Avant de charger, lire attentivement les précautions spécifiques du fabricant de la batterie et les taux de charge recommandés.
Se Connecter À La Batterie. Avant de se connecter à la (aux) batterie (s), assurez-vous que la prise d’alimentation AC ne soit pas branchée à une prise électrique. NE PAS CONNECTER LA PRISE D’ALIMENTATION AC DU CHARGEUR DE BATTERIE À UNE PRISE ÉLECTRIQUE AVANT QUE TOUTES AUTRES CONNEXIONS NE SOIENT FAITES. Assurez d’avoir identifié la bonne polarité des bornes de batterie sur la (les) batterie (s). La borne POSITIVE de la batterie est généralement indiquée par ces lettres ou symboles (POS, P, +).
Comprendre Les Lumières Del. Chaque batterie contient deux (2) DELs — une DEL CHARGE et une DEL ERREUR. La DEL CHARGE indique le processus de charge (rouge lorsque se charge et vert lorsque chargé) et la DEL ERREUR affiche une inversion de polarité ou une condition d’erreur. Pour mieux comprendre la configuration de lumière DEL, voir le tableau ci-dessous : Lumières Del Explications Lorsqu’en chargement ROUGE Lorsque la batterie se charge, la DEL CHARGE sera allumée ROUGE.
Murs coupe-feu. Barrières de sécurité de plusieurs niveaux empêchant les conditions d’utilisation anormales et peu sûres. Optimisation. Stabilise la composition chimique interne de la batterie pour une performance et une longévité augmentée. Maintenance Plus.™ Maintient la batterie complètement chargée, sans surcharge, indéfiniment. Énergie. Adapte la consommation d’énergie au besoin réel. Interaction. Modifie le processus de chargement en se basant sur le retour organique de la batterie. Sûr.
Rétablissement. Donne une pulsation de chargement de haute tension lorsqu’une tension basse est détectée, un sulfatage ou une perte de capacité. Résistance. Saleté, eau, rayons UV, impact et résistant aux chocs. Protégé de l’ignition. Non inflammable et à température contrôlée pour un fonctionnement sûr et sans soucis. Durées De Chargement. La durée requise du GEN Mini Series à charger une batterie normalement déchargée est montrée ci-dessous.
Étapes De Chargement. Tension (V) 1 Étape 2 3 4 5 6 7 8 D An al ys ia gn e R os éc ti c up ér at io In n i ti al is ez M as Ab se so rp O ti o pt n im iz at M io ai n nt en an ce Courant (A) Étape 1 & 2 : Analyse & Diagnostic Vérifiez la condition générale de la batterie, incluant la tension, l’état de charge et de santé, pour déterminer si la batterie est stable avant le chargement.
Tests De Batterie Et Diagnostiques. Le chargeur de batterie ne commencera pas à livrer de courant à la batterie tant que celle-ci n’est pas détectée comme étant « stable » par le chargeur de batterie. Une batterie « stable » veut dire que les connecteurs de borne d’œillet sont connectés à la batterie avec la bonne polarité (POSITIF-À-POSITIF, NÉGATIF-ÀNÉGATIF) et qu’ils ont une connexion propre et serrée à la batterie qui se fait charger.
Résolution Des Problèmes. Lorsque Les Dels Clignotantes S’allument. Lorsque le chargeur de batterie détecte une condition d’ERREUR, la DEL CHARGE et la DEL ERREUR s’allumeront. Si vous voyez cette condition d’ERREUR, ceci pourrait être attribuable à une des situations suivantes : • Incompatibilité De Tension De Batterie Assurez-vous d’avoir une batterie 12V. Ce chargeur de batterie n’est que pour les batteries 12V.
Aucune Lumière Ne S’allume Lorsque Le Chargeur De Batterie Est Branché À Une Prise Électrique. • Mauvaise Connexion Ac Vérifiez si la prise AC est alimentée. Si la prise AC n’a pas ou a peu d’alimentation, elle pourra causer cette condition. Branchez une lumière dans la prise AC pour vérifier si celle-ci est alimentée. Si la lumière est très faible, il s’agit probablement d’une alimentation AC qui est limitée. Le chargeur de batterie est conçu pour un usage à 70-130 Vac.
PELIGRO Riesgo a un daño serio o muerte CHOQUE ELECTRICO, EXPLOSIÓN, INCENDIO, Y DAÑO A LOS OJOS PROTECCIÓN A USTED Y A OTROS Antes de usuar, LEA Y COMPRENDA el Manual del Propetario y la guía Quick Start y Guía para Usuario. Al no leer o entender esta información las consequencias pueden resultar en DAÑOS SERIOS o MUERTE. NO RETIRE O CUBRA ESTA INFORMACIóN. Bienvenido! Gracias por comprar NOCO Genius® GEN Mini Series On-Board Battery Charger. FAVOR DE GUARDAR LAS INSTRUCCIONES.
PELIGRO RIESGO A CHOQUE ELECTRICO EL CARGOS ES UN APARATO ELECTRONICO QUE PUEDE ELECTROCUTAR O CAUSAR MUCHO DAÑO. PROHIBIDO CORTAR CABLES RIESGO A EXPLOSIONES SIN SUPERVISION, INCOMPATIBLE, O BATERIAS DANADAS PUEDEN EXPLOTAR SI SON USADAS CON EL CARGADOR. NO DEJAR EL CARGADOR DESATENDIDO DURANTE SU USO. NO INTENTAR CARGAR BATERIAS DAñADAS O CONGELADAS. FAVOR DE USAR EL CARGADOR SOLAMENTE CON BATERIAS CON EL VOLTAJE RECOMENDADO. FAVOR DE USAR EL CARGADOR SOLAMENTE EN AREAS VENTILADAS.
ADVERTENCIA RIESGO A DAÑO A LOS OJOS LAS BATERIAS PUEDEN EXPLOTAR Y PUEDE HABER DESECHOS VOLANDO. EL ACIDO EN LAS BATERAS PUEDEN CAUSAR IRRITACION A LOS OJOS. USAR PROTECCION PARA LOS OJOS AL OPERAR EL CARGADOR EVITAR EL CONTACTO CON LOS OJOS Y LAVAR LAS MANOS DESPUES DE USAR EL CARGADOR. EN CASO DE CONTACTO VISUAL, LAVE EL AREA AFECTADA CON BASTANTE AGUA. ADVERTENCIA RIESGO DE GASES EXPLOSIVOS TRABAJAR CERCA DE BATERIAS CON ACIDO-PLOMO ES PELIGROSO.
Favor de no desarmar e cargador; llevarlo a un lugar con un servicio caificado cuando el servicio o el reparo sea requerido. Recomponerlo inadecuadamente puede resultar en riesgo a un incendio o choque electrico. Para reducir el riesgo a un choque electrico, desconecte el cargador de la descarga antes de intentar darle mantenimiento o limpieza. El riesgo no sera reducido al apagar los controles.
Favor De Usar Las Siguientes Precauciones Cuando Trabaje Cerca De Bateria Con Acido-Plomo: • Alguien debe de estar al alcanze de su voz o suficientemente cercano para poder venir a usted si es que tiene un accidente. • Tener bastante agua fresca con jabon cerca en caso de que el acido de la bateria haga contacto con su piel, ropa u ojos. • Usar proteccion para los ojos y ropa protectora. Evite tocar sus ojos mientras trabaja con las baterias.
vehiculo del comprador y asegurese que el cargador sea compatible con el voltaje. • Si usa una extension, siempre conecte la extension al cargador antes de conectarla al enchufe. Al desconectar, siempre desconecte desconecte de la carga antes. Asegurese que la carga sea de 120VAC GFCI (Ground Fault Circuit Interrupt). Localizacion Del Cargador. • Localize el cargador lo mas lejano possible a la bateria. • Nunca coloque el cargador directamente arriba de la bateria; gases de la bateria danaran el cargador.
Conectandolo A La Bateria. Antes de conectar la(s) bateria(s), asegurese que el conector no esta conectado a un enchufe electrico. NO CONECTE EL CARGADOR A LA CARGA ELECTRICA HASTA QUE TERMINE DE HACER TODAS LAS CONECCIONES. Asegurese que haya identificado la polaridad correcta de las terminales de la(s) bateria(s). El lado POSITIVO de la bateria esta marcado por las letras o simbolos (POS,P, +) normalmente. El lado NEGATIVO de la bateria esta marcado por las letras o simbolos (NEG, N, -).
Conocimiento De La Iluminacion LED. Cada bateria contiene dos (2) LEDs- un CARGADOR LED y un ERROR LED. El CARGADOR LED indica el proceso de carga( Rojo cuando carga, Verde cuando termine de cargar) y el ERROR LED indica la Polaridad Inversa o la Condicion del Error.
Protección. Cuenta con una barrera de seguridad de varios niveles que impide que se produzcan condiciones anormales y peligrosas. Optimización. Estabiliza la composición química interna de la batería para incrementar su rendimiento y duración. Mantenimiento extra. Mantiene la batería completamente cargada sin sobrecargarla y permite que el cargador quede conectado indefinidamente con toda seguridad Ahorro de energía.
Recuperación. Aplica una carga de alto voltaje cuando detecta bajo voltaje, sulfatación o pérdida de capacidad. Resistente. Es resistente a la suciedad, el agua, los rayos ultravioleta y los golpes Protección a la ignición. Contola temperaturas y ignicion para tener una operacion libre de preocupaciones y segura. Tiempo De Carga. El tiempo necesario para que el cargador GEN Mini Series cargue una bateria descargada esta indicado abajo.
Pasos Para Cargar. Voltaje (V) 1 Pasos 2 3 4 5 6 7 8 D An al is ia is gn os R ec ti c up o er ac ió In n ic ia ci ón Vo lu m en Ab so r ci O ón pt im M ac an ió te n ni m ie nt o Corriente (A) Pasos 1 & 2: Analisis y Diagnostico Revisa la condicion inicial de la bateria, incluyendo el voltaje, estado de carga y condicion, para determinar si la bateria esta estable para cargar.
Prueba De Bateria Y Diagnostico. El cargador no comenzara a entregar corriente a la(s) bateria(s) hasta que el cargador detecte una bateria ‘estable.’ Una bateria ‘estable’ significa que la terminal del conector esta conectado a la bateria con la polaridad correcta (POSITIVO CON POSITIVO, NEGATIVO CON NEGATIVO) y tiene una coneccion firme y limpia. Si la bateria no esta estable por al menos tres (3) segundos, el cargador no comenzara a cargar la bateria y el cargador entrara en una condicion ERRONEA.
Solucion al Problema. Cuando Os Focos LED Parpadean. Cuando el cargador detecte un ERROR en su condicion, el LED rojo y el LED anaranjado van a parpadear. Si usted esta viendo una condicion de un error. Puede ser el resultado de una de las siguientes situaciones: • Voltaje De Bateria Incompatible. Revise que tenga una bateria 12V. Este cargador es para bateria 12V solamente. Si intenta cargar una bateria que no sea 12V, puede causar un ERROR. Cargue la bateria adecuado para resolver el ERROR.
Cuando No Haya Luces Prendidas Y El Cargador Esta Conectado A Una Carga Electrica. • Mala Conección AC. Revise si la carga AC tiene poder. Si la carga AC no tiene o tiene poco poder, puede ser la causa de esta condicion. Conecte una lampara a la carga para revisar si el interruptor tiene poder. Si la lampara esta extremadamente baja, esto puede ser el resultado de poder limitado. El cargador esta disenado para usarse de 70-120VAC.
1.800.456.6626 support@no.co 30339 Diamond Parkway, #102 Glenwillow, OH 44139 United States of America no.