+ Eni no Isl You've joined mi lions of people to enjoy the convenience of robotic GGT ell oo me plea assistance.
NOISE Ege Tyler lel pail lane Operate = Mike sure the power switch is tuned on before using the robot. Check the areas that need to be coned and remove obstacles on the floor « Robot will repeat cleaning the same areas o few times to ensure they are thoroughly craned There may be slam! particles such as deg food and cat litter scattering an the floor while the spinning brushes or working. The vacuuming function will clear up the debris.
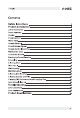
» English filer Contents Safety Instructions Product Composition . List of Accessories Robot Anatomy Dustbin... Charging Dock. Wryer Tank Remote Control CLEAN Button Sigma's Remote Control Operating Notice for Use How to Get Started Starting Up/Pause/Sieeping Scheduling . Cleaning Mod: Electroweak | Wet Mopping Maintenance .. Cleaning Side Brushes Cleaning Dustbin and Filter Cleaning Cliff Sensors and Auto Charging Pins Moe Wheel Clean Up Trouble Shooting Error Code Sheet.
Nos Ins Safety Instructions Before using the robot, please read and follow the safely Instructions and precautions below. = Read this user manual thoroughly and carefully before using this product = Keep this user manual = Any operation or use of this product in any way other than tho described in this manual may lead to serious Injury or product doge. WARNING 1. Only certified technicians may disassemble the product. Users are not allowed to disassemble or repair the product 2.
+ Eni Nos Safety Instructions 15. To avoid any tripping hazards or Injuries peas inform oll the opiate in the house when this product is in use. 18. Do not use this product when dustbin is full. 17. Normal operating temperatures [centigrade]. 18. Do net operate this product in high temperature environments. 19. The battery must be removed from the product before it is cropped. 20. Unplug the vacuum from power source when removing the battery. 21. The battery is 10 be disposed of safely. 22.
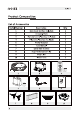
No Isl Erin Product Composition List of Accessories Serial Number Description O'Toole 1 Main Body {battery included) 1 2 Charging Dock 1 3 Remote Contra {buttery included) 1 4 Electroweak {pottery included) 1 5 Power Adapter 1 8 User Manual 1 7 Extra Side Brushes 2 8 High Performance Filter 2 2 kop Cloth 1 10 Water Toni 1
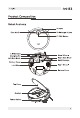
« noise Product Composition Robot Anatomy Bumper Spot Mode Self-chore Button CLEAN Button Cliff Sensors Charging Pin Nose Whee Left Side Brush Fight Side Brush Buck Possum Buttery Cover Left Wheel Right Whee Bottom Cover Top Cover Dustbin Power Switch
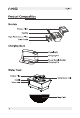
foist? Rhenish Product Composition Dustbin Primary Filler Dustbin High Performance Filter Filter Frame Charging Dock — Signal Light If H Charging Pin Power Supply Socket (Se Charging Pin Water Tank Huber Plug ‘Perter input hole Handle Weep hole Mop Cloth
Product Composition Nola Remote Control Display Screen 0 Direction Direction (wn) Start Pause wr Clock SE Che Schedule Spot Mode GF ER MAX Mode HOME {Auto Charge) (Ee Edge Mode LIFE CLEAN Button Signals theists eal [elf 1 gal Charging Middle it in orange flash steadily Fn nit Al lats off n selected mode “Three its flash in green When mat in srr Ja Flash sh i Low battery Middle it in orange tums solid Ha Tis n clearing mode Middle it in green tums solid Ero made fiddle ght in green purrs sal in spot mods Spo
foist? Rhenish Product Composition Remote Control Operating 1. Starting spouse + Press this button to story cleaning in selected mode. = Press this button to make the robot stop when i's cleaning. = Press this button to exchange from sleeping mode to selected mode. 2. Directional Buttons A" a" button: = Press this button to increase number in scheduling or clock mode; + Press this button to make robot move forward in selected mode and the robot will stop when i hits any objects. B.
Swi Nola Product Composition 5" " Horne Press this button to return robot to charging dock 6." CE)" Edge Press this button to make robot econ along wall in selected mode. 7." (#2" Spot Press this button to mike robot start spot cleaning. 8." GE" MAX Crass this button to switch suction power, 9.® 00:00 shows the scheduling time. 10. © f:00 Shows the dock ime.
Nola Enos Notice for Use How to Get Started 1. Place charging dote, plug in adapter, signal light on charging dock will turn solid. 2. Turn on the power switch around power socket, then display panel will flash.
Swi Nola Notice for Use 3. Charge the robot In either way os shown below: A. Plug into on outlet. B. Press to mike robot return to charging dock for charging itself. For better extending battery life: A. Before first use, charge the robot overnight. When charging is finished, display panel will turn off. B. In Norma’ use, always store the robot on charging deck with base plugged in. if the robot Is not used for long time, tum the power switch off, fully charge the robot and store tin o cool, dry place 4.
foist? Rhenish Notice for Use Starting Up/Pause/Sleeping Sleeping mode: robot is not working, light at ¢ button is off and power switch is on. Selected mode: robot Is not working green light at button flashes. Cleaning mode: robot is working, green light at #3 button tums solid. 1. Starting up A. Mike sure the power switch is turned on. BE. Press #0 button on robot of remote control to start cleaning. 2. Pause Press (8) button on robot or cremate control to change robot from Clean mode to selected mode. 3.
Sin Nola Notice for Use Scheduling You can preset a cleaning routine for your robot. Setting the dock time 1. Point the remote control at robot (make sure the power switch is on}. 2. Press (2 button and adjust te your local time with direction buttons. 3. Press CB button again to dove the setting. Setting a schedule The robot wil always work at the scheduled time unless power switch of the robot is turned off. 1. Point the remote control ot robot. 2. Press CED button and adjust time with direction buttons.
foist? Rhenish Notice for Use Cleaning Mode 1. Auto cleaning n Auto Cleaning mode, robot automatically cleans the areas ft can reach 2. Spot cleaning Robot takes a spiral pith to clean a specific area with concentrated dust and debris.
Notice for Use Nola 3. Edge cleaning In selected mode, press (20) button and robot moves forward until it detects o wall. [t citrons along the edges of walls for 10 minute 4. MAX Mode High suction power for areas with concentrated dust. Press GED button on remote control to increase suction level Press GE) again to return to normal level.
foist? Rhenish Notice for Use Electroweak Electroweak creates an invisible barrier that 55 Fro will not cross, This invisible barrier con be used to confine 55 Pro to o particular room or area, Power Switch 3 md Eire / Signal Light Signal Transmitter J = Battery Lid «Install buttery first, then turn ton. = Put the Electroweak’ on the outside of the doorway you wish to block. = Ensure the sigma! loge is facing forward ond toward the opening you would like to block. = Turn off the Electroweak after each use.
* tron Nola Notice for Use Wet Mopping Figure 3 Figure 4 1. Dustbin is for dry clean and water tank is for wet clean. 2. The map bracket with mop should be on the robot when the water tank is used. (Figure 1) 3. Pouring the clean water into the water tank. {Figure 2} 4. Open the robot lid and put the water tank into the body, the weep hole of the water tank shooed be aligned with the weep ho'e on the robot body.
no Isl Eng s Maintenance Cleaning Side Brushes Clean the side brushes when i gets dirty and replace if t's are dogged. Cleaning Dustbin and Filter Clean and empty dustbin after sate use, steps ore as shown in below figures, © After taking dustbin, check whether thees is foreign matter stuck in suck passage and clean it « Clean Liter after 15-30 days'use. And replace It after use for 6 months ot CosmosDB. « Install both Filter and primary filters when they ore dry.
* tron Nola Maintenance Cleaning Cliff Sensors and Auto Charging Pins Slightly clean the sensor window ond onto charging pins with o soft dry cloth. Charging pin Cliff sensors Charging pin Charging pin Nose Whee! Clean Up When there is foreign matter in nose wheel, it will affect the cleaning performance, please clean it follow the way below: 1. Pui the whee! up vertically and dean & Please note whether the gasket is off. 2.
Nola Angle + Trouble Shooting Error Code Sheet When the robot meets with some routine troubles, i will remind you by beep. ® Short tone Clean cliff sensor and shake bumper slightly, check whether there is foreign matter Cliff sensor or bumper gz ee sensor failure Error Appearance Keep moving Cliff sensor is dirty Check cliff sensor lens. backward or broken Clean or replace i if needed.
* tron Nola Trouble Shooting Auto button Horror small debris Cleo charging pins light is off stuck in charging pins. Check if robot is connected to while charging | Robot is not properly charging pins connected to charging pins.
no Isl Eng s Product Specifications Mechanical Specifications Electrical Specifications Dustbin precocity Cleaning Specifications Cleaning mode Auto, Spot, Edge, Dally Schedule Cleaning time » Gamins Remark The storage temperature of this product is between 10°C and 40°C.