
User Manual


8 Installing and using the Expedience OSU
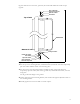
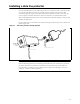
Setting the OSU inside the mounting bracket
Note: The OSU must be installed vertically.
The OSU has a peg on top, and a peg on bottom. The upper and lower pegs snap into the
mounting bracket’s peg holes.
To install the OSU in the mounting bracket:
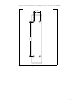
1 You must install the OSU vertically. To do so, make sure the bottom of the OSU faces the
earth. This is the side of the OSU labelled with a sticker “MOUNT THIS SIDE DOWN”.
The sticker is illustrated in Figure 7.
2 On the bottom arm of the mounting bracket, snap the OSU’s peg into the peg hole.
3 On the top arm of the mounting bracket, snap the OSU’s upper peg into the adjustment
arch.
To accommodate the height of the peg, you may need to lift the mounting bracket’s edge
up slightly.
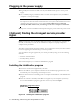
Partially tightening adjustment screws to hold OSU in place
To make sure the OSU doesn’t slip out of the mounting bracket, partially tighten the screws
in the adjustment arch.
If you still need to pivot the OSU along the adjustment arch—in order to find the strongest
signal from the service provider—do not fully tighten the screws yet.
You will fully tighten the screws after finding the strongest signal from the service provider.
When the screws are fully tightened, the OSU will no longer move along the adjustment arch.
Note: Before mounting the OSU in the bracket, apply an anti-seize compound to the screws
used in the assembly.
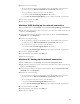
Figure 6 Adjustment arch and peg hole in mounting bracket
Figure 7 MOUNT THIS SIDE DOWN Sticker
Adjustment arch
Peg hole
MOUNT THIS
SIDE DOWN