
User Manual


12 Installing and using the Expedience OSU
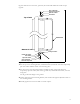
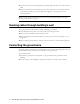
Plugging in the power supply
1 Plug the RJ-45 cord from the OSU into the jack labelled “OSU/power” on the power
supply.
2 Use a standard, category 5 Ethernet cable to connect the computer to the jack labelled
“computer” on the power supply.
Caution: Make sure that the RJ-45 cable from the OSU and category 5 Ethernet cable to
the computer or network hub are connected to the correct jacks as described in the section
“Installing a data line protector‚” in this manual. If the cables are not connected
correctly the OSU will not work, and damage to the user’s computer could result.
3 The power cord uses standard household power. Plug the power cord in the power source.
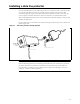
(Optional) Finding the strongest service provider
signal
Note: The following sections describe additional methods of optimizing the orientation of
the OSU, if necessary. You can use the subscriber’s computer or a laptop computer to
complete these procedures.
The OSU is equipped with an internal antenna. To provide the best service, the OSU searches
for the strongest signal transmitted by your service provider.
You can find the strongest signal from your service provider by using one of the following
methods:
• Software-assisted method
• Sound (auditory) method
Both methods require you to install the LinkMonitor program
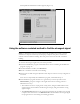
Installing the LinkMonitor program
1 Locate the software CD supplied with your OSU.
2 Insert the CD into your computer’s CD drive. If the installation program does not start
automatically, start it by clicking on the Setup.exe icon.
3 Follow the instructions in the dialog boxes to complete the installation of the LinkMonitor
program.
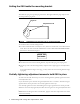
4 After the software is installed, a blue RSU icon appears in your computer’s system tray.
To run the LinkMonitor program, right click on the icon, and select Open.
Figure 10 Starting the LinkMonitor program
LinkMonitor program’s icon in
system tray