User Guide
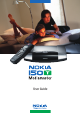
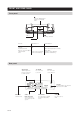
Quick Guide Preparing the Remote Control Connecting a TV and a video recorder RF video SCART 2 1 3 Switching on for the first time • Plug in your Mediamaster. • The “First time installation”menu is shown. • Press the select button on the remote control to start the installation procedure. Language • Select the desired menu language with cursor up /down. (Cursor = see page 9.) This will also be the default language for audio and subtitling.
Quick Guide Time adjustment Select cursor up/down to adjust the time in half-hour increments. To adjust the minutes, select cursor left/right . • Press select to finish the installation and to open the Navi Bars.
Contents Quick Guide 3 Switching on for the first time Language Channel search in progress Time adjustment 3 3 3 4 End user license Security information Remote control Front and rear panel Connecting the Mediamaster 6-7 8 9 10 11 About the SCART sockets Preparing the remote control About the digital transmission Connecting to the TV aerial General Connecting the Mediamaster to the TV Connection of a video recorder Connecting a satellite receiver and a video Connecting a HiFi system Procedure when RF c
NOKIA MEDIAMASTER SOFTW ARE END-USER LICENSE IMPORTANT: READ CAREFULLY BEFORE OR USING THE SOFTW ARE NOKIA CORPORATION, NOKIA HOME COMMUNICATIONS END-USER SOFTW ARE AGREEMENT This Software Agreement (“Agreement”) is between You (either an individual or an entity), the End User, and Nokia Corporation, Nokia Home Communications (“Nokia”). The Agreement authorizes You to use the Software specified in Clause 1 below and which is included in this Nokia digital TV receiver.
NOKIA MEDIAMASTER SOFTW ARE END-USER LICENSE Nothing contained in this Agreement shall prejudice the statutory rights of any party dealing as a consumer. Nokia is acting on behalf of its employees and licensors or affiliates for the purpose of disclaiming, excluding, and/or restricting obligations, and liability as provided in this clause 7, but in no other respects and for no other purpose. 8. EXPORT CONTROL.
GENERAL INFORMATION ABOUT THE MEDIAMASTER Throughout this manual, you will notice that the everyday operation of your Mediamaster is based on a series of user-friendly, on-screen displays and menus. These menus will help you make the most of your Mediamaster by guiding you through installation, channel selection, viewing and many other functions. All functions can be performed by using the buttons on the remote control, and some of the functions can also be performed by using the buttons on the front panel.
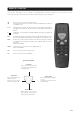
REMOTE CONTROL This section describes how to operate the Mediamaster using the buttons on the remote control. Some of the functions can also be performed by using the buttons on the front panel. Press once to turn the sound off/on (mute). Press and hold for a few seconds to switch the Mediamaster in and out of standby mode. 0-9 Change channels and enter values in menus. Note: If 0 is entered as the first digit in viewing mode, the TV Release functionality is activated (see below). 0 TV Release.
FRONT AND REAR PANEL Front panel to put the Mediamaster in and out of standby mode LED 1 to change channels LED 2 Function LED indicator 1 LED indicator 2 ON Standby Locked to channel Remote control feedback SW download Error Green Red Continous green flashing Continous red flashing Green (locked) / Red (not locked) Single flash Continous green flashing Continous red flashing digital audio S/PDIF digital output for connection to a HiFi system TV SCART for connection to the TV Rear panel antenna
CONNECTING THE MEDIAMASTER The box for your Mediamaster should contain the following items: • the Mediamaster • remote control with 2 AAA batteries • SCART cable (fully connected; 1.0 metre) • mains cable SCART cable RF cable Mains cable • RF cable • Owner’s manual with software license agreement Remote control Owner’s Manual About the SCART sockets The rear panel of the Mediamaster is equipped with 2 SCART sockets (see diagram).
CONNECTING THE MEDIAMASTER Note the following: • In some block of flats, the roof-mounted aerial system includes a filter and channel selector. If so, the aerial will probably not work with the Mediamaster, in which case you should contact your landlord. • Many older roof-mounted aerials may only receive a limited number of channels. As a result, digital channels transmitted on higher frequencies are difficult or even impossible to receive. The problem can be solved by replacing the roof aerial.
CONNECTING THE MEDIAMASTER Connection of a video recorder • Connect a SCART cable from the main SCART socket on the TV to the TV SCART socket on the Mediamaster. RF • Connect an RF cable from the TV/VCR output on the Mediamaster to the RF input socket on the video. video • Connect the TV aerial to the TV AERIAL input socket on the Mediamaster. • Connect an RF cable from the TV/VCR output on the video to the RF input socket on the TV.
CONNECTING THE MEDIAMASTER Procedure when RF connections are used This procedure is only necessary when your Mediamaster is connected to the TV with an RF lead and no SCART leads have been used. To tune your TV to the RF signal, it is possible that you will need both this manual and the manual for your TV. The steps below explain what to do if you have been unable to use SCART leads in your connection. • Plug in your Mediamaster to the mains.
FIRST TIME INSTALLATION General information Once your Mediamaster has been correctly connected, a “First time installation” must be performed. During this procedure, helpful information is displayed at the bottom of the menus. NOTE: The select button always confirms a selection in these menus; therefore, pressing it will take you to the next step in the installation process. However, more than one value often has to be entered in a menu.
FIRST TIME INSTALLATION Channel search in progress This menu will be shown while the Mediamaster is searching for TV and radio channels. All channels found will be listed on the screen. Note that the search procedure may take a few minutes. You may cancel the search at any time by pressing select. When Mediamaster is done searching, the number of TV and radio channels found will be displayed. • Press select to continue.
NAVI BARS General information Bookmark name Bookmark • Press select to open the Navi Bars . Use the Navi Bars , which consist of a horizontal bar and a vertical bar, to select TV or radio channels and/or change system settings. The horizontal row contains folders named TV, Settings , etc. Their names are shown in black at the bottom of each folder. Each folder contains bookmarks . The TV folder contains bookmarks for different TV channels; the Control folder contains bookmarks for system settings, etc.
NAVI BARS The “Control” and “Settings” folders Both of these system folders contains a few bookmarks. Each of these bookmarks contains menus from which you can choose different settings. The system folders cannot be deleted. The manual will now explain the different settings you can make from the Control and Settings folders, starting with the bookmarks from the Contr ol folder.
NAVI BARS Control folder ☛ Edit channels From these menus, you can create and edit favourite channel lists. You can add, delete, rename and arrange the order of the channels within the favourite lists. The “TV” list might contain a lot of channels. By creating your own favourite lists, you can make it more convenient to manage channels. Impor tant about editing channels Before you start, you must select which list, TV or radio, you want to edit.
NAVI BARS • Enter the name as follows : Press the number corresponding to the character you want: once for the first character, twice for the second, etc. The available characters are listed below: 1 2 3 4 5 *#&%$,!;-+)/\@^1 abc2ÅÄÁÁÂCÃ def3ÉÉËÊ ghi4ÎÏÍÌ jkl5 6 7 8 9 0 mno6ÖÔÑÓÒ pqrs7$ tuv8ÜÙÚ wxyz9 space 0 • If the next letter is located on the same key as the present one, wait for the letter to time out or press cursor right to move one position and then select the letter.
NAVI BARS Add/Delete channels From this menu, you can add and remove the channels in your favourite lists. The “TV” or “Radio” lists are used as a basis for where the channels are selected from. A channel is added or removed from the list by pressing info. The square on the righthand side of the line will be empty for removed channels, and will contain an “x” for added channels. In addition to the channel name, three different symbols can be shown. ( “ ” = a new channel you have not previously visited.
NAVI BARS Contr ol folder ☛ Timer General You can make the Mediamaster start and stop at a predefined time. The timer function is very useful when you want to record a programme and you cannot start/stop the recording event yourself, or when you just want to be reminded of the start of a programme you do not want to miss. Note: The timer function only works when the receiver is in standby . Timer setup • Select Channel List with cursor left/right . • Go to Channel to select the desired TV/Radio channel.
NAVI BARS Settings folder ☛ Channel This menu is used when you want to search for channels at a later time. To open it, you will be asked to enter your access code. The access code is set to 1234 at the factory. A channel search procedure can be performed in three different ways: Automatic, Manual or Advanced manual search. Automatic search • Highlight the line and press select to start searching for channels.
NAVI BARS Settings folder ☛ TV To open this menu, you will be asked to enter your access code. The access code is set to 1234 at the factory. From this menu, you can adjust the audio/video settings for your Mediamaster. TV screen format Select your TV screen format. The 4:3 format is the standard format for most TV screens. Select 16:9 for a widescreen TV. Position of the RGB output Adjust the horizontal position of the TV picture with cursor left /right .
NAVI BARS Settings folder ☛ Access To open this menu, you will be asked to enter your access code. The access code is set to 1234 at the factory. The following settings can be altered from this menu. Access Control Select “Yes” or “No” to turn the access control in all menus on or off. NOTE: Even when “No” is selected, the access code still has to be entered before you can watch locked channels.
NAVI BARS Settings folder ☛ SW update To open this menu, you must enter the access code. The access code has been set to 1234 at the factory. In order to keep the Mediamaster up-to-date, it will be possible to download new versions of the system software (SW). New software may include new and improved features for existing menus. Enter this menu to check for new software. If new software is available, information will be shown in the menu on how to proceed.
VIEWING MODE General Information The following describes the basic functions of your Mediamaster while watching digital terrestrial TV . In addition to the normal functions like switching the Mediamaster in/out of standby, changing the volume, etc., there are some other useful functions that will be explained in this part of the manual. Press Back to leave a menu at any time, without affecting any settings.
VIEWING MODE Extended programme information The Mediamaster can display information about programmes currently being broadcasted as well as those that will be broadcasted next. This procedure is the same for both TV and radio mode. By pressing info while watching TV, you will get the “Programme information” banner. Press info again to display extended information about the current and the next programme. Use cursor left /right to switch between the current and the next programme information.
VIEWING MODE TV Release (0) With the 0 button, you can toggle between externally connected equipment, such as a digital terrestrial TV or a video recorder, which must be switched on.) (This is only valid when the units are connected via SCART cables, and not by RF connection.) Teletext Pressing txt will open a teletext page, if teletext is transmitted. Select teletext pages with the numeric buttons on the remote control (Fig. 1).
GLOSSAR Y OF TERMS AC-3 Multichannel digital audio encoding system. PCR Program Clock Reference. Access Authorisation to use the coding system to purchase / order TV programmes. PID Packet Identifier. Access code A four-digit code stored in the Mediamaster. Used to lock/unlock the Mediamaster. Access control A feature that allows parents to ”lock” programmes that they consider unsuitable for children. A ”locked” channel or programme can only be ”unlocked” with the special access code.
TROUBLESHOOTING Problem Possible causes What to do The LED on the front panel does not light up/is not lit. The mains cable is not connected. Check that the mains cable is plugged into the power socket. The left LED is red. The Mediamaster is in standby mode. Press the standby button to bring the Mediamaster out of standby mode. The remote control is not working. The battery is dead. The remote control is being pointed properly. Change both batteries. Aim the remote control at the box.
TECHNICAL SPECIFICATIONS Transmission Standar ds DVB, MPEG 2, OFDM RF input Modulator output In-/output connector IEC female / IEC male RF input frequency 174-300; 474-862 MHz RF input power level -78 to -30 dBm RF impedance 75 Ω Frequency range Loop through 47-862MHz Frequency range RF modulator 470-862 MHz Output channel CH 21-69 Preset channel 43 Output signal PAL G, I, SECAM Demodulation Supports 2k and 8k TV SCART Video output Audio output RGB output RGB bandwidth Fast blanking output Status output 1
Nokia is a registered trademark of Nokia Corporation www.nokia.com 00000936.