Electronic user’s guide released subject to "Nokia User’s Guides Terms and Conditions, 7th June, 1998" Nokia 20 GSM Connectivity Terminal User’s Guide for modem use 9353276 Issue 1
DECLARATION OF CONFORMITY We, NOKIA MOBILE PHONES Ltd declare under our sole responsibility that the product TME-2 is in conformity with the provisions of the following Council Directive: 1999/5/EC. Copyright © Nokia Mobile Phones Ltd 2001. All rights reserved. Reproduction, transfer, distribution or storage of part or all of the contents in this document in any form without the prior written permission of Nokia is prohibited. Nokia and Nokia Connecting People are registered trademarks of Nokia Corporation.
Table of contents For your safety .....................4 Introduction ..........................5 System requirements ................7 Network services .......................7 Communications software ......8 Getting started .....................9 Setting up the terminal ...........9 AT commands .......................... 15 Light indicators ..................16 Nokia 20 GSM Connectivity Terminal accessories ...........18 Troubleshooting ..................19 Care and maintenance .......
Read these simple guidelines. Breaking the rules may be dangerous or illegal. Further detailed information is given in this manual. INTERFERENCE All wireless equipment may get interference which could affect performance. DO NOT USE IN HOSPITALS Follow any regulations or rules. Do not use near medical equipment. USE SENSIBLY Do not touch the antenna unnecessarily. USE QUALIFIED SERVICE Only qualified service personnel must install or repair equipment. ACCESSORIES Use only approved accessories.
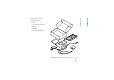
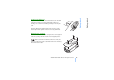
The Nokia 20 GSM Connectivity Terminal can also be used in conjunction with other fixed GSM solutions and various data solutions. It is an ideal solution for unmanned connections including telemetry, remote control, security systems and remote data retrieval. The Nokia 20 GSM Connectivity Terminal incorporates: GSM terminal (1) cradle (2) antenna (3) RS-232 data connector (4) power supply connector (5) ©2001 Nokia Mobile Phones. All rights reserved.
• GSM terminal • cradle • power supply with 2 cords • data cable • CD-ROM • installation kit (screws) ©2001 Nokia Mobile Phones. All rights reserved.
The Nokia 20 GSM Connectivity Terminal requires: • an RS-232 data connector • AT Hayes command support ■ Network services The Nokia 20 GSM Connectivity Terminal is approved for use in the GSM 900 and GSM 1800 networks and in the GSM 900/1800 dual band network. The Nokia 20 GSM Connectivity Terminal supports High Speed Circuit Switched Data (HSCSD), which enables data transmission rates of up to 43.2 kbps. HSCSD makes downloading large files faster and more convenient.
©2001 Nokia Mobile Phones. All rights reserved. 8 Introduction To connect to the Internet, to send and receive e-mail or faxes, or to transmit data from your PC, you need the appropriate data and fax communications software. You can use the Nokia 20 GSM Connectivity Terminal with most commercially available communications applications, such as Microsoft Exchange, Microsoft Outlook and Netscape Navigator. For example, Windows 95/98/2000/ NT 4.
■ Setting up the terminal To use the Nokia 20 GSM Connectivity Terminal for the first time, proceed as follows: 1 Install the SIM card. 2 Mount the terminal on the cradle. 3 Place the terminal in a proper location. 4 Connect the data cable to the terminal and to a PC or other compatible device. Connect the power supply to the terminal and to an AC wall outlet. 5 Enter the PIN code if your SIM card requires it (see page 12).
Keep all miniature SIM cards out small children’s reach. The SIM card and its contacts can easily be damaged by scratches or bending, so be careful when handling, inserting or removing the card. Insert the SIM card ensuring that the bevelled corner is on the bottom right and the golden contact area is facing downwards. Mounting the terminal Mount the terminal on the cradle using the three screws supplied in the sales package. Turn the antenna into an upright position.
Place the terminal in a proper location, for example on the desk far enough from your PC. It is also possible to install the terminal to a wall: 1 Choose a location far enough from electronic devices so that no interference takes place. 2 Drill appropriate screws through the three indentations on the cradle. Note: The three small holes are not for wall mounting but for mounting the terminal on the cradle.
1 Connect the data cable from the terminal to a PC or other compatible device. Use only a cable supplied by Nokia. 2 Connect the power cord from the power supply to the terminal. 3 Connect the power supply to an AC wall outlet. Entering the PIN code The PIN (Personal Identification Number) code protects your SIM card against unauthorised use. It is usually supplied with the SIM card. If the SIM card requires a PIN code, you must enter it to be able to use the terminal.
To protect your SIM card against unauthorised use, it is good to change the factory setting PIN code supplied by your service provider. The PIN code can be 4 to 8 digits long. To change the PIN code, enter the following AT command in the HyperTerminal connection window: at+cpwd="sc","OLDPIN","NEWPIN" where OLDPIN is the old PIN code and NEWPIN the new code. Press ENTER. See ”Figure 2. HyperTerminal connection” for details. ©2001 Nokia Mobile Phones. All rights reserved.
©2001 Nokia Mobile Phones. All rights reserved. 14 Getting started Getting started Figure 1.
■ AT commands Other AT commands, which are used to control the terminal, can be found in the List of AT Commands on the CD-ROM. The Nokia 20 GSM Connectivity Terminal supports ITU-T V.25ter, ETS GSM 07.05 and ETS GSM 07.07 commands. ©2001 Nokia Mobile Phones. All rights reserved. 15 Getting started Getting started Figure 2.
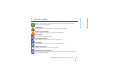
• Light indicators 1 and 2 are not in use. • Light indicators 3, 4 and 5 indicate the state of the terminal. Refer to Table 1. Table 1. Nokia 20 light indicators 3 4 5 Description - - - Power is off. Blinking - - Power is on. The terminal is attempting to connect to the telephone network. On - - In service. On - On Call in progress. On Blinking - There is an incoming call. - Blinking - Enter the PIN code. Blinking Blinking - Enter the PUK code.
5 Description On On Blinking The terminal has no space for new SMS messages. The oldest message is automatically deleted. - Blinking Blinking Install the SIM card. Blinking Blinking Blinking An error has occurred. Contact service personnel. ©2001 Nokia Mobile Phones. All rights reserved.
• Power supply (ACW-3): Supplied with the terminal. • Data package: Features an RS-232 data cable and an AT command list CD-ROM. • Antenna adapter: Allows an external antenna with a standard FME connector to be connected to the terminal. • Configurator Software: For a more advanced configuration of the terminal. ©2001 Nokia Mobile Phones. All rights reserved.
1 Check that the data cable is firmly connected to the terminal and to the PC or other compatible device. 2 Check that the power supply is firmly connected to the terminal and to an AC wall outlet. 3 Check that the antenna is firmly connected to the terminal. 4 Disconnect the power supply from the AC wall outlet before you check that the SIM card is installed properly. Reception is poor If there are problems with the reception, for example interruptions in the service, the signal may be too weak.
The PIN code is blocked If entering the PIN code fails three times successively, the code is blocked. You can unblock it by entering your PUK (Personal Unblocking Key) code. The PUK code may be supplied with the SIM card. If not, contact your local service provider for the code. If you lose the code, contact your service provider. When the PIN code is blocked, light indicators 3 and 4 blink.
©2001 Nokia Mobile Phones. All rights reserved. 21 Care and maintenance • Your Nokia 20 GSM Connectivity Terminal is a product of superior design and craftsmanship and should be treated with care. The suggestions below will help you to fulfill any warranty obligations and to enjoy this product for many years. When using your terminal OR any accessory: • Keep it and all its parts and accessories out of small children's reach. • Keep it dry.
Operating environment Remember to follow any special regulations in force in any area and always switch off the terminal whenever it is forbidden to use it, or when it may cause interference or danger. The Nokia 20 GSM Connectivity Terminal is switched on when the power supply is connected to the terminal and to an AC outlet. Do not connect the power supply whenever it is forbidden to use a wireless phone, or when it may cause interference or danger.
Most modern electronic equipment is shielded from radio frequency (RF) signals. However, certain electronic equipment may not be shielded against the RF signals from your terminal. Pacemakers Pacemaker manufacturers recommend that a minimum separation of 20 cm (6 inches) be maintained between a wireless phone and a pacemaker to avoid potential interference with the pacemaker. These recommendations are consistent with the independent research by and recommendations of Wireless Technology Research.
190x80x29 mm 250 g Power supply ACW-3 Charger type AC mains plug type Input voltage DC connector Weight Volume Cable length Switched mode power supply Europe, UK, US 100-240 VAC 5.5. mm DC plug 75 g + cables 115 cm3 AC 1500 mm, DC 1500 mm Environmental specifications Operating conditions Storage conditions -10C...+55C -40C...+85C Relative humidity range for operation 20...75% non-condensing and for storage 5...95% non-condensing.
The terminal is tested for electro-magnetic compatibility (EMC) according to the ETS 300 342-1/ 13/standards. ©2001 Nokia Mobile Phones. All rights reserved.