Nokia 2710 User Guide Issue 3
Contents Contents Safety 4 Support 5 Get started Insert SIM card and battery Insert a microSD card Remove the microSD card Charge the battery GSM antenna Headset Connect a USB data cable Magnets and magnetic fields Keys and parts Access codes Switch on or off Home screen Keypad lock Use your device without a SIM card Applications running in background 5 5 5 6 6 7 8 8 8 9 10 10 10 11 11 11 Calls Make and answer a call Loudspeaker Dialling shortcuts 11 11 12 12 Write text Text modes Traditional te
Contents Index 39 3
Safety Safety Read these simple guidelines. Not following them may be dangerous or illegal. Read the complete user guide for further information. SWITCH ON SAFELY Do not switch the device on when wireless phone use is prohibited or when it may cause interference or danger. ROAD SAFETY COMES FIRST Obey all local laws. Always keep your hands free to operate the vehicle while driving. Your first consideration while driving should be road safety.
Support 5 Support When you want to learn more about how to use your product or you are unsure how your device should function, go to www.nokia.com/support, or using a mobile device, nokia.mobi/support. If this does not resolve your issue, do one of the following: • • • Reboot your device. Switch off the device, and remove the battery. After about a minute, replace the battery, and switch on the device. Restore the original factory settings. Update your device software.
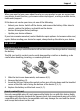
Get started Your phone supports microSD cards with a capacity of up to 16 GB. A compatible memory card may be supplied with the device, and may already be inserted in the device. If not, do the following: 1 2 3 Open the cover of the memory card slot. Insert the card into the memory card slot with the contact surface facing up, and press until it locks into place. Close the cover of the memory card slot.
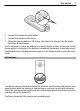
Get started 1 2 3 7 Connect the charger to a wall outlet. Connect the charger to the device. When the device indicates a full charge, disconnect the charger from the device, then from the wall outlet. You do not need to charge the battery for a specific length of time, and you can use the device while it is charging. If the battery is completely discharged, it may take several minutes before the charging indicator appears on the display or before any calls can be made.
Get started Headset Warning: When you use the headset, your ability to hear outside sounds may be affected. Do not use the headset where it can endanger your safety. When connecting any external device or any headset, other than those approved by Nokia for use with this device, to the Nokia AV Connector, pay special attention to volume levels. Do not connect products that create an output signal as this may cause damage to the device. Do not connect any voltage source to the Nokia AV Connector.
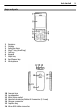
Get started Keys and parts 1 2 3 4 5 6 7 8 9 Earpiece Display Selection keys Navi™ key (scroll key) Call key Keypad Maps key End/Power key Microphone 10 11 12 13 14 15 16 Camera lens Loudspeaker Wrist strap eyelet Headset connector/Nokia AV Connector (3.
Get started 17 Memory card slot Access codes The security code helps to protect your device against unauthorised use. The preset code is 12345. You can create and change the code, and set the device to request the code. Keep the code secret and in a safe place separate from your device. If you forget the code and your device is locked, your device will require service. Additional charges may apply, and all the personal data in your device may be deleted.
Calls 7 8 9 10 11 Display Function of the left selection key Function of the scroll key Function of the right selection key Keypad lock Lock the keypad Select Menu, and press * within 2.5 seconds. Unlock the keypad Select Unlock, and press * within 1.5 seconds. If requested, enter the lock code. Answer a call when the keypad is locked Press the call key. When you end or reject a call, the keypad locks automatically.
Write text Reject a call Press the end key. Adjust the volume During a phone call, scroll up or down. Loudspeaker If available, you may select Loudsp. or Handset to use the loudspeaker or the earpiece of the phone during a call. Warning: Continuous exposure to high volume may damage your hearing. Listen to music at a moderate level, and do not hold the device near your ear when the loudspeaker is in use.
Navigate the menus 13 Traditional text input Press a number key, 2-9, repeatedly until the desired character appears. The available characters depend on the selected writing language. If the next letter you want is located on the same key as the present one, wait until the cursor appears, and enter the letter. To access the most common punctuation marks and special characters, press 1 repeatedly. To access the list of special characters, press *. To insert a space, press 0.
Messaging Text and multimedia messages You can create a message and optionally attach, for example, a picture. Your phone automatically changes a text message to a multimedia message when a file is attached. Text messages Your device supports text messages beyond the limit for a single message. Longer messages are sent as two or more messages. Your service provider may charge accordingly.
Messaging 4 15 Select Send. Multimedia messages are indicated with an icon at the top of the display. Service providers may charge differently depending on the message type. For details, contact your service provider. Flash messages Flash messages are text messages that are instantly displayed upon reception. Select Menu > Messaging. 1 2 3 Select More > Other messages > Flash message. Write your message. Select Send to and a contact.
2 3 4 Messaging Enter the recipient’s mail address, the subject, and the mail message. To attach a file, select Options > Insert. If more than one mail account is defined, select the account from which you want to send the mail. Select Send. Read a mail and reply Important: Exercise caution when opening messages. Messages may contain malicious software or otherwise be harmful to your device or PC. Select Menu > Messaging. Download mail headers Select your mail account.
Contacts 17 Multimedia msgs. — Allow delivery reports and the reception of multimedia messages and advertisements, and set up other preferences related to multimedia messages. Service messages — Activate service messages, and set up preferences related to service messages. Contacts You can save names and phone numbers in the device memory and on the SIM card. In the device memory, you can save contacts with numbers and text items. Names and numbers saved on the SIM card are indicated with .
Settings Settings Profiles Waiting for a call, but can’t let your device ring? There are various settings groups called profiles, which you can customise with ringing tones for different events and environments. Select Menu > Settings > Profiles. Select the desired profile and from the following: Activate — Activate the profile. Personalise — Modify the profile settings. Timed — Set the profile to be active until a certain time.
Settings 19 Select shortcut functions for the scroll key Select Navigation key. Scroll to the desired direction, and select Change or Assign and a function from the list. Synchronisation and backup Select Menu > Settings > Sync & backup. Select from the following: Phone switch — Synchronise or copy selected data, such as your contacts, calendar entries, notes, or messages, between your device and another device. Create backup — Back up selected data. Restore backup — Restore data from a backup.
Settings service), and your PC must support Bluetooth technology. After connecting to the network access point (NAP) service of the device, and pairing with your PC, your device automatically opens a packet data connection to the internet. This device is compliant with Bluetooth Specification 2.0 + EDR supporting the following profiles: generic access, hands-free, headset, object push, file transfer, dial-up networking, serial port, SIM access, and generic object exchange.
Operator menu 21 Accessories This menu is only available if the device is or has been connected to a compatible accessory. Select Menu > Settings > Accessories. Select an accessory and an option, depending on the accessory. Configuration You can configure your device with settings that are required for certain services. Your service provider may also send you these settings. Select Menu > Settings and Configuration. Select from the following: Default config. sett.
Applications Applications Alarm clock You can set an alarm to sound at a desired time. Set the alarm 1 Select Menu > Applications > Alarm clock. 2 Set the alarm, and enter the alarm time. 3 To issue an alarm on selected days of the week, select Repeat: > On and the days. 4 Select the alarm tone. If you select the radio as the alarm tone, connect the headset to the device. 5 Set the length of the snooze time-out period, and select Save. Stop the alarm Select Stop.
Applications 23 Open a game or application Select Games, Collection, or the memory card, and a game or an application. View the amount of memory available for game and application installations Select Options > Memory status. Download a game or application Select Options > Downloads > Game downloads or App. downloads. Your device supports J2ME™ Java applications. Make sure an application is compatible with your device before downloading it.
Applications Switch between camera and video mode In camera or video mode, scroll left or right. FM radio The FM radio depends on an antenna other than the wireless device antenna. A compatible headset or accessory needs to be attached to the device for the FM radio to function properly. Warning: Continuous exposure to high volume may damage your hearing. Listen to music at a moderate level, and do not hold the device near your ear when the loudspeaker is in use.
Applications 25 Listen to the latest recording Select Options > Play last recorded. Send the last recording in a multimedia message Select Options > Send last recorded. Media player Your device includes a media player for listening to songs or other MP3 or AAC sound files. Warning: Continuous exposure to high volume may damage your hearing. Listen to music at a moderate level, and do not hold the device near your ear when the loudspeaker is in use. Select Menu > Applications > Media player.
Maps Close the media player Press and hold the end key. Maps About Maps Select Menu > Maps. With Maps, you can browse maps of different cities and countries, search for addresses and places of interest, and view your current position, if available. You can also plan routes, and get turn-by-turn navigation guidance. If there are maps available in your device or on an inserted memory card, you can browse them without an internet connection.
Maps 27 Downloading A-GPS data involves data transfer through your service provider’s network. While roaming, that is, outside your service provider's network, the data transfer charges may be higher than expected. Therefore, by default, A-GPS is not used while roaming, but this means that calculating your location may take longer than when using A-GPS. To allow using A-GPS while roaming, select Menu > Settings > Connectivity > GPS > Net-assisted GPS.
Maps Navigate to your destination Plan a route Plan your journey, and create your route and view it on the map before setting off. Select Menu > Maps. 1 2 3 Select Plan route. Select Starting point and your current position, a saved or recent location, a place from the map, or a specific address as the start point of your route. Select Destination and the end point of your route. Show the route on the map Select Options > Show route > View map.
Maps 29 Stop navigating Select Stop. Navigate on foot Select Settings > Routing settings > Route selection > On foot. This optimises the routes you create for navigation on foot. Drive navigation view 1 2 3 Route Your location and the direction in which you are moving Compass Walk navigation view 1 2 3 4 5 Your location Route to follow Compass Your route trail — Displays where you have been walking.
Web or Internet View the direction to your destination If you are on off-road terrain, or you don't have the maps of the area downloaded in your device, you can view the direction to your destination. Select Menu > Maps. 1 2 3 Select Point me to. To set your destination, select the appropriate option. Select the desired location. The straight line indicates the straightest route and the shortest distance to your destination.
SIM services 31 SIM services Your SIM card may provide additional services. You can access this menu only if it is supported by your SIM card. The name and contents of the menu depend on the available services. Green tips Here are tips on how you can contribute to protecting the environment. Save energy When you have fully charged the battery and disconnected the charger from the device, unplug the charger from the wall outlet.
Product and safety information Your device may have preinstalled bookmarks and links for third-party internet sites and may allow you to access third-party sites. These are not affiliated with Nokia, and Nokia does not endorse or assume liability for them. If you access such sites, take precautions for security or content. Warning: To use any features in this device, other than the alarm clock, the device must be switched on.
Product and safety information 33 Battery Battery and charger information Your device is powered by a rechargeable battery. The battery intended for use with this device is BL-5C. Nokia may make additional battery models available for this device. This device is intended for use when supplied with power from the following chargers: AC-3. The exact charger model number may vary depending on the type of plug. The plug variant is identified by one of the following: E, EB, X, AR, U, A, C, K, or UB.
Product and safety information Authenticate hologram 1 When you look at the hologram on the label, you should see the Nokia connecting hands symbol from one angle and the Nokia Original Enhancements logo when looking from another angle. 2 When you angle the hologram left, right, down and up, you should see 1, 2, 3 and 4 dots on each side respectively. Successful completion of the steps is not a total assurance of the authenticity of the battery.
Product and safety information 35 Recycle Always return your used electronic products, batteries, and packaging materials to dedicated collection points. This way you help prevent uncontrolled waste disposal and promote the recycling of materials. Check product environmental information and how to recycle your Nokia products at www.nokia.com/werecycle, or with a mobile device, nokia.mobi/werecycle.
• • • • • Product and safety information Always keep the wireless device more than 15.3 centimetres (6 inches) from the medical device. Not carry the wireless device in a breast pocket. Hold the wireless device to the ear opposite the medical device. Turn the wireless device off if there is any reason to suspect that interference is taking place. Follow the manufacturer directions for the implanted medical device.
Copyright and other notices 37 Certification information (SAR) This mobile device meets guidelines for exposure to radio waves. Your mobile device is a radio transmitter and receiver. It is designed not to exceed the limits for exposure to radio waves recommended by international guidelines. These guidelines were developed by the independent scientific organisation ICNIRP and include safety margins designed to assure the protection of all persons, regardless of age and health.
Copyright and other notices is granted or shall be implied for any other use. Additional information, including that related to promotional, internal, and commercial uses, may be obtained from MPEG LA, LLC. See http://www.mpegla.com. TO THE MAXIMUM EXTENT PERMITTED BY APPLICABLE LAW, UNDER NO CIRCUMSTANCES SHALL NOKIA OR ANY OF ITS LICENSORS BE RESPONSIBLE FOR ANY LOSS OF DATA OR INCOME OR ANY SPECIAL, INCIDENTAL, CONSEQUENTIAL OR INDIRECT DAMAGES HOWSOEVER CAUSED.
Index H headset Index 39 8 A access codes accessories applications audio messages 10 21 22 15 B backing up data battery — charging battery charge level indicator Bluetooth browser business cards 19 5 6 10 19 30 17 C cable connection calendar call log calls camera configuration contacts 8 22 17 11 23 21 17 D date and time display settings 18 18 E e-mail extras N Nokia support information number mode 5 12 15 22 F factory settings flash messages O offline profile operator menu 11 21 21 15 G
Index S security code settings — phone settings, display shortcuts signal strength indicator SIM card speed dialling support switching device on/off synchronisation T text messages text modes to-do list tones traditional text input turning device on/off 10 18 20 18 18 10 5, 11 12 5 10 19 14 12 22 18 13 10 U USB connection 8 V video mode voice messages voice recorder 23 16 24 W web write text 30 12