Electronic user’s guide released subject to "Nokia User’s Guides Terms and Conditions, 7th June, 1998" User´s Guide 9353912 Issue 1
DECLARATION OF CONFORMITY We, NOKIA CORPORATION, declare under our sole responsibility that the product NPM-9 is in conformity with the provisions of the following Council Directive: 1999/5/EC. A copy of the Declaration of Conformity can be found from http://www.nokia.com/phones/declaration_of_conformity/. Copyright © Nokia Corporation 2001. All rights reserved.
General information ........................................................................................................................ 12 Stickers in the sales package........................................................................................................................................................ 12 Access codes...........................................................................................................................................................................
Contents Making a conference call........................................................................................................................................................... Answering or rejecting an incoming call.................................................................................................................................. Call waiting............................................................................................................................................
Messages (Menu 1).......................................................................................................................................................................... Writing and sending messages ................................................................................................................................................. Options for sending a message........................................................................................................................
Contents Call divert.................................................................................................................................................................................... Anykey answer........................................................................................................................................................................... Automatic redial ............................................................................................................
©2001 Nokia Corporation. All rights reserved. 7 81 81 82 82 83 85 86 86 88 Contents 70 71 71 72 73 74 75 75 75 76 76 77 78 78 79 79 80 80 81 81 Contents Making a calendar note.............................................................................................................................................................. When the phone alarms for a note .........................................................................................................................................
Contents Ending a WAP connection ......................................................................................................................................................... Appearance settings of the WAP browser ............................................................................................................................ Download settings ..............................................................................................................................................
Do not switch the phone on when wireless phone use is prohibited or when it may cause interference or danger. ROAD SAFETY COMES FIRST Don’t use a hand-held phone while driving. INTERFERENCE All wireless phones may get interference, which could affect performance. SWITCH OFF IN HOSPITALS Follow any regulations or rules. Switch the phone off near medical equipment. SWITCH OFF IN AIRCRAFT Wireless devices can cause interference in aircraft.
FOR YOUR SAFETY USE SENSIBLY Use only in the normal position. Don’t touch the antenna unnecessarily. QUALIFIED SERVICE Only qualified personnel may install or repair phone equipment. ACCESSORIES AND BATTERIES Use only approved accessories and batteries. Do not connect incompatible products. WATER-RESISTANCE Your phone is not water-resistant. Keep it dry. BACKUP COPIES Remember to make backup copies of all important data.
Dualband is a network dependent feature. Check with your local service provider if you can subscribe to and use this feature. A number of features included in this guide are called Network Services. These are special services that you arrange through your wireless service provider. Before you can take advantage of any of these Network Services, you must subscribe to them through your service provider and obtain instructions for their use from your service provider.
General information General information ■ Stickers in the sales package The stickers contain important information for service and customer support purposes. Attach the sticker to your warranty card. Attach the sticker to the Nokia Club Invitation Card supplied in the sales package. ■ Access codes • Security code (5-10 digits): The security code protects your phone against unauthorised use, and is supplied with the phone. The preset code is 12345.
• Wallet code (4-10 digits): The wallet code is needed to access the wallet services. For further information, see Wallet on page 76. • Signing PIN: The Signing PIN is needed for the digital signature. The signing PIN is supplied with the SIM card if the SIM card has a security module in it. ©2001 Nokia Corporation. All rights reserved. 13 General information • Barring password: The barring password is needed when using the Call barring service, see Security settings on page 65.
Overview of the functions of the phone Overview of the functions of the phone The Nokia 6510 phone provides many functions which are very practical for daily use, such as Clock, Alarm clock, Countdown timer, Games, Calculator, Calendar, Wallet and many more. Also a range of Nokia Xpress-onTM colour is available for your phone. To change the covers, see Changing the covers on page 26.
■ HSCSD (High Speed Circuit Switched Data) The phone enables you to use GSM high-speed data services. You can use high-speed functionality when your phone is connected to a computer via an IR connection and when the modem drivers supporting high-speed data software are installed on your computer and selected as an active modem. For availability and subscription to high-speed data services, please contact your network operator or service provider. See also Data and fax communication on page 96.
Overview of the functions of the phone ■ Radio Your phone has an integrated FM radio. You can listen to the radio by using a headset. See Radio (Menu 10) on page 72. ■ Voice features Your phone offers you the following voice features: • Voice dialling - to make a call by using a voice tag, see Voice dialling on page 41. • Voice commands - to activate certain functions in your phone that are listed in the Voice comms. menu, see Voice commands on page 79.
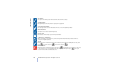
■ Keys and connectors 1. Power key, Switches the phone on and off. While in the phone book or in menu functions, or when the keypad is locked, pressing the power key briefly turns the phone’s display lights on for approximately 15 seconds. 2. Volume keys The upper key increases and the lower key decreases the earpiece (and headset) volume. 3. Selection keys, and The function of the keys depends on the guiding text shown on the display above the keys, for example Menu and Names in standby mode. 4.
Your phone 7. mailbox. and enter numbers and characters. Pressing and holding calls your voice are used for various purposes in different functions. 1 - Charger connector 2 - Headset connector 3 - Infrared (IR) port ■ Standby mode When the phone is ready for use, and no characters have been entered by the user, the phone is in standby mode. Selection keys in standby mode are Menu and Names. xxxx Indicates the cellular network in which the phone is currently being used.
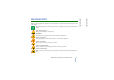
Other essential indicators in standby mode: You have received one or several text or picture messages. See Reading and replying to a message on page 50. You have received one or several voice messages. See Voice messages on page 52. The phone’s keypad is locked. See Keypad lock (Keyguard) on page 25 and Keyguard settings on page 61. The phone does not ring at an incoming call or a text message when Incoming call alert is set to Off and Message alert tone is set to Off. See Tone settings on page 62.
Getting started 2. Getting started ■ Installing the SIM card and the battery • Keep all miniature SIM cards out of the reach of small children. • The SIM card and its contacts can easily be damaged by scratches or bending, so be careful when handling, inserting or removing the card. • Before installing the SIM card, always make sure that the phone is switched off and then remove the battery. 1.
3. Insert the SIM card into the SIM card holder (7). Make sure that the SIM card is inserted properly and that the golden contact area on the card is facing downwards. Close the cover of the SIM card holder (8). ©2001 Nokia Corporation. All rights reserved. 21 Getting started Getting started 2. To release the SIM card holder, slightly lift the front edge of the cover on the card holder (4) and slide it backwards (5). Open the cover (6).
Getting started 4. Replace the battery (9). 5. Direct the back cover towards the locking catches on the front cover (10) and slide the back cover until it locks into its place (11). 22 ©2001 Nokia Corporation. All rights reserved.
1. Connect the lead of the charger to the socket on the bottom of your phone. 2. Connect the charger to an AC wall socket. The text Charging is displayed briefly if the phone is switched on. If the battery is completely flat, it may take a few minutes before the charging indicator appears on the display or any calls can be made. You can use the phone while the charger is connected. The charging time depends on the charger and the battery used.
Getting started • If the phone asks for a security code, key in the security code (displayed as *****), and press OK. See also Access codes on page 12. Warning: Do not switch the phone on when wireless phone use is prohibited or when it may cause interference or danger. TIPS ON EFFICIENT OPERATION: Your phone has a built-in antenna. As with any other radio transmitting device, do not touch the antenna unnecessarily when the phone is switched on.
• Locking the keypad In standby mode, press Menu and then lock the keypad. When the keypad is locked, within 1.5 seconds to appears at the top of the display. • Unlocking the keypad Press Unlock and then within 1.5 seconds to unlock the keypad. • When the keyguard is on To answer a call, press . During a call, the phone can be operated normally. When you end or reject the call, the keypad will automatically be locked. See also Keyguard settings on page 61 .
Getting started ■ Changing the covers Before changing the cover, always switch off the power and disconnect the phone from the charger or any other device. Always store and use the phone with the covers attached. 1. Remove the back cover of the phone. With the back of the phone facing you, press the back cover release button and slide the cover off the phone. See Installing the SIM card and the battery on page 20. 2. Gently pull the phone off the front cover starting from the bottom of the phone (1). 3.
5. Replace the back cover of the phone. Direct the back cover towards the locking catches on the front cover and slide the back cover until it locks into place. See Installing the SIM card and the battery on page 20. ©2001 Nokia Corporation. All rights reserved. 27 Getting started Getting started 4. To replace the front cover, align the top of the phone with the top of the front cover (3) and gently push the phone towards the cover (4). Ensure that the front cover is closed into place.
Call functions 3. Call functions ■ Making a call 1. Key in the phone number, including the area code. To edit the number on the display, press or to move the cursor and Clear to delete the character to the left of the cursor. For international calls, press twice for the international prefix (the + character replaces the international access code) and then key in the country code, area code and the phone number. 2. Press to call the number. 3.
, or press and . If the phone asks for the voice mailbox number, key it in and press OK. See also Voice messages on page 52. Speed dialling a phone number Assign a phone number to one of the speed dialling keys, from ( number in either of the following ways: • Press the speed dialling key you want and then press to ), and you can call that . • If Speed dialling is set to on, press and hold a speed dialling key until the call is started. See Speed dialling on page 60.
Call functions 6. To have a private conversation with one of the participants: Press Options and select Private. Scroll to the desired participant and press OK. Once you have finished the private conversation, re-establish to the conference call, as described in step 4. 7. To end the conference call, press . ■ Answering or rejecting an incoming call Press to answer the incoming call and press Press to reject the incoming call. to end the call. If you press Silence, only the ringing tone is muted.
Mute or Unmute, End active call, End all calls, Phone book, Menu and Hold or Unhold, New call, Conference, Private, Answer and Reject. Send DTMF is used to send DTMF tone strings, for example, passwords or bank account numbers. Key in the DTMF string or search for it in the phone book and press OK. Note that you can key in the wait character w and the pause character p by repeatedly pressing .
Writing text 4. Writing text You can key in text in two different ways, using the traditional method, or another method called predictive text input. ■ Using traditional text input The indicator text input. is shown on the top left of the display when you are writing text using the traditional • Press a number key, to , repeatedly until the desired character appears. All the characters available under a number key are not printed on the key.
or pr , and press to . • To switch between upper case and lower case, press of the display indicates the selected case. • Press , . The symbol ABC or abc shown at the top to move the cursor to the right or left, respectively. ■ Using predictive text input You can key in any letter with a single keypress. The predictive text input is based on a built-in dictionary to which you can also add new words. When the dictionary becomes full, the new word replaces the oldest added one.
Writing text Writing words with predictive text input 1. Start writing a word by using the keys word changes after each keystroke. to . Press each key only once for one letter. The For example, to write Nokia when the English dictionary is selected, press for k, for i and for a: for N, for o, In addition to the number keys, you can use other keys as follows: • To delete a character to the left of the cursor, press Clear. Press and hold Clear to delete the characters more quickly.
or adding a If the word is not correct, you have the following options: • Press repeatedly until the desired word appears and confirm it. • Press Options and select Matches. If the ? character is displayed after the word, the word you intended to write is not in the dictionary. To add the word to the dictionary, press Spell, key in the word (traditional text input is used) and press Save. When the dictionary becomes full, the new word replaces the oldest one that was added. 3.
Phone book (Names) 5. Phone book (Names) You can save names and phone numbers in the phone’s memory (internal phone book) or in the SIM card’s memory (SIM phone book). • The internal phone book can save up to 500 names with numbers and textual notes for each name. The total amount of names that can be saved depends on the length of the names, numbers and text items. • The phone supports SIM cards that can save up to 250 names and phone numbers.
Names and numbers will be saved in the memory being used, see Selecting the phone book settings above. 1. Press Names and select Add name. 2. Key in the name and press OK. See Writing text on page 32. 3. Key in the phone number, and press OK. To key in the numbers, see Making a call on page 28. 4. When the name and number are saved, press Done. Tip: Quick save In standby mode, key in the phone number. Press Options, and select Save. Key in the name and press OK.
Phone book (Names) 2. To access the list of names and phone numbers, press or in standby mode. 3. Scroll to the name saved in the phone´s internal phone book, to which you want to add a new number or text item and press Details. (If the name is not saved in the phone, the phone will ask you whether you want to save it there.) 4. Press Options and select Add number or Add text. 5.
■ Editing a name, number or a text item Search for the name (and number) you want to edit and press Details. Scroll to the name, number or text item you want to edit, and press Options. Select Edit name, Edit number, or Edit text, and edit the name, number, or text and press OK. ■ Erasing names and numbers Press Names and select Erase. • To delete names and numbers one by one, select One by one and scroll to the name (and number) you want to delete. Press Erase and press OK to confirm.
Phone book (Names) Default nos. is shown if you copy from the phone to the SIM card. Only the default numbers will be copied. 4. To select whether you want to keep or erase the original names and numbers, choose Keep original or Move original. • If you select All or Default nos., press OK when Start copying? or Moving is displayed.
■ Speed dialling To make a call using the speed dialling keys, see Speed dialling a phone number on page 29. Assigning a number to a speed dialling key Press Names and select Speed dials. Scroll to the speed dialling key number you want, and press Assign. If a number is already assigned to that key, press Options, and you can view, change or erase the assigned number. Press Search, and select first the name and then the number you want to assign.
Phone book (Names) Note: You must say the name exactly as you said it when you recorded it. This may be difficult in, for example, a noisy environment or during an emergency, so you should not rely solely upon voice dialling in all circumstances. Adding a voice tag Save or copy in the phone’s memory the names and phone numbers to which you want to add a voice tag.
If you are using the headset, press and hold the headset key to start the voice dialling. Replaying, changing or erasing a voice tag Press Names and select Voice tags. Scroll to the name with the voice tag you want, and press Options. • To replay the voice tag, select Playback. • To erase the voice tag, select Erase and press OK. • To change the voice tag, select Change. Press Start to add the new voice tag.
Phone book (Names) Press Names, select Caller groups and select the caller group you want. Select • Group name, key in a new name for the caller group and press OK. • Group ringing tone and scroll to the ringing tone you want to set for the group and press OK. Default is the ringing tone selected for the currently active profile.
■ Accessing a menu function By scrolling 1. To access the menu, press Menu. 2. Scroll through the menu and select, for example, Settings by pressing Select. 3. If the menu contains submenus, select the one you want, for example Call settings. 4. If the selected submenu contains further submenus, repeat step 3. Select the next submenu, for example Anykey answer. 5. Select the setting of your choice. 6. Press Back to return to the previous menu level, and Exit to exit the menu.
Using the menu ■ List of menu functions 1. Messages 1. Write message 2. Inbox 3. Outbox 4. Archive 5. Templates 6. My folders 7. Erase messages 8. Voice messages 9. Info messages 10.Service command editor 11.Message settings 2. Call register 1. Missed calls 2. Received calls 3. Dialled numbers 4. Erase Recent Call Lists 5. Call duration 6. Call costs 7. GPRS data counter 8. GPRS connection timer 46 3. Profiles 1. General 2. Silent 3. Meeting 4. Outdoor 5. Pager 4. Settings 1. Alarm clock 2.
11. Extras 1. Recorder 2. Wallet 3. Voice comms. 4. Countdown timer 5. Stopwatch 1. Only shown if supported by your SIM card. The name and contents vary depending on the SIM card. ©2001 Nokia Corporation. All rights reserved. 47 Using the menu 10. Radio 12. Services 1. Home 2. Bookmarks 3. Service inbox 4. Settings 5. Go to address 6. Clear the cache 13. SIM services1 Using the menu 9.
Menu functions 7. Menu functions ■ Messages (Menu 1) You can read, write and send text and picture messages or save your messages. All the messages in your phone’s message memory are organised in folders. Before you can send any text or picture messages, you need to save your message centre number, see Message settings on page 53. Writing and sending messages You can write and edit text messages of up to 160 characters. 1. Press Menu, and select Messages and Write message 2. Key in a message.
• To send a message to several recipients, select Send to many. When you have sent the message to everyone you want to send it to, press Done. • To send a message using a message profile, select Sending profile and then the message profile you want to use. For example, if you select a profile you have defined as an e-mail transmission, key in or search the phone book for the recipient’s e-mail address and press OK. Key in the e-mail service number, select Accept to send the message.
Menu functions • Since picture messages are saved in the phone’s memory, you cannot view them if you use your SIM card with another phone. Inserting a text template in a message When you are writing or replying to a message, press Options. Select Use template and select the template you want to insert. Inserting a picture template in a message When you are writing or replying to a message, press Options. Select Attach picture and select a picture to view.
Select Details to view, for example, the sender’s name and phone number, the message centre used, reception date and time. Select Use number to extract numbers from the current message. Select Save picture to save the picture in the Templates folder. Select Reply or Reply (text) to reply to a message. Select Original text to include the original message in the reply, or select standard answers, for example, Thank you or Congrats or Template to be included in the reply, or select Empty screen. 4.
Menu functions Erasing the messages Press Menu, select Messages and select Erase messages. To delete all the messages in a folder, scroll to the folder and press OK. Then press OK when Erase all read messages from folder? is displayed. To delete all read messages from all the folders, scroll to All read and press OK. Then press OK when Erase all read messages? is displayed.
will indicate new voice messages. Press Listen to call Info messages With the info message network service, you can receive messages on various topics, for example weather or traffic conditions, from your service provider. For available topics and relevant topic numbers, contact your service provider. If the GPRS connection is set to Always online, the info messages may not be received. In that case, set the GPRS connection to When needed, see Setting up the phone for a WAP service on page 82.
Menu functions Select Message centre number to save the phone number of the message centre. You need the message centre number to send text and picture messages. You receive the number from your service provider. Select Messages sent as to select the message format, or Message validity.
Dialled numbers To view the list of the 20 phone numbers that you have most recently called or attempted to call, press Menu, select Call register and Dialled numbers. See also Last number redialling on page 28. Erase recent call lists To erase the recent calls lists, press Menu, select Call register and select Erase recent call lists. Select whether you want to delete all the phone numbers in the recent call lists, or only the numbers in the missed calls, received calls or dialled numbers lists.
Menu functions • Call costs (network service) and select Last call units or All calls’ units to check the cost of your last call or all calls. Select Call cost settings and then select Clear counters, or select Show costs in to set the phone to show the remaining talk time in terms of charging units Units, or units of currency, Currency. Contact your service provider for charging unit prices. Select Call cost limit to limit the cost of your calls to a certain amount of charging units or units of currency.
• To set the profile to be active for a certain amount of time up to 24 hours, select Timed and set the time. When the time set for the profile expires, the previous profile that was not timed, becomes active. • To personalise the profile, select Personalise. Select the setting you want to change and make the changes. The settings can also be changed in the Tone settings menu, see Tone settings on page 62. In addition, you can rename a profile, Profile name. The General profile cannot be renamed.
Menu functions If the alarm time is reached while the phone is switched off, the phone switches itself on and starts sounding the alarm tone. If you press Stop, the phone asks whether you want to activate the phone for calls. Press No to switch off the phone or Yes to make and receive calls. Note: Do not press Yes when wireless phone use is prohibited or when it may cause interference or danger. Time and date settings Clock Press Menu, select Settings, Time and date settings and Clock.
Press Menu, select Settings, Call settings and Call divert (network service). With call divert you can direct your incoming calls to another number, for example, to your voice mailbox number. For details, contact your service provider. Divert options not supported by your SIM card or your network operator may not be shown. Select the divert option you want, for example, select Divert if busy to divert the voice calls when your number is busy or when you reject an incoming call.
Menu functions Speed dialling Press Menu, select Settings, Call settings and Speed dialling. Select On and the names and phone numbers assigned to the speed dialling keys, from to , can be dialled by pressing and holding the corresponding number key. Call waiting service Press Menu, select Settings, Call settings and Call waiting service. Select Activate and the network will notify you of an incoming call while you have a call in progress (network service). See Call waiting on page 30.
Tip: In standby mode, you can switch from one line to the other by pressing and holding . Phone settings Language Press Menu, select Settings, Phone settings and Language. Select the language for the display texts. If Automatic is selected, the phone selects the language according to the information on the SIM card. Keyguard settings Press Menu, select Settings, Phone settings and Keyguard settings.
Menu functions Press Menu, select Settings, Phone settings and Network selection. Select Automatic and the phone automatically selects one of the cellular networks available in your area. If you select Manual, the phone shows a list of the available networks and you can select a network that has a roaming agreement with your home network operator. Otherwise, No access will be displayed and you must select another network.
Select Message alert tone to set the alert tone for the incoming messages, Keypad tones, or Warning tones to set the phone to sound tones, for example, when the battery is running out of power. Select Alert for to set the phone to ring only upon calls from phone numbers that belong to a selected caller group. Scroll to the caller group you want or All calls and press Mark.
Menu functions • Select Use loopset to set the loopset in use instead of the headset, Yes. Use loopset is available only when Loopset is selected. GPRS modem settings You can connect the phone via IR connection to a compatible PC and use the phone as a modem to enable GPRS connectivity from the PC. Press Menu, select Settings and GPRS modem settings. Select Active access point and activate the access point you want to use. Select Edit active access point to change the access point settings.
Press Menu, select Settings and Security settings. Select • PIN code request to set the phone to ask for your PIN code every time the phone is switched on. Some SIM cards do not allow the PIN code request to be turned off. • Call barring service (network service) to restrict incoming calls to and outgoing calls from your phone. A barring password is required. • Fixed dialling to restrict your outgoing calls to selected phone numbers if this function is supported by your SIM card. The PIN2 code is required.
Menu functions Restore factory settings To reset some of the menu settings to their original values, press Menu, select Settings and Restore factory settings. Key in the security code and press OK. For example, the names and phone numbers saved in the phone book are not deleted. ■ Games (Menu 5) Note: The phone must be switched on to use this function. Do not switch on the phone when the use of a wireless phone is prohibited or when it may cause interference or danger.
Press Menu, select Games and Game services or Settings. Select • Game services and the phone tries to connect to the WAP pages of Club Nokia by using the currently active set of service settings. If the connection fails, you may not be able to access Club Nokia from the WAP service whose connection settings are currently active. In this case, enter the Services menu, activate another set of service settings, see Making a connection to a WAP service on page 85. Try again to connect to Club Nokia.
Menu functions 2. When ’0’ is displayed on the screen, key in the first number in the calculation, press decimal point. for a 3. Press Options and select Add, Subtract, Multiply, Divide, Square, Square root or Change sign. Tip: Alternatively, press times to divide. once to add, twice to subtract, three times to multiply or four 4. Key in the second number. 5. For a total, press Options and select Equals. Repeat steps 3 to 5 as many times as necessary. 6.
• Add to add a new note. Key in the subject for the note, press Options and select Save. Select the priority for the note, High (1), Medium (2), or Low (3). The notes are listed first in priority order and then in alphabetical order. Dictionary, refer to Setting predictive text input on or off on page 33. • Erase to delete the selected note. • Edit to modify the contents of the note. • Edit priority to change the priority level for the note. • View to view the selected note.
Menu functions Press Menu and select Calendar. Scroll to the day you want. If there are any notes set for the day, the corresponding note type indicator is shown. If you want to see the day’s notes, press Options and select Day notes. The note indicator is shown on the first line. You can view a single note by scrolling to it in day view, then pressing Options and View. The week view shows four weeks at a time.
Memo - Key in the note and press OK. When a tone alert is set, the indicator is displayed when you view the notes. When the phone alarms for a note The phone beeps, and displays the note. With a call note on the display, you can call the displayed number by pressing . To stop the alarm and view the note, press View. To stop the alarm without viewing the note, press Exit. ■ Infrared (Menu 9) You can set up the phone to receive data through its infrared (IR) port.
Menu functions Sending and receiving data via IR • Ensure that the IR ports of the sending and receiving devices are pointing at each other and that there are no obstructions between the devices. The preferable distance between the two devices in an infrared connection is one metre at most. • To activate the IR port of your phone to receive data via IR, press Menu and select Infrared. • The user of the sending phone selects the desired IR function to start data transfer.
• Frequency of the radio channel. 2. If you have radio channels already saved, you can scroll to the channel you would like to listen to, or select a radio channel location 1 to 9 by pressing the corresponding number key. 3. When the radio is on, press Options and select Switch off to turn off the radio. Tip: To quickly turn off the radio, press and hold . Tuning a radio channel When the radio is on, press and hold or to start the channel search. Searching stops when a channel is found.
Menu functions Using the radio When the radio is on, press Options and select • Switch off to turn off the radio. • Save channel to save the radio channel you have found, refer to Tuning a radio channel above. Up to 20 radio channels can be saved. • Auto tuning. Press either of the scroll keys briefly to start the channel search upwards or downwards. The search stops when a channel is found, press OK. To save the channel, see Save channel above. • Set frequency.
Note: The phone must be switched on to use each of the functions in this menu. Do not switch the phone on when wireless phone use is prohibited or when it may cause interference or danger. Recorder You can record pieces of speech, sound or an active call for three minutes. For example, this is useful when recording a name and phone number for writing them down later. Note: Obey all local laws governing recording of calls. Do not use this feature illegally. Recording 1.
Menu functions If you do not want to save the recording, press Clear to erase the preset name. Then press Back and OK. If you record an active call, the phone automatically saves the recording by the name Recording. List of recordings Press Menu, select Extras and Recorder. Select Recording list, scroll to the recording you want and press Options. • Select Playback to listen to the selected recording. • Select Edit title. Key in a new name for the recording and press OK.
If you want to reset the content of the wallet and the wallet code, key in *#3925538# in idle mode. You need to enter the phones security code before the contents and the wallet code are erased. Note that all the wallet contents will be erased. Press Menu, select Extras, and Wallet.
Menu functions • Rename card to rename the selected card Personal notes In personal notes you can store (max 30) sensitive personal notes, for example, passcodes or notations. Press Menu, select Extras, Wallet and Personal notes. By pressing Options you can view notes, add new notes, edit a selected note and sort notes either by name or by date. Send as text copies the content of the note to a text message. Copy to calend. copies the title and the note to the calendar as a reminder.
Press Menu, select Extras and Voice comms.. Select the command folder you want, scroll to the command to which you want to add a voice tag and press Options. If the command already has a voice tag, the indicator is shown. You can add a voice command in the same way as described in Adding a voice tag on page 42. See also Replaying, changing or erasing a voice tag page 43. You can activate the voice command in the same way as making a call by using a voice tag, see page 42.
Menu functions To stop the countdown timer or to change the countdown time: Press Menu, select Extras and Countdown timer. Select Change time to set the timer again, or Stop timer to stop the timer. Stopwatch You can measure time, take intermediate times or lap times by using the stopwatch. During timing, the other functions of the phone can be used. Using the stopwatch consumes the battery and the phone’s operating time will be reduced.
Viewing and erasing times Press Menu, select Extras, and Stopwatch. If the stopwatch is not reset, you can select Show last to view the latest measured time. Select View times. and a list of names or final times of the time sets is shown, select the time set you want to view. To delete the saved times, press Options and select Erase times. Select All at once and press OK, or select One by one and scroll to the times you want to delete. Press Erase and press OK.
Menu functions 2. Make a connection to the given WAP service. See Making a connection to a WAP service on page 85. 3. Start browsing the pages of the WAP service. See Browsing the pages of a WAP service on page 86. 4. Once you are done with browsing, end the connection to the WAP service. See Ending a WAP connection on page 88.
2. Select Active service settings. You need to activate the set where you want to save the service settings. A set is a collection of settings needed for making a connection to a WAP service. 3. Scroll to the set you would like to activate and press Activate. 4. Select Edit active service settings. 5. Select each of the service settings one by one and key in all the required settings. • Settings name - Key in the new name for the settings set and press OK.
Menu functions • IP address - Key in the address, press for a period, and press OK. You obtain the IP address from your network operator or service provider. • Authentication type - Select Secure or Normal. • Data call type - Select Analogue or ISDN. • Data call speed - Select the speed you want to use, or select Automatic. Automatic is available only if the current selected data call type is Analogue. The actual data call speed depends on the service provider. • Login type - Select Manual or Automatic.
• Login type - Select Manual or Automatic. If you select Manual when the GPRS connection is set to Always online, the Always online connection will be disabled. • User name - Key in the user name and press OK. • Password - Key in the password and press OK. Making a connection to a WAP service Firstly, make sure that the service settings of the WAP service you want to use are activated. To activate the settings: • Press Menu, select Services and Settings.
Menu functions If the bookmark does not work with the current active service settings, activate another set of service settings and try again. OR • Key in the address of the WAP service: Press Menu, select Services and then Go to address. Key in the address of the WAP service, press for special characters, and press OK. Note that it is not necessary to add the prefix http:// in front of the address since it will be added automatically.
Bookmarks - the list of bookmarks is displayed. For details, see Bookmarks on page 89. Edit / Open row / Open link / Open list - to key in text or select a highlighted item on the WAP page. Add bookmark - to add the current WAP page as a bookmark in your bookmarks list. Go to address - to key in the address of the WAP service you want. Service inbox - the list of service messages is displayed, see Service inbox on page 90. Appear. sett. - for details, see Appearance settings of the WAP browser on page 88.
Menu functions WAP direct calling The WAP browser supports functions which you can access while browsing. You can • make a voice call while you are on a WAP page. • send DTMF tones while a voice call is in progress. • save in the phone book a name and a phone number from a WAP page. Ending a WAP connection When you are using a WAP service, press Options and select Quit. When Quit browsing? is shown, press Yes. Alternatively, press . If GSM data is the selected data bearer, press twice.
You can set the phone to allow or prevent the receiving of cookies. A cookie is data that a WAP site saves in your phone’s browser cache memory. The data can be, for example, your user information or your browsing preferences. Cookies will be saved until you clear the cache memory, see The cache memory on page 91. 1. When no WAP connection is in progress • Press Menu, select Services, Settings and Download settings. When a WAP connection is in progress • Press Options and select Download settings. 2.
Menu functions 3. Select one of the following options: Go to to make a connection to the WAP page associated with the bookmark. Edit or Erase to modify or delete the selected bookmark. Send to send the selected bookmark to another phone via SMS, Via SMS. New bookmk. to create a new bookmark without connection to a WAP service. Key in the address and the title of the WAP page and press OK. Note that your phone may have some pre-installed bookmarks for sites not affiliated with Nokia.
Press Options and select Service inbox. 2. Scroll to the message you want and press Options. Select Download to activate the WML browser and download the indicated content. Select Details to display detailed information on the service notification. Select Erase to delete the selected service notification. To set the phone to receive service messages Press Menu, select Services, Settings, Service inbox settings, and Service messages. To set the phone to receive service messages, select On.
Menu functions Security indicator If the security indicator is displayed during a WAP connection, the data transmission between the phone and the WAP gateway or WAP server (identified by the IP address in the Edit active service settings) is encrypted. However, the security indicator does not indicate that the data transmission between the gateway and the content server (the location where the requested resource is stored) is secure.
Note: The text may not fit within a single screen. Therefore, make sure to scroll through and read all of the text before signing. Select the user certificate you want to use. Key in the signing PIN and press OK. Since the PIN code will not be sent outside the phone, it will remain secret. The phone displays a confirmation Code accepted. If you entered a wrong PIN, an error note Code error is displayed, and the phone asks you to key in the PIN code again.
Menu functions You can download the certificate from a WAP page, if the WAP service supports the use of authority certificates. After the download, you can view the certificate and then save or delete it. If you save the certificate, it is added to the certificate list in the phone. Authority certificates may also be available in the security module. • User certificates User certificates are issued to users by a Certifying Authority.
In addition to the functions available on the phone, your SIM card may provide additional services that you can access in menu 13. Menu 13 is shown only if it is supported by your SIM card. The name and contents of the menu depend entirely on the service available. Note: For availability, rates and information on using SIM services, contact your SIM card vendor, e.g. network operator, service provider or other vendor.
Data and fax communication 8. Data and fax communication You can transfer data to other compatible devices when your Nokia 6510 phone is connected to a compatible PC via an IR connection. To send and receive e-mail and faxes, and to connect to computers and access the Internet, you also need the appropriate data and fax communications software installed on your computer. You can use the Nokia 6510 with a variety of commercially available data and fax communications applications.
Modem setup Modem setup installs the following components on your PC: • N6510 data and fax modem adapters which enable you to use your phone as a modem in data and fax calls. • Nokia Modem Options software to set options for the data calls you make. Here you find the settings for HSCSD and GPRS. GPRS - General Packet Radio Service See also GPRS modem settings on page 64.
Data and fax communication Using data communication applications • Activate the IR connection of your phone by selecting Menu 9. • If you are using the IR connection, make sure that the infrared port of the phone faces the infrared port of the PC. • Start using the data communications application on the PC. For information on the use of the application, refer to the documentation for the application.
■ Charging and Discharging Your phone is powered by a rechargeable battery. Note that a new battery’s full performance is achieved only after two or three complete charge and discharge cycles! The battery can be charged and discharged hundreds of times but it will eventually wear out. When the operating time (talk-time and standby time) is noticeably shorter than normal, it is time to buy a new battery.
CARE AND MAINTENANCE CARE AND MAINTENANCE Your phone is a product of superior design and craftsmanship and should be treated with care. The suggestions below will help you to fulfil any warranty obligations and to enjoy this product for many years. • Keep the phone and all its parts and accessories out of the reach of small children. • Keep the phone dry. Precipitation, humidity and all types of liquids or moisture can contain minerals that will corrode electronic circuits.
Do not use a hand-held telephone while driving a vehicle. Always secure the phone in its holder; do not place the phone on the passenger seat or where it can break loose in a collision or sudden stop. Remember road safety always comes first! ■ Operating environment Remember to follow any special regulations in force in any area and always switch off your phone whenever it is forbidden to use it, or when it may cause interference or danger. Use the phone only in its normal operating positions.
IMPORTANT SAFETY INFORMATION • Should always keep the phone more than 20 cm from their pacemaker when the phone is switched on; • Should not carry the phone in a breast pocket; • Should use the ear opposite the pacemaker to minimise the potential for interference. • If you have any reason to suspect that interference is taking place, switch off your phone immediately. Hearing aids Some digital wireless phones may interfere with some hearing aids.
Users are advised to switch off the phone when at a refuelling point (service station). Users are reminded of the need to observe restrictions on the use of radio equipment in fuel depots (fuel storage and distribution areas), chemical plants or where blasting operations are in progress. Areas with a potentially explosive atmosphere are often but not always clearly marked.
IMPORTANT SAFETY INFORMATION ■ Emergency calls Important: This phone, like any wireless phone, operates using radio signals, wireless and landline networks as well as user-programmed functions. Because of this, connections in all conditions can not be guaranteed. Therefore, you should never rely solely upon any wireless phone for essential communications (e.g. medical emergencies).
Your mobile phone is a radio transmitter and receiver. It is designed and manufactured not to exceed the limits for exposure to radiofrequency (RF) energy recommended by The Council of the European Union. These limits are part of comprehensive guidelines and establish permitted levels of RF energy for the general population. The guidelines were developed by independent scientific organisations through periodic and thorough evaluation of scientific studies.
LIMITED MANUFACTURER’S WARRANTY PART OF EUROPE & AFRICA REGION This limited warranty shall apply in part of Nokia Mobile Phones’ Europe & Africa Region unless a local warranty exists. Nokia Mobile Phones Ltd ("Nokia") warrants that this NOKIA product ("Product") is at the time of its original purchase free of defects in materials, design and workmanship subject to the following terms and conditions: 1. This limited warranty is given to the end-purchaser of the Product ("Customer").
■ WARRANTY CARD FILL IN WITH BLOCK LETTERS Purchaser’s Name: __________________________________________________ Address: __________________________________________________ __________________________________________________ Country: __________________________________________________ Phone: __________________________________________________ Date of Purchase (dd/mm/yy): |__|__| /|__|__| /|__|__| Product Type (on phone type label under battery): |__|__|__| − |__|__|__| Product Model (on phone type label under b