Color Monitor User Guide Guide de l’utilisateur Bedienungsanleitung (International Spanish) (Italian) (Brazilian Portuguese) (Swedish) (Russian) (Polish) (Arabic) With Plug & Play✘ 19" (18" Viewable Diagonal)
Contents E N G L I S H For Your Records ..................................................................2 Getting Started Package Contents .................................................................3 Precautions ...........................................................................3 Quick Installation ...................................................................4 Using the Monitor Setting the Timing Mode .......................................................
Macintosh and Power Macintosh are registered trademarks of Apple Computer, Inc. Nokia is a registered trademark of Nokia Corporation. E N G L I S H Microsoft, Windows, Windows NT, and the Windows logo are registered trademarks of Microsoft Corporation in the United States and other countries. OnView, ViewMatch, and ViewMeter are registered trademarks of ViewSonic Corporation. VESA is a registered trademark of the Video Electronics Standards Association. DPMS and DDC are trademarks of VESA.
Getting Started E N G L I S H Congratulations on your purchase of a Nokia 930C color monitor. Important! Save the original box and all packing material for future shipping needs. NOTE: The word “Windows” in this user guide refers to the following Microsoft operating systems: Windows ‘95, Windows ‘98, Windows 2000, Windows NT. NOTE: This product was designed for operation in the magnetic fields of the hemisphere where it was purchased.
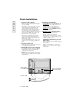
Quick Installation E N G L I S H 1 Connect video cable(s) Make sure both the monitor and computer are powered OFF. The monitor can be connected to one or two computers using either the DB-15 video cable (included) or a BNC video cable (purchased separately). To toggle between two computers: connect the DB-15 video cable to the monitor and first computer, and then connect the BNC video cable to the monitor and the second computer. Macintosh users: Models older than G3 require a Macintosh adapter.
Using the Monitor Setting the Timing Mode Setting the timing mode is important for maximizing the quality of the screen image and minimizing eye strain. The timing mode consists of the resolution (example 1280 x 1024) and refresh rate (or vertical frequency; example 75 Hz). After setting the timing mode, use the on-screen controls to adjust the screen image. The recommended timing modes for this monitor are: VESA 1280 x 1024 @ 85 Hz.
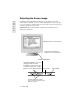
Adjusting the Screen Image E N G L I S H Beginning with the Main Menu shown below, use the buttons on the front control panel to adjust the on-screen controls which display on the screen. The on-screen controls are explained in the four steps at the top of the next page and are further explained on pages 8-10. IMPORTANT: The monitor should be warmed up for 30 minutes prior to making any adjustments.
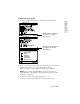
To adjust the screen image: 1 To display the Main Menu (parts 1-3 shown below), press button [A]. E N G L I S H Main Menu [1] Main Menu [2] Main Menu [3] + With Main Menu [1] displayed press button B to display Main Menu [2]. With Main Menu [2] displayed press button B to display Main Menu [3].
Main Menu Controls The menu items shown below can be adjusted by using the buttons (+ or –) on the front of your monitor. E N G L I S H Control Explanation Contrast adjusts the difference between the image background (black level) and the foreground (white level). Shortcut: Before displaying the Main Menu, press + or – to display the Contrast/Brightness control screen. Brightness adjusts the background black level of the screen image. Horizontal Size adjusts the width of the screen image.
Control Explanation (Continued) ViewMeter® displays information about the video signal E N G L I S H coming from your computer’s graphics card. This includes the refresh rate (or Vertical Frequency) and the scan rate (or Horizontal Frequency). H. Convergence (Horizontal Convergence) adjusts vertical color alignment. Use this control when red or blue borders are present around the vertical segments of black letters on a white background. V.
Control Explanation (Continued) Purity adjusts the uneven color of the overall image. For example, if one area of a color appears darker than another area, first use the degauss feature. If color is still uneven, use the purity control. E N G L I S H Top Left adjusts uneven color at top left corner of screen. Top Right adjusts uneven color at top right corner of screen. Bottom Left adjusts uneven color at bottom left corner of screen. Bottom Right adjusts uneven color at bottom right corner of screen.
Other Information Specifications CRT Type Phosphor Glass surface 19” (18.0” viewable diagonal area), 0.25 mm ~ 0.27 mm variable aperture grill pitch, 90o deflection RGB, medium-short persistence Anti-reflection, anti-static coating Standard light transmission rate = 40% Input Signal Video Sync RGB Analog (0.
Troubleshooting E N G L I S H No power • Make sure power button (or switch) is ON. • Make sure A/C power cord is securely connected to the back of the monitor and to a power outlet. • Plug another electrical device (like a radio) into the power outlet to verify that the outlet is supplying proper voltage. Power on but no screen image • Make sure the video cable supplied with the monitor is tightly secured to the video output port on the back of the computer.
Customer Support For the most expedient answer to your question, do the following: 1 2 3 Check Troubleshooting (on the previous page). For assistance contact your reseller. For further assistance see the contact information listed below. Ask your reseller to refer you to a service center if contact information for your country or region is not listed below: NOTE: You need to provide the serial number (on the back of the product).
Cleaning the Monitor E N G L I S H • MAKE SURE THE MONITOR IS TURNED OFF. • NEVER SPRAY OR POUR ANY LIQUID DIRECTLY ONTO THE SCREEN OR CASE. To clean the screen: 1 2 Wipe the screen with a clean, soft, lint-free cloth. This removes dust and other particles. If still not clean, apply a small amount of non-ammonia, non-alcohol based glass cleaner onto a clean, soft, lint-free cloth, and wipe the screen. To clean the case: 1 2 Use a soft, dry cloth.
Appendix Safety Guidelines CAUTION: The socket-outlet shall be installed near the equipment and shall be easily accessible. CAUTION: Use a power cable that is properly grounded. Always use the appropriate AC cord that is certified for the individual country. Some examples are listed below: USA................. UL Canada............. CSA Germany .......... VDE Switzerland ..... SEV Britain ............. BASE/BS Japan ...............
Compliance Information E N G L I S H This equipment has been tested and found to comply with the limits for a Class B digital device, pursuant to part 15 of the FCC Rules. These limits are designed to provide reasonable protection against harmful interference in a residential installation. This equipment generates, uses, and can radiate radio frequency energy, and if not installed and used in accordance with the instructions, may cause harmful interference to radio communications.