Owner’s Manual MEDIAMASTER 9200 S 9600 S GB 1
Important Information Wiring the plug (UK and Eire only) The mains lead on this product is already fitted with a non-rewireable (moulded) plug incorporating a fuse, the value of which is indicated on the pin face of the plug. Should the fuse need to be replaced, an ASTA or BSI approved BS 1362 fuse must be used of the same rating, marked thus: If the fuse cover is detachable always refit the cover after replacing the fuse. NEVER use the plug with the fuse cover omitted.
Mediamaster 9200 S and 9600 S The sky is the limit with your Mediamaster. It‘s easy to use, always at your command and adaptable for future advances. To begin with, you will find it necessary to read these instructions but you will soon find yourself competent without them. Contents For your safety Rear panel, Front panel Installation of the Mediamaster Connecting the Mediamaster to different units Preparing the remote control Switching on for the first time Before you continue .....
Rear panel Mains lead 230 V AC +/- 15%, 50 Hz 0/12 VOLT for an external LNB switch TV SCART for the audio / video input of the TV set AUDIO L R Stereo outputs for connection to a HiFi system SAT SCART for an analogue receiver LNB * Satellite dish input (Fconnector) VCR SCART for a video recorder RS232 for a printer, PC or a high speed modem SCSI For a CD-ROM player or other high-speed data equipment * LNB cables also feed the LNB with a supply voltage of 13/18 V (V/H polarisation) and a 0/22 kHz si
Installation The box for your Mediamaster should contain the following items: • the Mediamaster 1 4 • a remote control handset with batteries. 7 TV 2 5 8 3 6 9 0 GUIDE MENU EXIT • a fully featured SCART cable which can be used to connect your Mediamaster to the TV or video recorder. OK TEXT • Owner’s Manual. SCART cable About the SCART sockets • On the back side the Mediamaster is equipped with 3 SCART sockets (see figure).
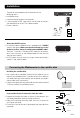
Connecting the Mediamaster to a TV set • Do not remove the cable from the TV to the TV aerial. TV • Connect one end of the SCART cable to the TV SCART socket on the back of the Mediamaster and the other end to the SCART input socket on your TV. SCART Connecting to a TV and a video recorder Refer to your video recorder manual for full instructions. • Connect one SCART cable between the TV and the TV SCART socket on the Mediamaster.
Connecting to an analogue satellite receiver and a video recorder • Connect one SCART cable between the TV set and the TV SCART socket on the Mediamaster. • Connect one SCART cable between the TV SCART socket on the analogue satellite receiver and the SAT SCART socket on the Mediamaster. With Video recorder NOKIA Smart priority switch B A VCR • Connect one SCART cable between the video recorder and the VCR SCART socket on the Mediamaster.
CA module and Smart Card. Model 9600 S only CA modules and Smart Cards are licenced to Service Providers. If you want to watch TV programmes from a Service Provider you must use a CA module (Conditional Access) with a Smart Card. Please note, that the CA module and the Smart Card may give special menus not described in this Manual. If no CA module is used you can only watch ”free to air” TV programmes.
Remote control This section describes how to operate the Mediamaster using the buttons on the remote control. You can also change programmes by pressing buttons on the Mediamaster‘s front panel. To turn the Mediamaster on/off (standby). Press once to switch to audio language/audio track (if available). Press twice to switch to Radio mode. TV To leave a menu and go back to watch a TV programme. To switch from Radio Mode to TV Mode.
About the Smart Card and CA Module. Model 9600 S only To be able to receive pay-TV channels you will need a CA Module and a Smart Card from the Service Provider of your choice. The Service Provider is the distributor of the programmes. If you are subscribing to services from more than one Service Provider, you might have to change between different Smart Cards, or even between different CA Modules.
Basic Settings The Welcome Menu To install the Mediamaster properly you have to adjust a few settings. You will always be guided by the information at the bottom of the menus. When you have finished the final part of the setup procedure you can start watching TV channels and listen to Radio channels. By now you should have the “Welcome Menu” on the TV screen. Press the OK button to proceed. Language selection Select the desired language. This will define the language shown in the menus.
Dish adjustment ASTRA, HOTBIRD, THOR and SIRIUS all have one (1) preprogrammed channel each. If the dish is already correctly adjusted and your selection on line “LNB frequency” is also correctly set, you should now see a programme (from the satellite you just selected) in the background. If not, or if the picture/sound is not satisfactory, you will have to adjust the dish to improve the reception quality. Check the signal strength meter at the lower part of this menu.
IMPORTANT! If you have a combination which consists of more than 1 LNB and/or more than one dish, you must connect the LNB:s to an external switch. Once installed and configured, the switch automatically performs the choice of correct LNB to the desired programme channel. This external switch is better known as a DiSEqCTM switch (Level 1 or 2 type). The DiSEqC switch can be located close to the LNBs, which then means you only need one cable down to the Mediamaster.
Antenna Configuration Set-Up If you have another antenna (dish) combination you can configure it with this menu, which appears when you make a selection from the “Antenna Configuration” menu, line “Multiantenna / LNB:s for multiple Satellite positions”. (You can also recall this menu at a later occasion. From the Main Menu; select “Installation” and then “Antenna Configuration”). Antenna alternative: Select an Antenna alternative from 1 to 8.
Channel Search set-up The information to enter in this menu is available in various magazines covering satellite TV reception, or from your Service Provider. You must also use it e. g. if you later want to add channels from a new transponder. Antenna Configuration: Select the option, 1 - 8, that corresponds to your antenna system. Transponder Frequency: Enter using the number buttons on the remote control. Polarization: Select polarization; “Horizontal” or “Vertical”.
Viewing TV Important general information The following will describe the basic functions of your Mediamaster during the watching of TV or listening to Radio channels from the Mediamaster. Sometimes the information may not be displayed as illustrated. Many of the functions described here are dependent on the Service Provider and/or can only be used if they are included in the transmitted programme information.
From here you can also obtain information about other channels. Select with the up/down buttons. If you stop on another channel number and press OK, you will exit the menu and return to TV mode, but now on the new channel. If you select “Next” on a programme line and press OK, you will set a “Reminder” . This means that, while watching TV, you will be reminded when the “Reminder marked” programme starts.
Volume level Increase or decrease the sound level by pressing the “+” and “-” buttons. A control bar will be displayed on the screen during level adjustment. (The max. level for volume is the current volume setting on the TV set). Please note, that the volume adjustments also change the volume level to your VCR during recording. button. It is possible to turn the sound on and off with the Sound off is indicated with the same symbol on the screen.
Video recorder With a Video Cassette Recorder (VCR) connected you can watch/ record video tapes. If your VCR is connected with a SCART cable and you press the Start button on the VCR, the playback will start and interrupt the TV programme from the Mediamaster. To watch TV programmes again , press the TV button or stop the VCR.
Settings from the Main Menu How to show the Main Menu Press the MENU button and you will get the Main Menu on the TV screen. Press the TV or EXIT button to leave the menu. Submenus from the Main Menu If you select one of the highlighted titles and press the OK button, a submenu will be shown on the TV screen. From a submenu you can adjust settings to your own requirements. The TV Guide and Radio Guide These guides will give you an overview of programme information from the TV/Radio channels.
CD From the CD menu you can control an external CD player connected to the SCSI socket. To use present and future CD-ROM applications, the player must have the following features: a) SCSI-2 connection b) support one of the following standards: CD-XA / CD-ROM / Video-CD / Photo CD Parental Control By pressing OK on the line “Parental Control” you will be requested to enter your PIN code. (Personal Identification Code). This code is set to 1234 by the factory.
Installation Submenus Installation Select this Menu from the line “Installation” in the Main Menu. The submenu will give you the opportunity to change the preferences performed during first time installation. You can also add features that were not included from the first time installation. Please note that helpful information for every line is given at the end of the menu. Antenna Configuration and Channel Search The “Antenna Configuration” line will bring you to the “Antenna Configuration Set-up” menu.
Edit TV and Radio Channels From these menus you can change the order of the TV and Radio channels to your needs by simply selecting and moving a channel to a new position. You may also delete unwanted channels. Follow the instructions in the menu. Language Settings From here you can change the language for the menus, main audio language and alternative audio language. Just follow the instructions given at the bottom of the menu.
Receiver upgrade (9600 S only) If your Service Provider has a new software version available for the Mediamaster, you can enter this menu and obtain information. You can select “Yes” if you want to download it now, or “No” if you prefer to do it at a later time. If no software is available, you will get the message “No new software available”. During downloading periods you are prevented from turning the Mediamaster on, or from changing any settings.
Glossary of terms Access Authorisation to use the coding system to purshase/order TV programmes. AGC Automatic Gain Control Audio system With digital satellite reception, the sound is transmitted in packages and is selected either in a special audio mode or pre-selected by using installation set-up. This gives the opportunity to select between several different languages to a movie. Amount of choices is dependent on what is available in the signal.
Problem solvings Problem Possible causes What to do The display on the front panel does not light up/is not lit Mains cable is not connected Check that the mains cable is plugged in to the power socket No sound or picture The satellite dish is not pointing at the satellite Adjust the dish.
Technical Specifications Transmission Standards DVB, MPEG 2 LNB / Tuner input Connector RF input frequency RF input power level Supply voltage Max.
9200 S 9600 S 66 76916-14 GB 28 Nokia is a registered trademark of Nokia Corporation © 9847