Bruksanvisning Owner’s Manual MEDIAMASTER 9820 T S1
MEDIAMASTER 9820 T Contents GENERAL OPERATION OF THE MEDIAMASTER FOR YOUR SAFETY REMOTE CONTROL Rear Panel Front Panel ABOUT THE SMARTCARD Subscription TV Services with a Smartcard (Viaccess) INSTALLATION OF THE MEDIAMASTER Preparing the Remote Control Connecting to the TV aerial Connecting the Mediamaster Connecting the Mediamaster to the TV Connecting a TV and VCR Connecting an Analogue Satellite Receiver and VCR Connecting a HiFi system Connecting to the telephone wall socket Tuning Procedure when RF Con
GENERAL OPERATION OF THE MEDIAMASTER Throughout this manual you will notice that the everyday operation of your Mediamaster is based on a series of user friendly onscreen displays and menus. These menus will help you get the most from your Mediamaster, guiding you through installation, channel selection, viewing and many other functions. All functions can be carried out using the buttons on the remote control, and some of the functions can also be carried out using the buttons on the front panel.
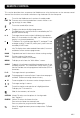
REMOTE CONTROL This section describes how to operate the Mediamaster using the buttons on the remote control. Some of the functions can also be carried out using the buttons on the front panel. To switch the Mediamaster in and out of standby mode. EXIT TV To return to the viewing mode from a menu without s t o r ing settings (in menu mode). To turn the sound off/on (mute). - + To adjust the volume of digital programmes. The Mediamaster’s maximum level is controlled by the TV’s present volume setting.
Rear Panel Mains lead 230 V AC ± 15% 50-60 Hz 230 V ±15% 50 Hz DIGITAL AUDIO phono connector S/PDIF output for connection to a HiFi system AUX SCART for connection to a VCR, or an analogue satellite receiver TELEPHONE for modem connection to the telephone wall socket TV/VCR for an RFcable to the aerial input of the TV or VCR TELEPHONE DIGITAL AUDIO TV / VCR AUX L TV TV AERIAL SERIAL AUDIO WARNING ! DO NOT OPEN – ELECTRICAL SHOCK HAZARD R 44 10285 AUDIO L R phono connectors Stereo outputs for
ABOUT THE SMARTCARD AND CA MODULE To be able to receive terrestrial scrambled digital channels you will need a Smartcard from the Service Provider, ”Senda”. Senda is the the programme distributor. Please note that a Smartcard may only be valid for a single Service Provider and due to this, a specific range of channels. The Smartcard and the CA module may also provide access to special menus not described in this manual. If so, please follow the instructions from the Service Provider.
INSTALLATION OF THE MEDIAMASTER The box for your Mediamaster should contain the following items: • the Mediamaster • a remote control with 2 AAA batteries • a SCART lead (fully featured 1,0 metre) • an aerial/RF lead (double screened 1,5 metres) SCART lead RF lead Owner’s manual License agrement • a telephone modem cable (10 metres with a splitter) Telephone modem cable • an Owner’s Manual • a Software License agreement About the SCART sockets • The rear panel of the Mediamaster is equipped with 2 S
• Certain outdoor antennas are pointed at an analogue slave transmitter. The roof antenna should be pointed at a digital TV transmitter. • It is not always advisable to position the antenna as high as possible. If problems arise, experiment with different antenna heights. The same applies to analogue transmissions. 2. Indoor or window-mounted antenna This type of antenna may be enough if the reception conditions are very good.
Connecting the Mediamaster There are many different types of TV/VCR and other equipment that you can connect to the Mediamaster. In this manual you will see some of the most common ways to connect your equipment. If you use RF leads you will have to tune your TV and VCR to the Mediamaster output channel (see page 12). If you have problems with your connections and need help, contact your dealer or Service Provider.
Connecting an Analogue Satellite Receiver and VCR • Connect a SCART lead between the main SCART socket on the TV and the TV SCART socket on the Mediamaster. • Connect a SCART lead between the TV SCART socket on the satellite receiver and the AUX SCART socket on the Mediamaster. • Connect a SCART lead between the VCR and the 2:nd SCART socket on the TV (if available). Aerial 2 1 • Connect an RF lead from the RF output on the VCR to the TV aerial input on the TV.
Tuning Procedure when RF Connections are Used This procedure is necessary only if your Mediamaster is connected to the TV with an RF lead and no SCART leads are used To tune your TV to the RF signal you might also need your TV manual in addition to this manual. The steps below explain what to do if you have been unable to use SCART leads in your connection. • Plug in your Mediamaster. Tuning your TV to the Mediamaster • Select a channel number on the TV that is not currently used for other TV channels.
FIRST TIME INSTALLATION General Information Once you have correctly connected the Mediamaster, you also have to perform a “First Time Installation.” During this procedure, helpful information is displayed at the bottom of the menus. Please note! The OK button always confirms a selection within these menus, and pressing it will take you to the next step in the installation process. However, and this is important, often more than one value has to be entered in a menu.
FIRST TIME INSTALLATION Channel Search The Channel Search procedure can be performed in two different ways. • “Automatic Search” or “Manual Search.” Automatic Search • Start the Automatic Search on the digital terrestrial network by pressing OK. Manual Search When you perform a Manual Search you first need to enter some parameters for the channel search to work. The information you need to enter in this menu is available from your Service Provider.
VIEWING MODE General Information The following describes the basic functions of your Mediamaster while watching terrestrial digital TV . Some of the functions described here are dependent on the Service Provider and can only be used if they are included in the transmitted programme information. Please note, that during the Channel Search procedure, the Mediamaster may download a large number of channels. This may include channels also those to which you do not have access unless you have a Smartcard.
VIEWING MODE The “i” (Information) Button The Mediamaster has the ability to display information about programmes currently being broadcast as well as those being broadcast next. By pressing the “i” button while watching TV you will get a special Programme Information Banner. Select channel with or the numeric buttons. The “i” symbol is coloured blue when displaying information about the current channel, and red when information for another channel is shown.
VIEWING MODE List of TV Channels At the channel search procedure, a Channel lists named “Channels” containing all channels are created. Name of the Channel list Indicates a closed network In the “Channels” list scrambled channels are marked with a picture of a Smartcard (if this information is transmitted in the signal) and locked channels are marked with a padlock. If you have performed a new channel search the new channels found will be marked with a star in the “Channels” list.
VIEWING MODE Format If you have a TV set with a 4:3 picture format, and the transmission is in 16:9, you can select Fullscreen or Letterbox to change display format. Fullscreen will fill up the screen vertically, but cut off some information from the left and right sides of the picture. Letterbox will give a complete picture, but leave black areas at the top and bottom.
MAIN MENU General Information Many of the functions of the Mediamaster are available from the Main Menu. • Press MENU to open it. Channels Please refer to “List of TV channels” on page 17. Edit Channels From these menus you can create and edit channel lists. You can, among other things, create favourite lists; add, delete, rename and arrange the order of the channels within the lists. In the “All TV” list the channels are presented network by network. First the name ”Marknätet”(terrestrial network).
MAIN MENU Create list From here you can create your own favourite lists, containing the channels you watch most frequently. You can give each list a specific name, e.g. “Sport” or “Films.” When a favourite list is selected, you see only those channels defined in the list. When you have given the list a name; press OK and you will enter the “Select Channels” menu (see next page) from where you add channels to the list.
MAIN MENU Select Channels From this menu you add and remove the channels in your Favourite Lists. You use the “All TV” list as basis to select the channels from. A channel is added or removed by pressing the OK button. The square to the right on a line will be empty for removed channels, and will contain an “x” for added channels. • If you have a Favourite list that contains several satellites and networks, you can close the one(s) you are not going to work with.
MAIN MENU Rearrange Channels From here you can arrange the sequence for the channels within your favourite lists. • With , mark the channel you want to move to a new position within the list. • Press again and the right side of the marked channel will change to . • Move the channel to the desired position with OK. and press It is also possible to first mark several channels, and then move them all simultaneously. • For each channel, press the marked channels.
MAIN MENU Guide • Press GUIDE to get access to the receiver’s EPG. Refer to page 16. System Configuration You will be asked to enter your access code before you can open this menu. The code is preset to 1234 from the factory. (The code can be changed from the Parental Control menu. Refer to page 26.) If you want to customize the system to suit you better, you can specify some settings from the submenus in the “System Configuration” menu.
MAIN MENU TV Settings From here you can adjust settings concerning your TV. TV screen format Select your TV screen format. The 4:3 format is the standard format for most TV screens. Select 16:9 for a wide screen TV. TV signal If the teletext function does not work when watching channels from an analogue satellite receiver connected to the Mediamaster, change this setting from RGB to PAL. RF channel Select this alternative if you have to change the RF channel.
MAIN MENU Receiver Upgrade In order to keep the Mediamaster up-to-date, it will be possible to download new versions of the system software via satellite and from the Internet. New software may include new or improved features for existing menus. Enter this menu to check for new software. If new software is available you will get information in the menu on how to proceed.
MAIN MENU Parental Control To open this menu you will be asked to enter your access code. From the factory the access code is set to 1234. The following settings can be altered from this menu. Receiver lock If you select “On,” you will have to enter the access code every time you start the Mediamaster from stand-by. Age Rating Control If you want everybody to have access to all available types of programmes, select “Off.” If you select “On,” you may block programmes unsuitable for children.
MAIN MENU Picture format If you have a TV set with the 4:3 picture format and the transmission is in 16:9, you can select Fullscreen or Letterbox. Fullscreen will fill up the screen but cut off some information on the left and right sides. Letterbox will give a complete picture, but leave black areas at the top and bottom. ‘fullscreen format’ ‘letterbox format’ System Information If you have to contact your service provider or a service center, they might ask for information available from this menu.
MAIN MENU Conditional Access This menu will only be activated if you have inserted a valid Smartcard/CA module in the slot behind the front lid. If more than one CA system is activated, select the one from which you want information. The Viaccess Conditional Access (CA) System is embedded in the Mediamaster. A Smartcard that supports this standard can be used in the left slot on the front panel.
GLOSSARY OF TERMS Access OFDM Orthogonal Frequency Division Multiplexing. Authorisation to use the coding system to purchase / Modulation method used in digital terrestrial networks in order TV programmes. Europe. Audio system PCMCIA With digital satellite reception, the sound is transmitted Personal Computer Memory Card International Associain packages and is selected either in a special audio mode tion. The Common Interface slot follows this standard. or pre-selected by using the installation set-up.
PROBLEM SOLVING Problem Possible causes What to do The display on the front panel does not light up/is not lit. Mains cable is not connected. Check that the mains cable is plugged in to the power socket. No sound or picture, but the front panel shows the time or - - : - -. The Mediamaster is in standby mode. Press the standby button or any number button to bring the Mediamaster out of standby. Bad picture/blocking error. Signal to weak. Check if the aerial works for analouge reception.
PROBLEM SOLVING Problem Possible causes What to do You made a video recording of a The Mediamaster was not left on digital terrestrial channel and whole the appropriate channel. or parts of the programme was not recorded. The system is connected by SCART leads and the VCR is not in AV/EXT mode. The system is connected by RF leads and the VCR is not set to the channel tuned for digital terrestrial TV.
TECHNICAL SPECIFICATIONS Transmission Standards DVB, MPEG 2 RF input (OFDM)/Modulator output Loop through output Input/output connector IEC female / IEC male RF input frequency 470 to 862 MHz RF input power level -77 dBm RF impedance 75 Ω Frequency range Loop through 47 to 864MHz Frequency range Re-modulator 470 to 862 MHz Output channel UHF CH 21-69 Preset channel 43 Output signal PAL B/G TV SCART Video output Audio output RGB output 1 Vpp (± 1 dB) / 75 Ω 0,5 Vrms / RL >10 kΩ Internal RGB or from AUX SCAR
MENUS SCREEN STRUCTURE First time installation Welcome 1 2 3 . menu Language Svenska Suomi Norsk 1 2 . Channel Search Progress TV Channels SVT 1 TV 3 SVT 2 TV 8 TV 24 Kommande kanal TV 4 Kommande kanal Channel Search Automatic Search Manual Search Picture Main Menu User Preferences ¨ 1 2 3 Language Preferences Parental Control Appearance Preferences 1 2 3 ¨ Channels ¨ All TV Viaccess Embedded ¨ Marknätet Teracom Norrköping SVT 1 Delivery sys: SVT 2 Nerwork: TV 24 SVT Östnytt ....... ......
230 V ±15% 50 Hz TELEPHONE DIGITAL AUDIO TV / VCR AUX L WARNING! DO NOT OPEN – ELECTRICAL SHOCK HAZARD TV SERIAL TV AERIAL AUDIO R 44 10285 Nokia is a registered trademark of Nokia Corporation 66 76938-11 S2 www.nokia.