FC C D ra ft Nokia 3555 User Guide Model 3555c - 23 April 2007
Issue 1, Part No. XXXXXX Copyright © 2007 Nokia. All rights reserved. Reproduction, transfer, distribution or storage of part or all of the contents in this document in any form without the prior written permission of Nokia is prohibited. Nokia, Visual Radio, Nokia Connecting People, and NaviTM key are trademarks or registered trademarks of Nokia Corporation. Other product and company names mentioned herein may be trademarks or tradenames of their respective owners.
This device may contain commodities, technology or software subject to export laws and regulations from the US and other countries. Diversion contrary to law is prohibited. Export controls This device may contain commodities, technology or software subject to export laws and regulations from the US and other countries. Diversion contrary to law is prohibited.
Contents Contents For your safety....................................................................................................... 5 General information............................................................................................. 8 1. Get started ......................................................................................................... 9 2. Your device....................................................................................................... 16 ft 3.
For your safety For your safety Read these simple guidelines. Not following them may be dangerous or illegal. Read the complete user guide for further information. SWITCH ON SAFELY Do not switch the device on when wireless device use is prohibited or when it may cause interference or danger. ROAD SAFETY COMES FIRST ra INTERFERENCE ft Obey all local laws. Always keep your hands free to operate the vehicle while driving. Your first consideration while driving should be road safety.
For your safety WATER-RESISTANCE Your device is not water-resistant. Keep it dry. BACK-UP COPIES Remember to make back-up copies or keep a written record of all important information stored in your device. CONNECTING TO OTHER DEVICES When connecting to any other device, read its user guide for detailed safety instructions. Do not connect incompatible products. EMERGENCY CALLS ■ About your device ra ft Ensure the device is switched on and in service.
For your safety device may also have been specially configured for your network provider. This configuration may include changes in menu names, menu order and icons. Contact your service provider for more information. This device supports WAP 2.0 protocols (HTTP and SSL) that run on TCP/IP protocols.
General information General information ■ Overview of functions Your device provides many functions that are practical for daily use, such as text and multimedia messaging, calendar, clock, alarm clock, music player, and builtin camera. Your device also supports the following functions: • Active standby. See Active standby p. 18. ft • Plug and play online service to get the configuration settings. See Plug and play service p. 14 and Configuration settings service p. 8. • Audio messaging.
Get started Important: Use only services that you trust and that offer adequate security and protection against harmful software. ■ Nokia support Check www.nokia.com/support or your local Nokia website for the latest version of this guide, additional information, downloads, and services related to your Nokia product. ft On the website, you can get information on the use of Nokia products and services. If you need to contact customer service, check the list of local Nokia Care contact centers at www.
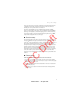
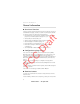
Get started Remove the battery as shown. D ra ft To open the SIM card holder, press slightly (1) and lift the holder (2). FC C Insert the SIM card properly into the holder. Close the SIM card holder.
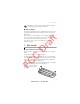
Get started Replace the battery. D ra ft Replace the back cover (1). FC C Slide the back cover into its place (2). ■ Insert a microSD card Keep all microSD memory cards out of the reach of small children. A microSD card can be loaded with ringing tones, themes, tones, images and videos. If you delete, reload, or replace this card, these functions and features may not function properly. Use only compatible microSD cards with this device.
Get started Use only microSD cards approved by Nokia for use with this device. Nokia utilizes the approved industry standards for memory cards but not all other brands may function correctly or be fully compatible with this device. Important: Do not remove a microSD card in the middle of an operation when the card is being accessed. Removing the card in the middle of an operation may damage the memory card as well as the device, and data stored on the card may be corrupted. ra D C 2.
Get started For availability of approved enhancements, please check with your dealer. When you disconnect the power cord of any enhancement, grasp and pull the plug, not the cord. 1. Connect the charger to a wall socket. ft 2. Connect the charger to your device. A CA-44 charging adapter can be used with older charger models. ra If the battery is completely discharged, it may take a few minutes before the charging indicator appears on the display or before any calls can be made.
Get started Set the time, time zone, and date Enter the local time, select the time zone of your location in terms of the time difference with respect to Greenwich Mean Time (GMT), and enter the date. See Time and date p. 43. Plug and play service Connect a headset ■ C D You can connect an HS-47 headset to your device. Connect the headset to the device as shown.
Get started Device strap ra ■ ft Note: As with any other radio transmitting device, do not touch the antenna unnecessarily when the device is switched on. Contact with the antenna affects call quality and may cause the device to operate at a higher power level than otherwise needed. Avoiding contact with the antenna area when operating the device optimizes the antenna performance and the battery life. FC C D Remove the back cover of the device. Insert a thread through the eyelet.
Your device 2.
Your device ■ Navigate the menus The device offers you an extensive range of functions, which are grouped into menus. 1. To access the menu, select Menu. To change the menu view, select Options > Main menu view > List or Grid. To rearrange the menu, scroll to the menu you want to move, and select Options > Organize > Move. Scroll to where you want to move the menu, and select OK. To save the change, select Done > Yes. ft 2. Scroll through the menu, and select an option (for example, Settings). ra 3.
Your device Main display 1 Network mode indicator 2 Signal strength of the cellular network 3 Battery charge status 4 Indicators 5 Network name or the operator logo ra 8 The left selection key is Go to or a shortcut to another function. See My shortcuts p. 43. ft 6 Clock 7 Main display 9 The middle selection key mode is Menu.
Your device , Your device is connected to the instant messaging service, and the availability status is online or offline. You received one or several instant messages. The keypad is locked. The device does not ring for an incoming call or text message. The alarm clock is activated. The stopwatch is running. ft The countdown timer is running. The device is registered to the GPRS or EGPRS network. , A GPRS or EGPRS connection is established. , The GPRS or EGPRS connection is suspended (on hold).
Your device To deactivate the flight mode, select any other profile. In the flight mode you can make an emergency call. Enter the emergency number, press the call key, and select Yes when asked Exit flight profile? The device attempts to make an emergency call. When the emergency call ends, the device automatically changes to the general profile mode. Keypad lock (keyguard) Select Menu or Unlock (1), and press * (2) within 1.5 seconds to lock or unlock the keypad.
Call functions PIN codes The personal identification number (PIN) code and the universal personal identification number (UPIN) code (4 to 8 digits) help to protect your SIM card against unauthorized use. See Security p. 50. The PIN2 code (4 to 8 digits) may be supplied with the SIM card and is required for some functions. The module PIN is required to access the information in the security module. See Security module p. 72. ft The signing PIN is required for the digital signature.
Call functions 3. To end the call or to cancel the call attempt, press the end key, or close the device. To search for a name or phone number that you have saved in Contacts, see Search for a contact p. 38. To access the list of dialed numbers, press the call key once in the standby mode. To call the number, select a number or name, and press the call key. 1-touch dialing • Press a speed-dialing key, then the call key. ft Assign a phone number to one of the 1-touch dialing keys, 2 to 9.
Write text To mute the ringing tone, press a volume key when the device is closed, or select Silence when the device is open. Call waiting To answer the waiting call during an active call, press the call key. The first call is put on hold. To end the active call, press the end key. To activate the Call waiting function, see Call p. 48. Options during a voice call ft ■ Many of the options that you can use during a call are network services. For availability, contact your service provider.
Write text , , or appears next to the text input indicator, indicating the character case. To change the character case, press #. indicates number mode. To change from the letter to number mode, press and hold #, and select Number mode. To set the writing language while writing text, select Options > Writing language. ■ Predictive text input ft To set predictive text input on, select Options > Prediction option > Prediction > On.
Messaging ■ Traditional text input To set traditional text input on, select Options > Prediction options >Prediction > Off. Press a number key, 1 to 9, repeatedly until the desired character appears. Not all characters available under a number key are printed on the key. The characters available depend on the selected writing language. If the next letter you want is located on the same key as the present one, wait until the cursor appears. 5.
Messaging Write and send a message 1. Select Menu > Messaging > Create message > Message. 2. Enter one or more phone numbers or e-mail addresses in the To: field. To retrieve a phone number or e-mail address from a memory, select Add. 3. Write your message in the Message: field. 4. To send the message, select Send. See Messaging p. 25. ft Read and reply to a message 1. To view a received message, select Show. To view it later, select Exit. ra To read the message later, select Menu > Messaging > Inbox.
Messaging Copyright protections may prevent some images, music (including ringing tones), and other content from being copied, modified, transferred or forwarded. Note: When the device is sending the message, the animated is shown. This is an indication that the message has been sent by your device to the message center number programmed into your device. This is not an indication that the message has been received at the intended destination.
Messaging A received flash message is indicated with Message: %U and a few words from the beginning of the message. To read the message, select Read. To extract numbers and addresses from the current message, select Options > Use detail. To save the message, select Save and the folder in which you want to save it. ■ Nokia Xpress audio messaging You can use the MMS to create and send an audio message. MMS must be activated before you can use audio messages. ft 1.
Messaging Options > Add folder. To delete or rename a folder, scroll to the desired folder, and select Options > Delete folder or Rename folder. Your device has templates. To create a new template, save a message as a template. To access the template list, select Menu > Messaging > Saved items > Templates. ■ E-mail application ft The e-mail application uses a packet data connection (network service) to allow you to access your e-mail account.
Messaging 1. Select Menu > Messaging > E-mail message. 2. If more than one e-mail account is defined, select the account from which you want to send the e-mail. 3. Enter the recipient’s e-mail address, write the subject, and enter the e-mail message. To attach a file from Gallery, select Options > Insert. 4. To send the e-mail message, select Send > Send now. To save the e-mail in the Outbox folder to be sent later, select Send > Send later.
Messaging 3. To send the message, select Send > Send now. E-mail folders Your device saves e-mail that you have downloaded from your e-mail account in the Inboxes folder. The Outboxes folder contains the following folders: “Account name” for incoming e-mail, Archive for archiving e-mail, Custom 1—Custom 3 for sorting e-mail, Junk where all spam e-mail is stored, Drafts for saving unfinished e-mail, Outbox for saving e-mail that has not been sent, and Sent items for saving e-mail that has been sent.
Messaging Login — to connect to the IM service. To set the device to automatically connect to the IM service when you switch on the device; in the login session, select Automatic login: > On, or select Menu > Messaging > Instant messages, connect to the IM service, and select Options > Settings > Automatic login > On. Saved convers. — to view, erase, or rename the conversations you saved during an IM session Connect. settings — to edit the settings needed for messaging and presence.
Messaging answer an invitation or to reply to a message expand the Conversations folder and scroll to the contact to whom you would like to chat and select Open. To add contacts, see Add IM contacts p. 34. Groups > Public groups (not visible if groups are not supported by the network) — the list of bookmarks to public groups provided by the service provider is displayed. To start a IM session with a group, scroll to a group, and select Join.
Messaging Add IM contacts When connected to the IM service, in the IM main menu select Options > Add contact > By mobile number, Enter ID manually, Search from serv., or Copy from server (depending on service provider). Scroll to a contact. To start a conversation, select Chat. Block or unblock messages ft When you are in a conversation and want to block messages, select Options > Block contact.
Messaging To call your voice mailbox, select Menu > Messaging > Voice messages > Listen to voice messages. To enter, search for, or edit your voice mailbox number, select Voice mailbox number. If supported by the network, indicates new voice messages. To call your voice mailbox number, select Listen. You can also receive messages on various topics from your service provider (network service). For more information, contact your service provider. Select Menu > Messaging > Info messages.
Messaging Text messages The text message settings affect the sending, receiving, and viewing of text and SMS e-mail messages. Select Menu > Messaging > Message settings > Text messages and from the following options: Delivery reports > Yes — to ask the network to send delivery reports about your messages (network service) ft Message centers > Add center — to set the phone number and name of the message center that is required for sending text messages. You receive this number from your service provider.
Messaging MMS creation mode - Allows you to select whether or not to create multimedia messages with restrictions on content. When selecting Restricted receiving device is more likely to support sent messages. Select Free enables you to add various types of multimedia to the message.
Contacts Incoming mail settings — to enter the number of mails to be retrieved in maximum Outgoing mail settings (SMTP) — to enter SMTP (simple mail transfer protocol) information and setting options used when sending e-mail Display terminal window > Yes — to perform manual user authentication for intranet connections ft 6. Contacts ra You can save names and phone numbers (contacts) in the device memory and in the SIM card memory.
Contacts To save details for a contact, search for the contact to which you want to add a detail, and select Details > Options > Add detail. Select from the options available. ■ Edit contacts Select Options > Edit, search for the contact, and select Details to edit a name, number, text item, or to change the image. Delete contacts ft ■ ra To delete all the contacts and the details attached to them from the device or SIM card memory, select Menu > Contacts > Delete all contacts > From phone mem.
Contacts To move or copy marked contacts, select Menu > Contacts > Names. Scroll to a contact, and select Options > Mark. Then mark all other contacts, and select Options > Move marked or Copy marked. To move or copy all contacts, select Menu > Contacts > Move contacts or Copy contacts. ■ Business cards You can send and receive a person’s contact information from a compatible device that supports the vCard standard as a business card.
Log ■ Info, service, and my numbers Select Menu > Contacts and from one of these options: Info numbers — to call the information numbers of your service provider if the numbers are included on your SIM card (network service) Service numbers — to call the service numbers of your service provider if the numbers are included on your SIM card (network service) ft My numbers — to view the phone numbers assigned to your SIM card, if the numbers are included on your SIM card ra 7.
Settings Select Menu > Settings > Profiles, the desired profile and from the following options: Activate, Customize, or Timed. ■ Themes A theme contains elements for personalizing your device. Select Menu > Settings > Themes and from the following options: Select theme orTheme downloads. Tones ft ■ You can change the tone settings of the selected active profile. ra Select Menu > Settings > Tones. You can find the same settings in the Profiles menu. See Customize in Profiles p. 41.
Settings Cell info display > On — to display the cell identity, if available from the network ■ Mini display Select Menu > Settings > Mini display. You can change the settings for Wallpaper, Screen saver, Fold animation, and other settings. ■ Time and date ft To change the time and date settings, select Menu > Settings > Date and time > Date and time settings, Date and time format settings, or Auto-update of date & time (network service).
Settings Add all or Remove all — to activate or deactivate voice commands to all functions in the voice commands list ■ Connectivity You can connect the device to a compatible device using a Bluetooth wireless technology or a USB data cable connection. You can also define the settings for EGPRS dial-up connections. ft Bluetooth wireless technology D ra This device is compliant with Bluetooth Specification 2.
Settings Search for audio enhancements — to search for compatible Bluetooth audio devices. Select the device that you want to connect to the device. Bluetooth wireless connection ft Paired devices — to search for any Bluetooth device in range. Select New to list any Bluetooth device in range. Select a device, and Pair. Enter an agreed Bluetooth passcode of the device (up to 16 characters) to associate (pair) the device to your phone.
Settings Modem settings You can connect the device using Bluetooth wireless technology or USB data cable connection to a compatible PC and use the device as a modem to enable GPRS connectivity from the PC. ft To define the settings for connections from your PC, select Menu > Settings > Connectivity > Packet data > Packet data settings > Active access point, and activate the access point you want to use.
Settings Data transfer with a compatible device For synchronization use Bluetooth wireless technology or a cable connection. The other device must be activated for receiving data. To start data transfer, select Menu > Settings > Connectivity > Data transfer and the transfer contact from the list, other than Server sync or PC sync. According to the settings, the selected data is copied or synchronized.
Settings Data storage — to connect to a PC that does not have Nokia software and use the device as a data storage To change the USB mode, select Menu > Settings > Connectivity > USB data cable > Nokia mode, Printing & Media, or Data storage. ■ Call Select Menu > Settings > Call and from the following options: ft Call forwarding — to forward your incoming calls (network service). You may not be able to forward your calls if some call restriction functions are active.
Settings language. See Enhanced voice dialing p. 22 and Voice commands in My shortcuts p. 43. Memory status — to view the amount of used and available device memory Automatic keyguard — to set the keypad of your device to lock automatically after a preset time delay when the device is in the standby mode and no function of the device has been used. Select On, and set the time. Security keyguard — to set the device to ask for the security code when you unlock the keyguard.
Settings If your device is provided with a hearing aid coil select Hearing aid > T-coil hearing aid mode > On to optimize the sound quality when using a t-coil hearing aid. is shown when the T-coil hearing aid mode is active. ■ Configuration You can configure your device with settings required for certain services to function correctly. Your service provider may also send you these settings. See Configuration settings service p. 8.
Settings PIN2 code request — to select whether the PIN2 code is required when using a specific device feature which is protected by the PIN2 code. Some SIM cards do not allow the code request to be turned off. Call restrictions — to restrict incoming calls to and outgoing calls from your device (network service). A restriction password is required. ft Fixed dialing — to restrict your outgoing calls to selected phone numbers if this function is supported by your SIM card.
Gallery Copyright protections may prevent some images, music (including ringing tones), and other content from being copied, modified, transferred or forwarded. This device supports OMA DRM 1.0 and 2.0. ■ Restore factory settings ft To reset some of the menu settings to their original values, select Menu > Settings > Restore settings. Enter the security code. The names and phone numbers saved in Contacts, are not deleted. ra 9.
Gallery Select the image you want to print and Options > Print. ■ Memory card Keep all memory cards out of the reach of small children. You can use the microSD memory card to store your multimedia files such as video clips, music tracks, and sound files, images, and messaging data, and to back up information from device memory. ft Some of the folders in Gallery with content that the device use, for example, Themes, may be stored on a memory card.
Media 10. Media When taking and using images or video clips, obey all laws and respect local customs as well as privacy and legitimate rights of others, including copyrights. You can take photos or record live video clips with the built-in VGA camera with autofocus and zoom. Camera ft ■ ra The camera produces pictures in .jpg format, and you can digitally zoom up to eight times. Take a photo To open the camera viewfinder, select Menu > Media > Camera.
Media ■ Video You can record video clips in .3gp format. Available recording time depends on the video clip length and quality settings. The length and file size of the clips may vary depending on the selected quality and available memory. To set the quality of your video clips, select Menu > Media > Video > Options > Settings >Video clip quality > High, Normal or Basic. Record a video clip ra ft To select the file size limit, select Menu > Media > Video > Options > Settings > Video clip length.
Media To pause the playing, select . To stop the playing, press and hold the end key To skip to the next track, select track, select . . To skip to the beginning of the previous To rewind the current track, select and hold . To fast forward the current track, select and hold . Release the key at the position you want.
Organizer Record sound 1. Select Menu > Media > Recorder. To use the graphical keys , the desired key, and select it. , or on the display, scroll left or right to 2. To start the recording, select . To start the recording during a call, select Options > Record. While recording a call, all parties to the call hear a faint beeping sound. When recording a call, hold the device in the normal position near to your ear. To pause the recording, select . . The recording is saved in Gallery > ft 3.
Organizer To select the alarm tone or set the radio as the alarm tone, select Alarm tone:. If you select the radio as an alarm tone, connect the headset to the device. To set a snooze time-out, select Snooze time-out and the time. Stop the alarm The device sounds an alert tone even if the device was switched off. To stop the alarm, select Stop. If you let the device continue to sound the alarm for a minute or select Snooze, the alarm stops for the time you set in Snooze time-out, then resumes.
Organizer To stop the alarm without viewing the note, select Exit. ■ To-do list To save a note for a task that you must do, select Menu > Organizer > To-do list. To make a note if no note is added, select Add note. Fill in the fields, and select Save. ■ ft To view a note, scroll to it, and select View. While viewing a note, you can also select an option to edit the attributes. You can also select an option to delete the selected note and delete all the notes that you have marked as done.
Push to talk ■ Countdown timer To start the countdown timer, select Menu > Organizer > Timer > Normal timer, enter the alarm time, and write a note text that is displayed when the time expires. To start the countdown timer, select Start. To change the countdown time, select Change time. To stop the timer, select Stop timer. To have an interval timer with up to 10 intervals started, first enter the intervals. Select Menu > Organizer > Timer > Interval timer. To start the timer, select Start timer > Start.
Push to talk You can use PTT to have a conversation with one person or with a group of people (channel) having compatible devices. While you are connected to the PTT service, you can use the other functions of the device. To check availability and costs, and to subscribe to the service, contact your network operator. Roaming services may be more limited than for normal calls. Before you can use the PTT service, you must define the required PTT service settings. See PTT settings p.
Push to talk Channel list, a channel, and Options > Send invitation. To send the invitation, use a text message. To add a provisioned channel, select Menu > Push to talk > Add channel > Options > Edit add. manually. Enter the Channel addr.: provided by your service provider. Receive an invitation ft 1. When you receive a text message invitation to a channel, Channel invitation received: %U is displayed. 2.
Push to talk Options >Subscribe contact, or if one or more contacts are already marked Subscribe marked. or indicate that the person is either available or unknown. indicates that the person wants not to be disturbed, but can receive callback requests. indicates that the person does not have PTT switched on. Make a channel call ft To call a channel, select Channel list, the desired channel, and press and hold the PTT key.
Push to talk Receive a PTT call A short tone notifies you of an incoming PTT call. Information, such as the channel, the phone number, or the nickname (network service) of the caller are displayed. You can either accept or reject an incoming one-to-one call if you have set the device to first notify you of the one-to-one calls. ■ ft When you press and hold the PTT key while the caller is talking, you hear a queuing tone, and Queuing is displayed.
Push to talk To delete the request, select Delete. To save a new contact or to add the PTT address to a contact from a received callback request, select Options > Save as or Add to contact. ■ Add a one-to-one contact You can save the names of persons to whom you often make one-to-one calls in the following ways: ft To add a PTT address to a name in Contacts, search for the desired contact, select Details > Options > Add detail > PTT address.
Applications ■ Configuration settings You may receive the settings for connecting to the service from your service provider. See Configuration settings service p. 8. You can enter the settings manually. See Configuration p. 50. To select the settings for connecting to the service, select Menu > Push to talk > Configuration settings. Select from the following options: Configuration — to select a service provider.
SIM services Important: Only install and use applications and other software from sources that offer adequate security and protection against harmful software. To download an application, use the Nokia Application Installer from PC Suite, or select Menu > Applications > Options > Downloads > App. downloads; the list of available bookmarks is shown. See Bookmarks p. 69. For the availability of different services and pricing contact your service provider. 14.
Web With the browser you can view the services that use wireless markup language (WML) or extensible hypertext markup language (XHTML) on their pages. Appearance may vary due to screen size. You may not be able to view all details of the internet pages. ■ Set up browsing Connect to a service ra ■ ft You may receive the configuration settings required for browsing as a configuration message from your service provider. See Configuration settings service p. 8.
Web To browse through the page, scroll in any direction. To select an item, press the call key, or select Select. To enter letters and numbers, press the 0 to 9 keys. To enter special characters, press *. While browsing, you can make a phone call, and save a name and a phone number from a page. ■ Bookmarks ft You can save page addresses as bookmarks in the device memory. ra 1. While browsing, select Options > Bookmarks; or in the standby mode, select Menu > Web > Bookmarks. 2.
Web Character encoding > Content encoding — to select the encoding for the browser page content Character encoding > Unicode (UTF-8) web addresses > On — to set the device to send a URL as a UTF-8 encoding Screen size > Full or Small— to set the screen layout Show page title > Yes or No— to display the title of the web page JavaScript > Enable — to enable the Java scripts Security settings ft ■ Cookies ra A cookie is data that a site saves in the cache memory of your device.
Web To access the Service inbox in the standby mode, when you have received a service message, select Show. If you select Exit, the message is moved to the Service inbox. To access the Service inbox later, select Menu > Web > Service inbox. ft To access the Service inbox while browsing, select Options > Other options > Service inbox. Scroll to the message you want, and to activate the browser and download the marked content, select Retrieve.
Web Security module The security module improves security services for applications requiring a browser connection, and allows you to use a digital signature. The security module may contain certificates as well as private and public keys. The certificates are saved in the security module by the service provider. To view or change the security module settings, select Menu > Settings > Security > Security module settings.
PC connectivity To make a digital signature, select a link on a page, for example, the title of the book you want to buy and its price. The text to sign, which may include the amount and date, is shown. Check that the header text is Read and that the digital signature icon shown. is If the digital signature icon does not appear, there is a security breach, and you should not enter any personal data such as your signing PIN. To sign the text, read all of the text first, and select Sign.
Battery information ■ Bluetooth Use the Bluetooth technology to connect your compatible PC to the internet. Your device must have activated a service provider that supports internet access and your PC has to support Bluetooth PAN (personal area network). After connecting to the network access point (NAP) service of the device and pairing with your PC your device automatically opens a packet data connection to the internet.
Battery information shorten its lifetime. If left unused, a fully charged battery will lose its charge over time. If the battery is completely discharged, it may take a few minutes before the charging indicator appears on the display or before any calls can be made. Use the battery only for its intended purpose. Never use any charger or battery that is damaged. ft Do not short-circuit the battery.
Battery information Authenticate hologram 1. When looking at the hologram on the label, you should see the Nokia connecting hands symbol from one angle and the Nokia Original Enhancements logo when looking from another angle. ra ft 2. When you angle the hologram left, right, down, and up, you should see 1, 2, 3, and 4 dots on each side respectively. D 3. Scratch the side of the label to reveal a 20-digit code, for example, 12345678919876543210. Turn the battery so that the numbers are facing upwards.
Battery information If you cannot confirm that your Nokia battery with the hologram on the label is an authentic Nokia battery, please do not use the battery. Take it to the nearest authorized Nokia service point or dealer for assistance. The use of a battery that is not approved by the manufacturer may be dangerous and may result in poor performance and damage to your device and its enhancements. It may also invalidate any approval or warranty applying to the device.
Care and maintenance Care and maintenance Your device is a product of superior design and craftsmanship and should be treated with care. The suggestions below will help you protect your warranty coverage. • Keep the device dry. Precipitation, humidity and all types of liquids or moisture can contain minerals that will corrode electronic circuits. If your device does get wet, remove the battery and allow the device to dry completely before replacing it.
Additional safety information Additional safety information Your device and its enhancements may contain small parts. Keep them out of the reach of small children. ■ Operating environment ra ft Remember to follow any special regulations in force in any area, and always switch off your device when its use is prohibited or when it may cause interference or danger. Use the device only in its normal operating positions.
Additional safety information • Always keep the device more than 15.3 centimeters (6 inches) from the pacemaker • Not carry the device in a breast pocket • Hold the device to the ear opposite the pacemaker to minimize the potential for interference. If you suspect interference, switch off your device, and move the device away. Hearing aids ft Some digital wireless devices may interfere with some hearing aids. If interference occurs, consult your service provider.
Additional safety information depots, storage, and distribution areas; chemical plants; or where blasting operations are in progress. Areas with a potentially explosive atmosphere are often but not always clearly marked. They include below deck on boats, chemical transfer or storage facilities and areas where the air contains chemicals or particles such as grain, dust, or metal powders.
Additional safety information organization ICNIRP and include safety margins designed to assure the protection of all persons, regardless of age and health. ft The exposure guidelines for mobile devices employ a unit of measurement known as the Specific Absorption Rate or SAR. The SAR limit stated in the ICNIRP guidelines is 2.0 watts/kilogram (W/kg) averaged over 10 grams of tissue.
Additional safety information ■ Battery information This section provides information about battery charging times with the standard charger (AC-3), talk-times, and standby times. Be aware that the information in this section is subject to change. For more information, contact your service provider.
Index A D data communication 74 transfer 46 data cable 47 date settings 43 digital rights management 51 digital signature 72 display 17, 18 downloading files 51 downloads 8, 70 C C D barring password 21 battery authentication 75 charging 12 charging times 83 charging, discharging 74 information 83 installation 9 talk and standby times 83 blacklist 31 Bluetooth 44, 74 bookmarks 69 browser 68, 69, 70 business cards 40 ra B ft charger times 83 clock settings 43 codes 20, 21 configuration 50 setting s
H N handsfree. See loudspeaker.
time 83 standby mode 17, 43 status indicators 17, 18 stopwatch 60 strap 15 switch on and off 13 swivel 42 synchronisation 46 T ra ft take an image 54 talk time 83 technical information 82 text 23, 24, 25 text message 25 themes 42 time settings 43 to-do list 59 tones 42 traditional text input 25 U unlock keypad 20 UPIN 13 FC C D codes 20 module 72 settings 50 service inbox 70 messages 70 numbers 41 services 67 settings active standby 42 call 48 camera 54 clock 43 configuration 50 connectivity 44 da