Installation Guide for GigaBit TX to SX Tap Model CVT-GCU/SX Doc.
Installation Guide for Gigabit TX/SX Tap Table of Contents Introduction. . . . . . . . . . . . . . . . . . . . . . . . . . . . . . . . . . . . . . . . . . . . . . . . . . . . . . 1 Key Features. . . . . . . . . . . . . . . . . . . . . . . . . . . . . . . . . . . . . . . . . . . . . . . . . . . . . 1 Product Diagram. . . . . . . . . . . . . . . . . . . . . . . . . . . . . . .
Installation Guide for Gigabit TX/SX Tap PLEASE READ THESE LEGAL NOTICES CAREFULLY. By using a Net Optics Tap you agree to the terms and conditions of usage set forth by Net Optics, Inc. No licenses, express or implied, are granted with respect to any of the technology described in this manual. Net Optics retains all intellectual property rights associated with the technology described in this manual. This manual is intended to assist with installing Net Optics products into your network.
Installation Guide for Gigabit TX/SX Tap Introduction Net Optics GigaBit TX to SX Tap simplifies connecting FX fiber monitoring and security devices to GigaBit copper network links. Convert TX to SX and tap into the link with one device, reducing cost and complexity at the same time. GigaBit TX to SX Taps support passive monitoring of GigaBit links at speeds at 1000 Mbps.
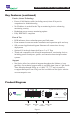
Installation Guide for Gigabit TX/SX Tap Key Features (continued) Passive, Secure Technology • Passes all full-duplex traffic (including errors) from all layers for comprehensive troubleshooting • No IP address is needed for the Tap or monitoring device, enhancing monitoring security • Redundant power ensures monitoring uptime • Fully IEEE 802.
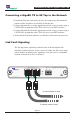
Installation Guide for Gigabit TX/SX Tap Connecting a GigaBit TX to SX Tap to the Network 1. Unpack the Tap and verify that you have all components, and obtain the required cables needed to successfully install the unit. 2. Connect Network Port A to the appropriate switch, server or router using a CAT5E RJ45 straight-thru cable. This will act as your DCE interface. 3. Connect Network Port B to the appropriate switch, server or router using a CAT5E RJ45 straight-thru cable.
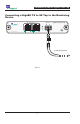
Installation Guide for Gigabit TX/SX Tap Connecting a GigaBit TX to SX Tap to the Monitoring Device 1. Supply power to the Tap using the 2 redundant power supplies included with the unit. Verify that the Power LED illuminates. 2. Using a Net Optics Custom Monitor Cable, connect the single-duplex end to the Tap Monitor Port A/B. 3. Connect the twin-duplex end of the cable labeled DCE into the appropriate monitoring device port to monitor the DCE link. 4.
Installation Guide for Gigabit TX/SX Tap Connecting a GigaBit TX to SX Tap to the Monitoring Device A Network B Monitor ® A GigaBit Converter Tap B 2 1 www.netoptics.com ACT LINK ACT LINK LASER CAUTION! To monitoring device Figure 3.
Installation Guide for Gigabit TX/SX Tap Specifications Splitter Specifications: Split Ratio: 50/50 Fiber Type: Multimode Corning 62.5/125µm, wavelength 850nm Insertion Loss: Network Port: ≤ 4.5 dB Monitor Port: ≤ 4.5 dB Operating Specifications: Operating Temperature: 10˚C to 55˚C Storage Temperature: 0˚C to 70˚C Relative Humidity: 10% min, 95% max, non-condensing Mechanical Specifications: Power Supply: Input: 100-240 VAC, 47-63 Hz, 0.5A (AC100-125V, 50-60Hz, 30VA for Japan) Output: 12V, 1.
Installation Guide for Gigabit TX/SX Tap Limitations on Warranty and Liability Net Optics offers a limited warranty for all its products. IN NO EVENT SHALL NET OPTICS, INC. BE LIABLE FOR ANY DAMAGES INCURRED BY THE USE OF THE PRODUCTS (INCLUDING BOTH HARDWARE AND SOFTWARE) DESCRIBED IN THIS MANUAL, OR BY ANY DEFECT OR INACCURACY IN THIS MANUAL ITSELF.
Installation Guide for Gigabit TX/SX Tap Notes:
Installation Guide for Gigabit TX/SX Tap Notes:
www.netoptics.com © 2007 by Net Optics, Inc. All Rights Reserved.