!" User’s Guide for Nokia Image Frame SU-7 9311006 Issue 1
!" DECLARATION OF CONFORMITY We, NOKIA CORPORATION, declare under our sole responsibility that the product SU-7 is in conformity with the provisions of the following Council Directive: 1999/5/EC. A copy of the Declaration of Conformity can be found at http://www.nokia.com/phones/declaration_of_conformity/. Copyright © 2004 Nokia. All rights reserved.
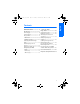
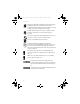
!" FOR YOUR SAFETY ................... 4 Introduction ............................. Power supply................................... Technical data................................. Image format .................................. 6 6 6 7 1. Overview............................... 8 2. Getting started .................. 11 Setting up the Nokia Image Frame............................................... 11 Switching the power on and off ..............
# !" FOR YOUR SAFETY FOR YOUR SAFETY Read these simple guidelines. Breaking the rules may be dangerous or illegal. Further detailed information is given in this manual. Do not connect the Nokia Image Frame to the mobile network when wireless phone use is prohibited or when it may cause interference or danger. INTERFERENCE All devices may get interference, which could affect performance. SWITCH OFF IN HOSPITALS Follow any regulations or rules.
!" FOR YOUR SAFETY IMPORTANT: English Only use chargers in dry conditions. Never supply power to the device with a charger when the device or charger or their parts are damp or wet. If the device has been exposed to salt water, wipe it immediately with a cloth dampened with fresh water to avoid corrosion. The device must then be carefully wiped dry.
$ !" Introduction Introduction The Nokia Image Frame SU-7 is an enhancement product, which enables you to view the digital images taken or received by your IrDA-enabled Nokia phone or other compatible devices. You can connect the Nokia Image Frame to the devices using its infrared (IR) port. If you insert a SIM card to the Nokia Image Frame, you can also receive new images as MMS messages.
!" Introduction • Operating temperature: 0 oC to 40 oC English • Compatibility: The Nokia Image Frame SU-7 is compatible with phones and other devices that support image sending over infrared (IrDA). Note that if image sending cannot be activated from the phone (IrDA Send feature), the Nokia Image Frame can pull the images from the compatible Nokia phone when the phone’s IR connection has been activated.
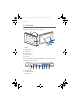
% !" Overview 1. Overview The Nokia Image Frame has the following parts: 1. Display 2. Infrared (IR) port 3. Control keys 4. Table support 5. Charger connector 6. Back cover You can use the Nokia Image Frame through the control keys on top of the device. The control keys are: 1. Power on/off key 2. Show/Brightness key 3.
& !" Overview 4. Three-position switch: English • Slide show mode • Image view mode • Edit mode 5. Up key 6. Down key 7. Mark key 8. IrDA key There are three ways to press the keys.
!" Overview This indicator blinks when the Nokia Image Frame attempts to establish the IrDA connection. When the connection is established and the Nokia Image Frame is sending or receiving an image, the indicator is displayed continuously. Confirms that the images have been successfully received or sent (the receiving device has confirmed the images as received). The image is not supported by the Nokia Image Frame.
!" Getting started ■ Setting up the Nokia Image Frame Warning! To avoid damage to the SIM card, do not install, move or remove the SIM card if the power supply is connected to an AC wall outlet. 1. If you want to be able to receive images over MMS, you have to insert a SIM card into the Nokia Image Frame. 1. With the display of the Nokia Image Frame facing you, detach the cover on the back of the Nokia Image Frame by pushing it down forward. 2.
!" Getting started 2. Connect the lead from the charger to the socket at the back of the Nokia Image Frame (1). 3. Connect the charger to an AC wall socket. 4. Set the Nokia Image Frame on the table with the control keys on the top. If most of your images are in the upright position, you can turn the Nokia Image Frame upright so that the control keys are on the right side of the display.
!" Getting started If the PIN query is activated on the SIM card, the Nokia Image Frame displays the PIN query when the power is switched on. Note: If you want to deactivate the PIN query, insert the SIM card to your phone and deactivate the PIN query as instructed in your phone’s user guide. 1. Press briefly or is highlighted. 2. Press briefly until the correct first number of the PIN code to select the number.
# !" Getting started OTA message You can configure the MMS settings by an OTA message if your operator offers that service. Note: Before receiving the settings, set the Nokia Image Frame to the edit mode by sliding the three-position switch to . Send a text message 91 from your mobile phone to the phone number of the SIM card you inserted to the Nokia Image Frame. For example, 91 12345 mms.
!" Getting started • 27 English Command for setting the SMS Center number. • 43 Command for setting the password prompting on or off. • 45 Command for setting the connection security on or off. • 44 <1_or_2> Command for setting the authentication method for the connection. The method is normal (1) or secure (2). • 46 <1_or_2> Command for setting the session mode. The mode is temporary (1) or permanent (2).
$ !" Using the Nokia Image Frame 3. Using the Nokia Image Frame ■ Viewing the images If there is only one image in the Nokia Image Frame, it is displayed when you switch on the power. If there is more than one image in the Nokia Image Frame, you can set the Nokia Image Frame to show just one image, or several images in rotation as a slide show. Setting Nokia Image Frame to show one image: 1. Slide the three position switch to . 2.
!" Using the Nokia Image Frame 1. Slide the three position switch to 2. Press briefly or . to scroll the images. 3. If you want to be able to view an image, mark it by pressing briefly while the image is displayed. The Nokia Image Frame displays the icon for all marked images. If you want to unmark an image, press briefly while the marked image is displayed. When the Nokia Image Frame receives new images, it automatically marks them.
% !" Using the Nokia Image Frame ■ Modifying the display brightness When the power is switched on, you can modify the brightness of the display by pressing briefly . There are five brightness levels, and each time you press , the level is raised by one. When the highest brightness level is used and you press , the Nokia Image Frame returns to the lowest brightness level.
& !" Using the Nokia Image Frame 1. If you want the images in the Nokia Image Frame to be in a certain order, press briefly or to scroll to the image after which you want to store the new images. 2. Direct the IR ports of the Nokia Image Frame and the compatible sending device toward each other, and ensure that there are no obstructions between the devices. The maximum allowed distance is up to 1.5 m and the transmission angle 15o. 3.
!" Using the Nokia Image Frame 3. Activate the image source device’s IR connection. For more information on how to do this, refer to the user’s guide of that device. 4. Press to enter the active IR reception mode. The Nokia Image Frame displays the icon. 5. During the image transfer, the Nokia Image Frame displays the icon and the received images one by one. 6.
!" Using the Nokia Image Frame 1. If you want the images in the Nokia Image Frame to be in a certain order, press briefly or to scroll to the image after which you want to store the new images. 2. Press briefly to view the oldest unchecked image in the memory. If the phone number of the sender is known, it is displayed on the screen with the downloaded image. 3. If you want to store the image, press briefly .
!" Care and maintenance Care and maintenance Your Nokia Image Frame SU-7 is a product of superior design and craftsmanship and should be treated with care. The suggestions below will help you to fulfil any warranty obligations and to enjoy this product for many years. • Keep all enhancements out of the reach of small children. • Keep Nokia Image Frame dry.
!" Important Safety Information ■ Power supply The Image Frame power supply ACW-5A converts mains voltage to low voltage DC. Note: The power supply socket should be easily accessible, and it must not be covered. The power supply is insulation class 2-covered. Warning: Dangerous voltage. Do not attempt to open the casing under the back cover. Note: This power supply is for indoor use only! Do not expose the unit to water, rain or dust.
# !" Important Safety Information Hearing aids Some digital wireless phones may interfere with some hearing aids. In the event of such interference, you may want to consult your service provider. Other medical devices Operation of any radio transmitting equipment, including the Nokia Image Frame, may interfere with the functionality of inadequately protected medical devices.