
User's Manual


5
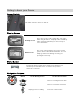
Charging and Installing Batteries
The Sensor is pow ered by four AA-size batt eries (1.2~ 1.5V). You may use t he four AA-size
1.2V NiMH batt eries provided with the Sensor, or you may use AA-size alkaline batteries
(1.5V). Before using your Sensor, make sure the batt eries are fully charged.
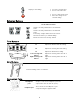
The Sensor is reverse volt age protected: inst alling batteries backw ards cannot damage it. If
the batteries are backwards, simply reverse the battery connector.
Also inside the battery compartment is t he 4 w ire Receiver Programming Cable. This cable
can be plugged int o the receiver’s TACH pins in order t o upgrade the softw are on t he receiver.
T he RC De skt o p w ill in st ru ct yo u w h en a so ft w are upg rad e is availab le .
Charging the Supplied NiMH Batteries
When using the supplied NiMH batt eries, charge the batteries for 12-14 hours (using the
supplied charger) before using the Sensor. Be sure t o get t he polarit y correct w hen inst alling
the batteries into t he charger.
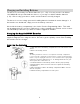
Installing the Batteries
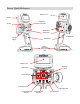
1. Slid e an d r emo v e the batter y co mpar tmen t cov er at the botto m of the
Sensor.
2. Remov e th e batter y hold er .
NOTE:
The battery holder w ires connect to a receptacle in the battery compartment.
I t is not necessary to unplug the connector w hen you remove the battery holder.
Howev er, if you do unplug the connector, note its orientation first.
I f you plug it
in w ro n g , yo ur Sen sor w ill not turn on - no d amage w ill b e d one to your
Sensor, just remove and reverse it.
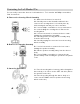
3. I n stal l the b att er ies in th e batter y holder . O bserv e pr op er polar ity .
4. Plu g th e b atter y holder co nn ecto r in to th e r ecep tacle in th e b atter y
comp ar tmen t.
5. Place the batt er y ho ld er in th e b atter y co mpar tmen t. Mak e su r e th e
wires do not pinch.
6. Slid e th e batt er y co mp ar tment cov er into place.