
User's Manual


6
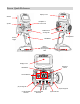
Charging and Installing Batteries
The Sensor is powered by four AA-size batteries (1.2~ 1.5V). You may use the four AA-size
1.2V NiMH batteries provided with the Sensor, or you may use AA-size alkaline batteries
(1.5V). Before using your Sensor, make sure the batteries are fully charged.
The Sensor is reverse voltage protected: installing batteries backwards cannot damage it. I f
the batteries are backwards, simply reverse the battery connector.
Also inside the battery compartment is the 4 wire Receiver Programming Cable. This cable
can be plugged into the receiver’s TACH pins in order to upgrade the software on the receiver.
The RC Desktop will instruct you when a software upgrade is available.
Charging the Supplied NiMH Batteries
When using the supplied NiMH batteries, charge the batteries for 12-14 hours (using the
supplied charger) before using the Sensor. Be sure to get the polarity correct when installing
the batteries into the charger.
Installing the Batteries
1. Slide and remove the battery compartment cover at the bottom of the
Sensor.
2. Remove the battery holder.
NOTE:
The battery holder wires connect to a receptacle in the battery compartment.
It is not necessary to unplug the connector when you remove the battery holder.
However, if you do unplug the connector, note its orientation first.
I f you plug it
in wrong, your Sensor will not turn on - no damage will be done to your
Sensor, just remove and reverse it.
3. I nstall the batteries in the battery holder. Observe proper polarity.
4. Plug the battery holder connector into the receptacle in the battery
compartment.
5. Place the battery holder in the battery compartment. Make sure the
wires do not pinch.
6. Slide the battery compartment cover into place.