Link to Download Desktop Software: WWW.SUPPORT.NOMADIO.
Link to Download Desktop Software: WWW.SUPPORT.NOMADIO.NET/REACT Copyright 2006 Nomadio Published November, 2006 Table of Contents Getting to Know Your React.................................................................................................................7 Power Switch...............................................................................................................................7 Display Screen ..................................................................................
Connection .....................................................................................................................................15 Connecting the Tach Sensor ................................................................................................................15 Binding the Transceiver..................................................................................................................16 How the Binding Process Works......................................................
Adjusting the Brake End Point ...................................................................................................43 Trim and EPA Interaction ..........................................................................................................43 Throttle End Point......................................................................................................................44 Adjusting the Throttle End Point ..........................................................................
Measurement method........................................................................................................69 Tach (RPM)....................................................................................................................................70 Tank Mode......................................................................................................................................... 71 Activating / Deactivating Tank Mode.........................................................
Racing Association Approvals........................................................................................................95 Nomadio 1 Year Limited Warranty .....................................................................................................95 Warranty Coverage ....................................................................................................................95 Exclusions and Limitations .............................................................................
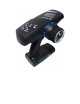
Navigation Buttons Button In the drive screen In the function menu Moves to next higher menu item Moves to next lower menu item Displays previous reading Decreases selected value Displays next reading • • Increases selected value Goes to next submenu • Goes to selected submenu Saves the change to the selected setting • Selection Buttons Button In the function menu Sets the currently edited value to its maximum value Sets the currently edited value to its minimum value Cancels any changes made an
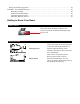
Trim Buttons T3 Button In the drive screen T1 Adjusts the steering trim T2 Adjusts the steering dual rate setting T3 Adjusts the throttle dual rate setting T4 Adjusts the throttle trim Grip Buttons Performs shifting action on channel 3 Charging and Installing Batteries The React is powered by a 4 cell battery pack(included). Also inside the battery compartment is the 4 wire Receiver Programming Cable.
Charging the Batteries Make sure the Nomadio React battery pack is properly installed and the React is switched off. Batteries other than the Nomadio React battery pack cannot be charged by the React, and attempting to do so will void the warranty. Batteries other than the Nomadio React battery pack must be removed prior to connecting over USB for any reason, even when just using RC Desktop. Connect the USB cables and insert the USB cable into a PC or powered USB hub.
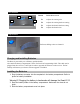
The battery pack is properly installed. The USB cables are connected properly. Installing the Transceiver Mounting the Transceiver • Install the transceiver so it is protected from vibration or shock. • Use double-sided tape or Velcro® to mount the transceiver. • Position the transceiver where it will not contact other solid components. Mount the transceiver away from moving parts, sharp corners, and possible contaminants (fuel, dirt, etc.).
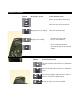
plug rather than the servo wires. Servo Connection Connect the servos to the appropriate positions in the transceiver: Connect… …into transceiver receptacle Receiver battery / Channel 4 servo “Power” Steering servo “Steering” Throttle servo or ESC “Throttle” Shifting servo “Shft/CH3” FCC Compliance Reminder If you install the React transceiver inside of a vehicle, and you are not the final end user, FCC regulations require you to make the React Transceiver’s FCC ID easily visible to the end user.
Temperature Sensor The temperature sensor is used to monitor the temperature of a vehicle component such as a main battery pack, electric motor, or nitro engine. Installation The green circuit board of the sensor is the active measuring element. Install the sensor so that this board is pressed against the item whose temperature you wish to measure. The sensor has been designed to be thin enough to fit between the fins on a heat sink.
Tachometer Sensor The tachometer (“tach”) sensor is used to monitor the rotation speed of a vehicle component such as a drive shaft and this speed is converted into vehicle speed. You will need to measure the distance your model rolls in order to provide the React with enough information to give you an accurate speed. We recommend that you get a tape measure and measure several rotations of the wheel to reduce the measurement error. Installation 1.
The sensor side of the tach circuit board must be mounted closest to magnets. The sensor is on the opposite side from the large chip that protrudes from the shrink tubing. The graphic above shows where the sensor is so you can mount it correctly. When moving, the magnets should pass directly over the center of the sensor. We have used a variety of methods of mounting tach sensors, depending on the car and the chosen location.
If you don’t see changing RPM values, the magnets or sensor are out of position, or the sensor could be plugged into the wrong sensor port on your transceiver. If your magnets are hitting the sensor or a part of your car when the wheels are turning, you must re-mount them so they do not hit anything. Binding the Transceiver The binding process “locks” the React and a transceiver together so that they listen only to each other.
Toggles between the driving screen and the function menu or returns to the previous level from a sub-menu Menu: Go to the selected sub-menu Menu: Move to the next higher menu item. Menu: Move to the next lower menu item. Menu: Go to the selected sub-menu. Drive: Display next statistic. Menu: Decrease the selected value setting. Drive: Display previous statistic. Menu: Set currently edited value to maximum. Menu: Set currently edited value to minimum. Menu: Cancel changes made to the current parameter.
Top Menu Level The following illustration shows the function menu structure for the top-level menu. All main submenus may be accessed from the top menu level. Channels 3 & 4 have identical setups, and are documented together. Manage Models Active Model New Model Delete Model Copy Model Rebind Steering Functions Steering Trim Steering trim adjusts the center point of the steering servo by adjusting the center point within the steering servo’s total travel range.
Steering Trim Steering (Ch1) Throttle (Ch2) Shift (Ch3) Ch4 On the driving screen, steering trim is represented by the position of the pointer on the upper bar.
Steering Dual Rate Steering dual rate adjusts the range of servo movement when the steering wheel is fully turned in either the left or right direction. This is used to increase or decrease the steering sensitivity across the entire servo range. The steering dual rate value is applied to both left and right sides, and is expressed as a percentage of servo range (configured by end point adjustments).
Adjusting Steering Dual Rate using the Function Menu Use the navigation controls to adjust steering dual rate as follows: 1. Access the top function menu from the driving screen. 2. Navigate to the Steering (Ch1) menu. or 3. Navigate to Dual Rate. : then or Value 0 4. Change the value. 1-99 or 100 Description Steering servo range is set to minimum. Steering servo range is set to a percentage of full range. For example, value “50” gives 50% of full servo range.
Adjusting Steering Dual Rate using the Trim Buttons You can also use the T2 trim button to adjust the steering dual rate. Dual Rate and End Point Adjustment Full servo range is determined by the left and right end point adjustments. The dual rate value determines the relative servo range between the left and right end points. The servo will never move beyond the set end point adjustments, no matter what dual rate setting is applied.
Servo travel RIGHT 1~100% (quick) +ve exponential (quicker response) 0% ( linear) Steering wheel turned full LEFT Neutral A positive (+ve) exponential value gives a quicker steering response near the steering neutral point, making it MORE responsive to small steering inputs, without affecting total travel like Dual Rate would. Steering w he tur ned full RIG Servo travel LEFT Adjusting Steering Exponential Use the navigation controls to adjust steering exponential as follows: 1.
servo center. Steering sub-trim should be initially adjusted after you have assembled your vehicle’s steering system; after you begin driving the vehicle, use steering trim to make fine adjustments to center the steering within the total steering range. If you find that you have to use a large amount of steering sub-trim to get the vehicle to drive straight, you should consider resetting the steering sub-trim to 0 and readjusting the servo horn on the servo output shaft.
A trim (or sub-trim) setting of 100 is equivalent to an End point setting of 50. Steering Left End Point The steering left end point value adjusts how far the steering servo turns to the LEFT with respect to its full range of motion to the left. End point adjustment should be adjusted prior to other steering settings, as the left end point value affects other steering settings. The left end point is set independently of the right end point (which adjusts how far the steering servo turns to the RIGHT).
by the end point settings (left and right) and trim settings. Changing the left end point value has the following visual effect on the driving screen bars. Left end point value is approximately the same as the right end point value. Increased left end point value (more servo travel to the left is possible). Decreased left end point value (less servo travel to the left is possible).
Steering Right End Point The steering right end point value adjusts how far the steering servo turns to the RIGHT with respect to its full range of motion to the right. End point adjustment should be adjusted prior to other steering settings, as the right end point value affects other steering settings. The right end point is set independently of the left end point (which adjusts how far the steering servo turns to the LEFT).
Right end point value is approximately the same as the left end point value. Increased right end point value (more servo travel to right is possible). Decreased right end point value (less servo travel to right is possible). The position of the pointer on the bar is affected by the steering end point values (left and right) and trim setting; increasing the right end point value may visually appear to have the same effect as decreasing the left end point value.
Steering Servo Reverse Steering Servo Reverse reverses the direction the servo moves upon receiving an input from the steering wheel. Changing the Steering Servo Reverse Setting Use the navigation controls to change the steering servo reverse setting as follows: 1. Access the top function menu from the driving screen. 2. Navigate to the Steering (Ch1) menu. 3. Navigate to Servo Reverse. or then or Value 4. Change the value. Off On Description Standard servo direction. Reversed servo direction.
3. Navigate to Servo Type. 4. Change the value. or Value Description Analog Digital Steering servo is analog. Steering servo is digital. Steering Speed Steering speed allows you to limit the maximum speed that the steering servo will be driven to match your movements on the wheel. There are three parameters that can be adjusted to precisely set up your limiting. Trigger sets the minimum amount of control input before the speed limiter becomes active.
Return speed determines the limited speed that is applied to motions back toward center that are above the trigger setting. 100 is the maximum servo movement rate. 1 is the minimum rate. Default is 100 (full speed) Changing the Steering Speed Interaction with other parameters Servo Speed is applied after Expo. The trigger level for Servo Speed refers to the curved input value. Use the navigation controls to change the steering servo type as follows: 1. Access the top function menu from the driving screen.
Return Speed Trigger The percentage of full speed applied to servo motion toward center once the trigger amount has been exceeded. The threshold above which speed limiting will be applied.
Throttle Functions The following illustration shows the function menu structure for the throttle functions: Throttle Trim Throttle trim adjusts the resting (centered) position of the throttle servo horn (electric or nitro vehicle) or the neutral point of an ESC (electric vehicle). When initially setting up the vehicle, the throttle trim setting should be set to 0. On a throttle servo, the servo horn should be positioned as appropriate on the servo.
Adjusting Throttle Trim using the Function Menu Use the navigation controls to adjust throttle trim as follows: 1. Access the top function menu from the driving screen. 2. Navigate to the Throttle (Ch2) menu. or 3. Navigate to Trim. then or Value 0 4. Change the value. or -ve value (-100 Æ -1) +ve value (1 Æ 100) Description Throttle trim is centered within servo range. Throttle trim is to the BRAKE end. Throttle trim is to the THROTTLE end.
Adjusting Throttle Trim using the Trim Button You can also use the T3 trim button to adjust throttle trim. Trim and EPA Interaction A trim (or sub-trim) setting of 100 is equivalent to an End point setting of 50. Throttle Dual Rate Throttle dual rate adjusts the range of servo movement when the throttle trigger is moved from full brake to full throttle position. This is used to increase or decrease the throttle sensitivity across the entire servo range.
Adjusting Throttle Dual Rate using the Function Menu Use the navigation controls to adjust throttle dual rate as follows: 1. Access the top function menu from the driving screen. 2. Navigate to the Throttle (Ch2) menu. or 3. Navigate to Dual Rate. then or Value 1 4. Change the value. or Description Throttle/brake range is set to minimum. 1-99 Throttle/brake range is set to a percentage of full range. For example, value “50” gives 50% of full servo range.
Servo travel THROTTLE 0% (linear) -1 ~ -100% (mild) Neutral A negative (-ve) exponential value gives a milder throttle response near the throttle neutral point, making it LESS responsive to small throttle inputs, without changing overall throttle travel like Dual Rate would.
Adjusting Throttle Exponential Use the navigation controls to adjust throttle exponential as follows: 1. Access the top function menu from the driving screen. 2. Navigate to the Throttle (Ch2) menu. or 3. Navigate to Throttle Expo. then or Value 4. Change the value. or 0 -ve value (-1 to -100) +ve value (1 to 100) Description Neutral throttle response (linear). Milder throttle response near neutral. Quicker throttle response near neutral.
Neutral Full brake A positive (+ve) exponential value gives a quicker braking response near the throttle neutral point, making it MORE responsive to small braking inputs, without changing overall throttle travel like Dual Rate would. 0% (linear) 1~100% (quick) Servo travel BRAKE +ve exponential (quicker response) Adjusting Brake Exponential Use the navigation controls to adjust brake exponential as follows: 1. Access the top function menu from the driving screen. 2. Navigate to the Throttle (Ch2) menu.
Throttle Sub-Trim Throttle sub-trim adjusts the center point of the throttle servo. This differs from throttle trim in that throttle sub-trim adjusts the servo’s entire travel range; by moving the center point of the servo, the throttle and brake end points (throttle, brake) stay the same relative “distance” from the servo center. Throttle sub-trim should be initially adjusted before using throttle trim, which is used to make fine adjustments to center the throttle within the total steering range.
1. Access the top function menu from the driving screen. 2. Navigate to the Throttle (Ch2) menu. or 3. Navigate to Sub Trim. then or Value 0 -ve value (-100 Æ -1) 4. Change the value. or +ve value (1 Æ 100) Description Throttle sub-trim is centered within the servo range. Throttle sub-trim is to the BRAKE end. Throttle sub-trim is to the THROTTLE end. Trim and EPA Interaction A trim (or sub-trim) setting of 100 is equivalent to an End point setting of 50.
Brake End Point The brake end point value adjusts how far the throttle goes to the BRAKE end with respect to its full range of motion to the brake end. End point adjustment should be adjusted prior to other throttle settings, as the brake end point value affects other throttle settings. The brake end point is set independently of the throttle end point (which adjusts how far the throttle moves to the THROTTLE end).
Changing the brake end point value has the following visual effect on the driving screen bars. Brake end point value is approximately the same as the throttle end point value. Increased brake end point value (more servo travel for BRAKING is possible). Decreased brake end point value (less servo travel for BRAKING is possible).
Throttle End Point The throttle end point value adjusts how far the throttle goes to the THROTTLE end with respect to its full range of motion to the throttle end. End point adjustment should be adjusted prior to other throttle settings, as the throttle end point value affects other throttle settings. The throttle end point is set independently of the brake end point (which adjusts how far the throttle servo turns to the BRAKE end).
Changing the throttle end point value has the following visual effect on the driving screen bars. Throttle end point value is approximately the same as the brake end point value. Increased throttle end point value (more servo travel for THROTTLE is possible). Decreased throttle end point value (less servo travel for THROTTLE is possible).
The position of the pointer on the bar is affected by end point values (throttle and brake) and trim setting; increasing the throttle end point value may visually appear to have the same effect as decreasing the brake end point value. An end point setting of 100 (the default) is typical for most servos, and should always be used for ESCs.
Trim and EPA Interaction A trim (or sub-trim) setting of 100 is equivalent to an End point setting of 50. Throttle Dual Rate Mode Dual Rate Mode controls the behavior of the Dual Rate setting for the throttle servo. Changing the Throttle Dual Rate Mode Use the navigation controls to change the dual rate mode as follows: 1. Access the top function menu from the driving screen. 2. Navigate to the Throttle (Ch2) menu. or 3. Navigate to DR Mode. 4. Change the value.
1. Access the top function menu from the driving screen. 2. Navigate to the Throttle (Ch2) menu. 3. Navigate to Servo Reverse. or then or Value 4. Change the value. Off On Description Standard servo direction. Reversed servo direction. Throttle Servo Type Throttle servo type lets you select the type of throttle servo (analog or digital) in the vehicle. Analog servos are sent signals at 50 frames/sec, while Digital servos are sent signals at 100 frames/sec.
Changing the Throttle Servo Type Use the navigation controls to change the throttle servo type as follows: 1. Access the top function menu from the driving screen. 2. Navigate to the Throttle (Ch2) menu. 3. Navigate to Servo Type. 4. Change the value. or then or Value Description Analog Digital Throttle servo is analog. Throttle servo is digital. Throttle Speed Throttle speed allows you to limit the maximum speed that the throttle servo will be driven to match your movements on the trigger.