FloorHeat™ Installation Manual Transforming frosty floor surfaces into radiant warmth
Transforming frosty floor surfaces into radiant warmth Contents Important Instructions! ...................................................................................................... 3 Safety Instructions: ............................................................................................................. 4 Planning the Installation:.................................................................................................. 7 Laying Out the Heating Mats ..............................
Important Instructions! Do not install the heating mats before reading carefully this installation manual. INSTALL ONLY IN ACCORDANCE WITH NATIONAL ELECTRICAL CODE (NFPA 70) ARTICLE 424IX. Use this product only on a dedicated circuit protected by a GFCI (Ground Fault Circuit Interrupter) or with a thermostat with a built in GFCI. Never install this product anywhere except inside buildings and cover with a permanently installed floor covering.
Safety Instructions: INSTALLATION FloorHeat™ heating mats should be installed only by qualified personnel who are familiar with the construction and operation of the apparatus and the risk involved. The installation of this heating product shall be in accordance with the manufacturer's instructions and the regulations of the authority having jurisdiction.
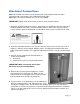
Before Starting: Before installing the heating mats make sure that you have the following additional parts: Electrical junction box: To be used as the connecting junction for the cold leads of the heating mats Installation shall be made in accordance with National Electrical Code, NFPA-70. Final acceptance is to be determined by authorities having jurisdiction.
Always Remember to Take the Following Precautions During the Installation Process: Ensure that: the electric circuit that supplies electricity to the heating mats is equipped with a type A ground fault current interrupter (GFCI). Ensure that: the total current needed for all the heating mats connected in parallel is not more than 80% of the listed amperage capacity of the relevant electrical breaker. If you need advice consult your installer / supplier.
NEVER: NEVER fold or wrinkle the heating mats. NEVER overlap heating on top of each other. NEVER place heavy or sharp tools, or other potentially damaging objects on top of the heating mats. NEVER install or use this product under walls or partitions. NEVER install electrical cables or pipes in the floor together with the heating system. NEVER use insulation layer which contains cellulose.
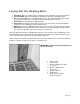
Laying Out the Heating Mats 1. Floor Base: Make sure that the floor is completely clean of all debris or any other materials. 2. Laying the Mats: Open the heating mats. Roll them on top of the insulating material. 3. When using FloorHeat™ it is recommended to leave a gap of approximately 4 inches from the wall to the heating mats, and a gap of about 2 inches between each mat. 4. Ensure that each heating mat is completely flat. 5.
Electrical Connections Note: All electrical connections must be performed by a fully qualified electrician and in accordance with each country's NEC (National Electrical Code). Note: Make sure that all conductor sizes are at least 14AWG. IMPORTANT! Tightly screw all connections to ensure good electrical contacts. 1. Install the electrical junction box or boxes, above floor level according to the local safety and building regulations and codes.
6. Feed the cold leads of each mat into the thermostat box. We suggest you mark each cold lead with a number that corresponds to its mat. That way if there is ever a problem, you can easily identify which mat it is. Make sure that you can see your label. Do not remove any labels that maybe on the cold leads. -Connect all leads of the same color. -Connect the ground wire from the mat to the ground lead wire (green) of the house via a UL approved conduit.
Wiring Diagram Less Than 16 Amp. More Than 16 Amp.
Installation Examples IMPORTANT! Check your local building codes and regulations and act accordingly should they contradict any of the following examples or instructions. Under wood, laminate, parquet flooring 1. Wood flooring material 2. Self-leveling concrete or Thin-set/Grout/Tile adhesive 3. Heating mat 4. UL Listed Insulation Material (Optional) 5. Floor slab (concrete / wood) Under tiles in dry/wet surroundings 1. Tiles 2. Self-leveling concrete or Thin-set/Grout/Tile adhesive 3. Heating mat 4.
Sizes of Heating Mats and Values Ribbon Floor Heating System Coverage (ft²) Voltage Watts Amps Model # 5.0 6.7 8.3 10.0 11.7 13.3 15.0 16.7 120 120 120 120 120 120 120 120 55 74 91 110 129 146 165 184 0.46 0.62 0.76 0.92 1.08 1.22 1.38 1.53 FH5-120 FH6-120 FH8-120 FH10-120 FH12-120 FH13-120 FH15-120 FH17-120 5.0 6.7 8.3 10.0 11.7 13.3 15.0 16.7 240 240 240 240 240 240 240 240 55 74 91 110 129 146 165 184 0.22 0.31 0.38 0.46 0.54 0.61 0.69 0.
Warranty FloorHeat™ warrants that its FloorHeat™ floor heating mat (referred to in this warranty as “Product”) will be free from defects in material and workmanship for fifteen (15) years after their initial installation. This warranty extends only to the original owner (referred to in this warranty as “Buyer”) of the products and only to Products in their original site of installation. 1.
This warranty is FloorHeat™’s only obligations and the buyer’s exclusive remedies with respect to any defects in products. 4. All other representations, warranties and conditions, whether oral or written, express or implied, statutory or otherwise, including without limitation any implied warranty or condition of merchantability or fitness for a particular purpose or non-infringement, are expressly excluded.