
Installation Sheet

Installation Instructions
NLSTR-4L1334W
LED Tunable Strip Light - Selectable CCT
6505 Gayhart Street, Commerce, CA 90040
Tel 323.767.2600 | www.noralighting.com | e-mail: nora@noralighting.com
© 2022 Nora Lighting, Inc. All rights reserved. Instructions subject to change without notice.
021122P1
IS-NLSTR-4L1334W-R01
READ PRIOR TO ATTEMPTING INSTALLATION
ALWAYS TURN OFF MAIN POWER BEFORE INSTALLATION
INSTALLATION SHOULD BE CARRIED OUT BY YOUR LOCAL ELECTRICIAN
Page 1 of 2
WARNING - Risk of fire or Electric shock.
• To reduce the risk of fire, electric shock or injury to persons; read and follow all warning and installation instructions before installing.
• All installation should be performed by a qualified electrician.
• To avoid electric shock, ensure power is turned off before installation.
• All wiring must be installed in accordance with all Electrical Codes.
• To prevent product malfunction and/or electrical shock, this product must be properly grounded.
• Suitable for non-insulated frame. DO NOT cover fixture with insulation liner or similar material.
• DO NOT install fixture on unstable or easily breakable surface.
• DO NOT exert force on the surface of the fixture.
AVERTISSEMENT - Risque d’incendie ou de décharge électrique.
• Pour réduire le risque d’incendie, de décharge électrique ou de blessure, lire et suivre les avertissements et les instructions d’installation avant d’installer le produit.
• L’installation doit être effectuée par un électricien qualifié.
• Pour éviter toute décharge électrique, s’assurer que le courant est coupé avant de procéder à l’installation. Tout le câblage doit être installé conformément aux codes de l’électricité.
• Pour éviter le mauvais fonctionnement du produit ou une décharge électrique, ce produit doit être correctement mis à la terre.
• Convient à une surface et à un cadre non isolés. NE PAS recouvrir le luminaire d’une doublure isolante ou autre matière similaire.
• NE PAS installer le luminaire sur une surface instable ou facilement cassable.
• NE PAS exercer de force sur la surface du luminaire.
SURFACE MOUNT INSTALLATION
TURN OFF MAIN POWER BEFORE INSTALLATION
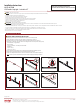
1. Install appropriate anchors (not included) into the ceiling or wall, if needed. (Figure 1)
2. Pinch spring buttons near both ends of the luminaire to remove the lens. (Figure 2)
3. Optional junction box cover plate (ordered separately: NLSTRA-JBCW) may be used. (Figure 3)
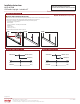
4. Route power cord through cover plate and wire accordingly with wire nuts inside junction box: (Figure 4)
• Black (120-277V) = Supply Voltage
• White = Neutral
• Green or Copper Wire = Grounding Junction Box Wire
0-10V Wiring:
• Purple = Dim (+)
• Pink or Grey = Dim (-)
5. Secure luminaire to the mounting surface using appropriate hardware (not included). (Figure 5)
6. Replace the lens by pushing upward and secure with spring buttons. (Figure 6)
7. Change color temperature to desired CCT. Switch is located on the side of each luminaire. (Figure 7)
Note: Luminaire is preset to 3000K and may have been changed in shipping / handling / installation.
42"
Figure 1 Figure 3
Figure 7
Figure 4
Spring button
Optional cover plate
(ordered separately)
CCT Switch
Figure 2
Figure 6Figure 5