Spray Height Control System 5465BC-LP UC5 and UC4.
Printed in Canada Copyright 2010 by NORAC Systems International Inc. Reorder P/N: 5465BC-LP-INST Rev C (UC5 & UC4.5 Severe Terrain Option Low Profile Brackets) NOTICE: NORAC Systems International Inc. reserves the right to improve products and their specifications without notice and without the requirement to update products sold previously. Every effort has been made to ensure the accuracy of the information contained in this manual.
Contents 1 Introduction ................................................................................................................ 1 2 Kit Parts ...................................................................................................................... 2 3 Ultrasonic Sensor Installation .................................................................................. 4 4 Electrical Installation .........................................................................................
1 Introduction Congratulations on your purchase of the NORAC Spray Height Control System. This system is manufactured with top quality components and is engineered using the latest technology to provide operating reliability unmatched for years to come. When properly used the system can provide protection from sprayer boom damage, improve sprayer efficiency, and ensure chemicals are applied correctly. Please take the time to read this manual completely before attempting to install the system.
2 Kit Parts 2.
2.2 List of Parts Item Part Number Name Quantity B05 44706-01 KIT CABLE TIE BLACK 1 B20 44971 SENSOR MOUNTING BRACKET LOW PROFILE 16GA 2 C06 43210-10 CABLE UC5 NETWORK 18 AWG 10M 2 E05 43750 UC5 ULTRASONIC SENSOR 2 E10 43760 UC5 NETWORK COUPLER 3-WAY 2 M02 5465BC-LP-INST MANUAL INSTALLATION UC5 SEVERE TERRAIN OPTION LOW PROFILE 1 Do not use high speed power tools/drills when installing hardware. The use of dielectric grease is not recommended on any NORAC electrical connections.
3 Ultrasonic Sensor Installation 3.1 Ultrasonic Sensor Serial Number Arrangement When installing the UC5 sensors, start with the smallest serial number on the left-hand side, and proceed to the largest serial number on the right hand side. Each UC5 sensor has a serial number stamped on the sensor housing. Apply a light coating of the supplied Permatex Anti-seize grease to all threaded parts upon installation.
3.2 Ultrasonic Sensor Mounting Guidelines The following guidelines will ensure optimal sensor performance and prevent sensor measurement error. These rules should be followed for both the wing sensors and the main lift (middle) sensor. 1. In its lowest position, the sensor must be 9 inches (23 cm) or more from the ground. 2. Ensure that there are no obstructions within a 12-inch diameter circle projected directly below the center of the sensor. 3.
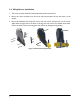
3.3 Low Profile Bracket Mounting Guidelines 1. Minimize the distance between the bolts to prevent bending the bracket and prevent the bracket from loosening over time. 2. Ensure the bracket is mounted tight against the bottom of the boom, minimizing the distance between the boom structure and the angled flange. Figure 4: Bracket Mounting Guidelines A problem can arise if a sensor is not mounted correctly. It is possible for the sensor to read off of the boom instead of the ground.
3.4 Wing Sensor Installation 1. The sensor bracket should be oriented forward (ahead of the boom). 2. Mount the sensor brackets onto the boom half way between the tip and center of the sprayer. 3. Mount the NORAC UC5 ultrasonic sensor into the sensor bracket and run the sensor cable either through hole in the back or through the side cut-out and behind the bracket. Ensure the cable is clear of moving parts and will not be damaged during folding.
4 Electrical Installation The outer wing sensors will have been installed with either a 2-way coupler with terminator (NORAC part number 43764T [E20]) or a 3-way coupler and a terminator plug (NORAC part numbers 43760 and 43764 [E10 & E20]). Determine which type is installed and follow the appropriate set of instructions. 4.1 Installation with 2-Way Coupler with Terminator 1. Remove the 2-way coupler with terminator (E20) from the outer sensor and install it at the inner sensor. 2.
4.2 Installation with 3-Way Coupler and Terminator Plug 1. Remove the terminator plug (E20) from the existing 3-way coupler installed at the outer sensor. 2. Install the 3-way coupler (E10) at the inner sensor. Plug the terminator plug (E20) and the sensor cable into the 3-way coupler. 3. Connect the CANbus cable (C06) between the 3-way couplers. Only the components shown in black are included in this kit.
5 Software Setup 1. Start up your sprayer and test the sprayer’s functionality. The display terminal does not need to be powered on for the original boom function switches to operate. Unfold the booms and raise/lower each boom and the main section. Confirm that the cabling and hoses are agreeable to the entire range of motion. 2. If any functions do not work, review the hydraulic and electrical portions of this manual to check for proper installation. 3.
6 Cable Drawings 6.
Canada NORAC Systems International Inc. Phone: (+1) 306 664 6711 Toll Free: 1 800 667 3921 Shipping Address: 3702 Kinnear Place Saskatoon, SK S7P 0A6 United States NORAC, Inc. Phone: (+1) 952 224 4142 Toll Free: 1 866 306 6722 Shipping Address: 6667 West Old Shakopee Road, Suite 111 Bloomington, MN 55438 Europe NORAC Europe Phone: (+33) (0)4 26 47 04 42 Shipping Address: Rue de l’hermitage 01090 GUEREINS France www.norac.