Owner’s Manual For 1200XX models: For 120X-IMXX models: 12.0 cu.ft., 2-way, 4-door, R.V. refrigerator. 12.0 cu.ft., 2-way, 4-door, R.V. refrigerator with ice maker. The letter “X”, in the model numbers above, stands for a letter or numeral which means a refrigerator option. ! WARNING: Improper installation, adjustment, alteration, service or maintenance can cause injury or property damage. Refer to this manual.
Table of Contents Gas Absorption 3 Year Limited Warranty Policy ......................... 2 Gas Absorption Warranty Information ........................................ 3 Gas Absorption Warranty Questions .......................................... 3 Safety Awareness ....................................................................... 4 Safety Instructions ...................................................................... 4 About Your Refrigerator ......................................................
2. IN NO EVENT AND UNDER NO CIRCUMSTANCES SHALL NORCOLD BE RESPONSIBLE UNDER THIS LIMITED WARRANTY FOR ANY OTHER CHARGE WHATSOEVER, INCLUDING BUT NOT LIMITED TO CHARGES OR CLAIMS FOR LABOR, LOST BUSINESS, LOST TIME, LOST PROFITS, LOSS OF USE, OR ANY KIND OF INCIDENTAL OR CONSEQUENTIAL DAMAGES, HOWEVER DENOMINATED OR DESCRIBED. THE REMEDY UNDER THIS WARRANTY IS LIMITED TO REPLACEMENT OR REPAIR. 3.
- Do not spray liquids near electrical outlets, connections, or the refrigerator components. Many liquids are electrically conductive and can cause a shock hazard, electrical shorts, and in some cases fire. Safety Awareness Read this manual carefully and understand the contents before you use the refrigerator. - The refrigerator cooling system is under pressure. Do not try to repair or to recharge a defective cooling system. The cooling system contains sodium chromate.
Food compartment: Crispers: Start up the refrigerator (see “Operating the Refrigerator Controls”)and let it cool for eight hours before loading with food. If the refrigerator does not start to cool down after about two hours, contact your dealer or a Norcold authorized service center. The crispers are located at the bottom left side of the fresh food compartment and supply a storage area to preserve fruit and vegetable freshness. Make sure that you always push the crispers fully in.
To remove or move the shelves of the fresh food compartment: - Remove the screws [41] from each retainer [54] on the side of the refrigerator (See Art00992). Temperature control system: - Pull each shelf forward out of the slot. Although the refrigerator is not frost -free, it is made to limit frost on the cooling fins. At regular intervals, the temperature control system automatically melts most of the frost from the cooling fins.
Operating the Refrigerator Controls AC Operation 120 volts AC (108 volts min.-132 volts max.) Propane gas operation: Propane gas (11 inches water column pressure) 12 volts DC - control voltage (10.5 volts min. - 15.4 volts max.) The refrigerator operates on these energy sources. Operation out of these limits can damage the refrigerator electrical components and will void the warranty.
- Push and hold the ON / OFF button for one second and then release to silence the alarm. - Push the ON / OFF button to turn the refrigerator on. - The refrigerator will start a 30 second trial for ignition. - During the 30 second trial for ignition, the refrigerator controls open the gas safety valve and the igniter makes sparks. - When no fault code shows and only the power indicator remains, this means that the refrigerator is operating on propane gas in the manual mode.
Ice Maker (Optional) Refrigerator Care Checklist The ice maker is assembled to the refrigerators at the factory as optional equipment. If the refrigerator does not have a factory installed ice maker, one cannot be added to the refrigerator at a later time. Your refrigerator will give you years of trouble free service if you do these simple checks every three to six months: The ice maker is fully automatic and will operate in ambient temperatures as low as 0° F.
It is normal for frost to collect inside the freezer. Excess frost decreases the cooling performance of the refrigerator. Defrost the refrigerator and freezer as necessary: - Wash the interior with a mild cleaner or a solution of liquid dish detergent and warm water. - Rinse with a solution of baking soda and clean water. - Remove all food from the refrigerator. - Dry with clean cloth. - Turn the refrigerator OFF. - Put all food in the refrigerator.
Door Sealing - Make sure the propane gas pressure is 11 inches water column. - Adjust if needed. Check the seal of the doors (See Art00980). If either door does not seal correctly, excess frost will collect inside the refrigerator. Make sure the doors seal correctly: - Close each door on a piece of paper that is about the size and thickness of a dollar bill. - Make sure the combustion seal is complete and intact. - Replace or repair it if needed. - Make sure the burner and the burner orifice are clean.
1. Remove the tape and plastic bags from the end of the water supply line, the end of the ice maker water line, and the water solenoid valve. Remove and clean the burner orifice: Your dealer or Norcold authorized service center must do this procedure. 2. Connect the ice maker water line to the water solenoid valve. Remove and clean the burner orifice (See Art00956): 3. Connect the garden hose adapter to the water solenoid valve. - Close the valve at the propane gas tank(s). 4.
Remove the Refrigerator Reinstall the Refrigerator Your dealer or Norcold authorized service center must do this procedure. Your dealer or Norcold authorized service center must do this procedure. ! ! CAUTION: The rear of the refrigerator has sharp edges and corners. To prevent cuts or abrasions when working on the refrigerator, be careful and wear cut resistant gloves. WARNING: To avoid possible propane gas leaks, always use two wrenches to loosen and tighten the gas supply line connections. 1.
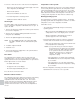
Replacement Parts Ice Maker Wiring Pictorial and Diagram (Optional) You may purchase replacement parts through your local RV dealer or authorized Norcold Service Center. The parts of the ice maker wiring pictorial and diagram are (See Art01500): Wiring Diagram and Pictorial The parts of the wiring diagram are (See Art01769): The parts of the wiring pictorial are (See Art01770): A .................................................................... Temperature switch B ....................................
Fault Codes Fault Codes Fault Code Meaning No display. DC voltage is unavailable to the refrigerator control panel or the refrigerator is OFF. " dr " Audible alarm also. The door was open for more than 2minutes. Corrective Actions Check: - That the refrigerator is ON. - That the battery charging equipment of the vehicle is operational. - That the AC/DC converter is operational (if applicable). - See your dealer or a Norcold authorized service center. Close the door.
Owner’s Manual 16
Art00990 54 41 Art00992
5 AMP 12VDC F1 GND T1 + 12 VDC/VCD - 12 VDC/VCD WH-BK/BC-NR S WH/BC H YL-GN-/JN-VE 1 2 3 T - WH/BC 2 9 C RD/RG D WH/BC WH/BC RD/RG RD/RG 10 6 RD-WH/RG-BC LIMIT_OUT LIMIT_IN BK/NR BK/NR F2 OVERLAY/REV˚TRMENT WH/BC T P1 GN/VE } L1 1 WH-RD/BC-RG 120 VAC 120 VCA 2 BU/BL T 3 WH-VT/BC-VT 4 WH/BC VT/VT Art01769 BK/NR E B BK/NR L2 BK/NR BK/NR BK/NR 3 4 5 AMP 6 BK/NR BK/NR YL/JN OR/OR 1 TEMP MODE ON-OFF 2 3 4 5 6 YL/JN G 5 P2 G 7 DISPLAY BOARD/CARTE D AF
F OVERLAY/REV˚TRMENT 1 E 5 U 1 F 7 5 DISPLAY BOARD/ CARTE D AFFICHAGE V 2 3 F 4 G D G 4 C 2 S T1 P2 GND 1 P1 A T 12VDC 10 -12VDC/VCD LIMIT_OUT AC_HT_HI AC_HT_HI LIMIT_IN AC_HT_LO L2 L1 5 AMP AC_HT_LO F1 F2 O 6 H 1 Q +12VDC/VCD POWER BOARD/ PANNEAU D ALIMENTATION 5 AMP 1 6 J R P K 11 N L T T B B M 7 1 8 Art01770