
User's Manual

©2006 Nordic ID Oy
Nordic ID PL3000 user manual, v. 2.6, October 2006 98
After the driver is installed the connection should be established automatically. This can be verifi ed by
observing the round grey icon in the ActiveSync main window. If the grey icon begins to spin and changes
from grey to green, the connection is being established. If not, you need to confi gure ActiveSync to use the
USB port by selecting “Connection Settings” from the ActiveSync fi le menu and by checking the “Allow
USB connection with this desktop computer” check box. Apply the changes by selecting OK. After this the
window is closed. When the connection is established the icon will stop spinning and remain green. You
have now successfully set up your USB ActiveSync connection.
File transfers & Synchronisation
When the ActiveSync connection is established ActiveSync will ask you on your PC if you wish to set up
a new partnership. If you answer “No”, you will still be able to transfer fi les to and from the PL3000, and
you can also install programs. Answering, “Yes” will enable you to keep data automatically synchronised
between your PC and PL3000.
Creating an ActiveSync connection to a PC
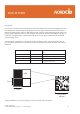
Through ActiveSync fi le folders of the PL3000 can be accessed from a PC.
Install ActiveSync onto your PC.
Save the PL3000_usbsync, wceusbh security log and wceusbh system fi les to your hard drive.
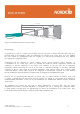
After connecting the PL3000 charger with USB cable to the PC, place the PL3000 into the charger. Switching
on the PL3000, your PC should automatically start the hardware installation wizard. In the wizard select the
folder where PL3000_usbsync is installed and install the drivers.
If your PC does not automatically recognise the PL3000, install the driver by starting the hardware installation
from the control panel.