
User's Manual

©2006 Nordic ID Oy
Nordic ID PL3000 user manual, v. 2.6, October 2006 99
Appendix E Creating Cisco WLAN connection
Start the Aironet Client Utility (ACU) from the Cisco folder.
Create a profi le and edit the settings according to your network.
To ensure that there is suffi cient signal in the WLAN network you should use the site survey tool of the
ACU.
After creating the profi le and settings, connect to the network using the Wireless Login Module under Start-
up menu within programs within Cisco.
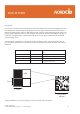
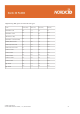
Exemplary Ad-Hoc network installation
Add a network by using the Aironet Client Utility.
Write the SSID code of the network you have selected.
Choose the Infrastructure Mode value: No
Confi rm the setting by clicking OK
Select active profi le: AdHoc and confi rm the setting by clicking OK
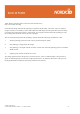
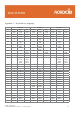
After setting set fi xed IP addresses to the PL3000 and the PC an Adhoc network is created.
Specify an IP Adress for the PL3000.
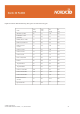
The IP Address, Subnet mask, Default Gateway Primary DNS and Secondary DNS addresses must be same
as for the PC.