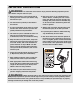
Model No. NTC3015.0 Serial No. USER'S MANUAL Serial Number Decal QUESTIONS? As a manufacturer, we are committed to providing complete customer satisfaction. If you have questions, or if parts are damaged or missing, PLEASE CONTACT OUR CUSTOMER SERVICE DEPARTMENT DIRECTLY. CALL TOLL-FREE: 1-888-825-2588 Mon.–Fri., 6 a.m.–6 p.m. MST ON THE WEB: www.nordictrackservice.com CAUTION Read all precautions and instructions in this manual before using this equipment. Keep this manual for future reference.
TABLE OF CONTENTS IMPORTANT PRECAUTIONS . . . . . . . . . . . . . . . . . . . . . . . . . . . . . . . . . . . . . . . . . . . . . . . . . . . . . . . . . . . . . . . .3 BEFORE YOU BEGIN . . . . . . . . . . . . . . . . . . . . . . . . . . . . . . . . . . . . . . . . . . . . . . . . . . . . . . . . . . . . . . . . . . . . . .4 ASSEMBLY . . . . . . . . . . . . . . . . . . . . . . . . . . . . . . . . . . . . . . . . . . . . . . . . . . . . . . . . . . . . . . . . . . . . . . . . . . . . . . .
IMPORTANT PRECAUTIONS WARNING: To reduce the risk of serious injury, read the following important precautions before using the exercise cycle. 1. Read all instructions in this manual and all warnings on the exercise cycle before using the exercise cycle. 10. The pulse sensor is not a medical device. Various factors, including the user's movement, may affect the accuracy of heart rate readings. The pulse sensor is intended only as an exercise aid in determining heart rate trends in general. 2.
BEFORE YOU BEGIN Congratulations for selecting the new NordicTrack® SL 528 exercise cycle. Cycling is one of the most effective exercises for increasing cardiovascular fitness, building endurance, and toning the entire body. The SL 528 exercise cycle offers an impressive array of features to let you enjoy this healthful exercise in the convenience and privacy of your home. after reading this manual, see the front cover of this manual.
ASSEMBLY Assembly requires two persons. Place all parts of the exercise cycle in a cleared area and remove the packing materials. Do not dispose of the packing materials until assembly is completed. Assembly requires the included tools and your own adjustable wrench driver . and Phillips screw- Use the part drawings below to identify the small parts used in assembly. The number in parentheses below each drawing is the key number of the part, from the PART LIST on page 22.
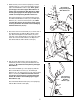
1. Attach the Left Front Stabilizer (15) to the left side of the Upright Frame (5) with three M8 x 22mm Button Screws (54) and three M8 Split Washers (55). Make sure that the Left Front Stabilizer is turned so the Wheel (17) is facing forward as shown. Attach the Right Front Stabilizer (40) to the right side of the Upright Frame (5) in the same way. 1 15 17 40 5 55 55 54 54 2.
4. While another person holds the Upright (2) near the Upright Frame (5), connect the Upper Wire Harness (42) to the Middle Wire Harness (51). Next, gently pull the upper end of the Upper Wire Harness to remove the slack from the Wire Harnesses while inserting the Upright into the Upright Frame. Be careful to avoid pinching the Wire Harnesses. 4 Be careful to avoid pinching the Wire Harnesses.
7. The Console (4) requires four “D” batteries (not included); alkaline batteries are recommended. Remove the battery cover from the bottom of the Console. Next, insert four batteries into the battery compartment; make sure that the batteries are oriented as shown by the diagram inside the battery compartment. Reattach the battery cover. 7 4 Batteries Battery Cover 8.
HOW TO OPERATE THE EXERCISE CYCLE HOW TO ADJUST THE PEDAL STRAPS HOW TO ADJUST THE SEAT POST To adjust the pedal straps, first pull the ends of the straps off the tabs on the pedals. Adjust the straps to the desired position, and then press the ends of the straps back onto the tabs. For effective exerSeat cise, the seat should be at the proper height. As you pedal, there should be a slight bend in Seat your knees when Post the pedals are in the lowest position.
CONSOLE DIAGRAM Note: If there is a sheet of clear plastic on the face of the console, remove it before using the console. FEATURES OF THE CONSOLE The advanced console offers a selection of features designed to make your workouts more enjoyable and effective. When the manual mode of the console is selected, the resistance of the pedals can be changed with the touch of a button. As you exercise, the console will provide continuous exercise feedback.
The Training Zones bar—The Training Zones bar will show the approximate intensity level of your exercise. HOW TO USE THE MANUAL MODE 1 Press any button on the console or begin pedaling to turn on the console. A few seconds after the console is turned on, the displays will light. A tone will then sound and the console will be ready for use. 2 Select the manual mode.
Note: The console can show speed and distance in either miles or kilometers. The letters MPH or Km/H will appear in the lower display to show which unit of measurement is selected. To change the unit of measurement, first hold down the Start button for a few seconds. An E (for English) or an M (for metric) will appear in the lower display. Press the 1 Step Resistance 10 button to change the unit of measurement.
When the one of the “Too Fast” indicators lights, decrease your pace. When the “On Pace” indicator lights, maintain your current pace. HOW TO USE A PRESET PROGRAM 1 Press any button on the console or begin pedaling to turn on the console. See step 1 on page 11. 2 Select one of the six preset programs. To select one of the six preset programs, press the Resistance/ Pace button repeatedly until “P 1,” “P 2,” “P 3,” “P 4,” “P 5,” or “P 6” appears in the upper display.
4 Monitor your progress with the displays. HOW TO USE A HEART RATE PROGRAM See step 4 on page 11. 5 1 Measure your heart rate if desired. See step 1 on page 11. See step 5 on page 12. 6 Turn on the fan if desired. 2 Select one of the two heart rate programs. To select a heart rate program, press the Heart Rate Control button once or twice until “P 7” or “P 8” appears in the upper display. A few seconds after a program is selected, the upper display will show how long the program will last.
4 Hold the handgrip pulse sensor. The Target Pace guide will prompt you to increase or decrease your pedaling pace during the program. When one of the “Too Slow” indicators lights, increase your pace. When the one of the “Too Fast” indicators lights, decrease your pace. When the “On Pace” indicator lights, maintain your current pace.
HOW TO CONNECT YOUR PORTABLE STEREO HOW TO CONNECT YOUR CD PLAYER, VCR, OR COMPUTER Note: If your stereo has an RCA-type AUDIO OUT jack, see instruction A below. If your stereo has a 1/8” LINE OUT jack, see instruction B. If your stereo has only a PHONES jack, see instruction C. To use iFIT.com CDs, the exercise cycle must be connected to your portable CD player, portable stereo, home stereo, or computer with CD player. See pages 16 and 17 for connecting instructions. To use iFIT.
HOW TO CONNECT YOUR HOME STEREO HOW TO CONNECT YOUR COMPUTER Note: If your stereo has an unused LINE OUT jack, see instruction A below. If the LINE OUT jack is being used, see instruction B. Note: If your computer has a 1/8” LINE OUT jack, see instruction A. If your computer has only a PHONES jack, see instruction B. A. Plug one end of the audio cable into the jack beneath the console. Plug the other end of the cable into the adapter. Plug the adapter into the LINE OUT jack on your stereo. A.
HOW TO CONNECT YOUR VCR HOW TO USE AN IFIT.COM CD OR VIDEO PROGRAM Note: If your VCR has an unused AUDIO OUT jack, see instruction A below. If the AUDIO OUT jack is being used, see instruction B. If you have a TV with a built-in VCR, see instruction B. If your VCR is connected to your home stereo, see HOW TO CONNECT YOUR HOME STEREO on page 17. To use an iFIT.com CD or video program, the exercise cycle must be connected to your CD player or VCR.
Note: If the resistance of the pedals and/or the pace setting does not change when a “chirp” is heard: 2 See step 2 on page 18. • Make sure that the letters “iFIT” appear in the display. 4 Select the iFIT.com mode. 3 Go to your computer and start an internet connection. • Adjust the volume of your CD player or VCR. If the volume is too high or too low, the console may not detect the program signals. 4 Start your Web browser, if necessary, and go to our Web site at www.iFIT.com.
MAINTENANCE AND TROUBLESHOOTING Inspect and tighten all parts of the exercise cycle regularly. Replace any worn parts immediately. HANDGRIP PULSE SENSOR TROUBLESHOOTING If the handgrip pulse sensor does not function properly, see step 5 on page 12. To clean the exercise cycle, use a damp cloth and a small amount of mild soap. Important: To avoid damage to the console, keep liquids away from the console and keep the console out of direct sunlight.
CONDITIONING GUIDELINES The following guidelines will help you to plan your exercise program. Remember that proper nutrition and adequate rest are essential for successful results. During the first few minutes of exercise, your body uses easily accessible carbohydrate calories for energy. Only after the first few minutes of exercise does your body begin to use stored fat calories for energy.
PART LIST—Model No. NTC3015.0 Key No. Qty. 1 2 3 4 5 6 7 8 9 10 11 12 13 14 15 16 17 18 19 20 21 22 23 24 25 26 27 28 29 30 31 32 33 34 35 36 37 38 39 40 41 42 1 1 1 1 1 2 1 1 1 1 1 1 1 1 1 1 2 1 2 1 1 1 1 1 1 1 1 1 1 1 1 1 2 1 1 1 1 1 1 1 1 1 Description R0505A Key No. Qty.
EXPLODED DRAWING—Model No. NTC3015.
HOW TO ORDER REPLACEMENT PARTS To order replacement parts, call the toll-free telephone number on the front cover of this manual. To help us assist you, please be prepared to give the following information: • the MODEL NUMBER of the product (NTC3015.