
Owner's Manual


7
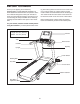
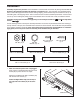
3. Identify the Left Upright (89), which is marked
with a “Left” sticker. Have a second person hold
the Left Upright near the Base (97).
See the inset drawing. Tie the wire tie in the
Left Upright (89) securely around the end of the
Upright Wire (84). Then, pull the other end of the
wire tie until the Upright Wire is routed through
the Left Upright.
84
3
84
89
Wire
Tie
Wire
Tie
89
97
84
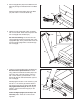
2. Pull the Upright Wire (84) and the Base Ground
Wire (94) through the indicated hole in the Base
(97).
Attach the Base Ground Wire (94) to the Base
(
97) with a #8 x 1/2" Ground Screw (9).
84
2
Hole
9
94
97
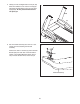
4. Hold the Left Upright (89) against the Base (97).
Be careful not to pinch the wires. If neces-
sary, position the Base Ground Wire (94) in the
hole in the side of the Left Upright. Insert two
3/8" x 2 3/4" Screws (7) and two 3/8" x 1 1/4"
Screws (8) with two 3/8" Star Washers (12) into
the Left Upright.
Partially tighten the 3/8" x 2 3/4" Screws (7) and
the 3/8" x 1 1/4" Screws (8) until the heads of
the Screws touch the Left Upright (89); do not
fully tighten the Screws yet. Note: It may be
helpful to use the Short Hex Key (63) on the
Screw shown.
Attach the Right Upright (not shown) in the
same way. Note: There are no wires on the
right side.
89
97
63
4
8
7
12
94
12