Patent Pending Model No. NTC07942 Serial No. USER'S MANUAL Serial Number Decal QUESTIONS? As a manufacturer, we are committed to providing complete customer satisfaction. If you have questions, or if there are missing parts, we will guarantee satisfaction through direct assistance from our factory. TO AVOID DELAYS, PLEASE CALL DIRECT TO OUR TOLLFREE CUSTOMER HOT LINE. The trained technicians on our customer hot line will provide immediate assistance, free of charge to you.
TABLE OF CONTENTS IMPORTANT PRECAUTIONS . . . . . . . . . . . . . . . . . . . . . . . . . . . . . . . . . . . . . . . . . . . . . . . . . . . . . . . . . . . . . . . .3 BEFORE YOU BEGIN . . . . . . . . . . . . . . . . . . . . . . . . . . . . . . . . . . . . . . . . . . . . . . . . . . . . . . . . . . . . . . . . . . . . . .4 ASSEMBLY . . . . . . . . . . . . . . . . . . . . . . . . . . . . . . . . . . . . . . . . . . . . . . . . . . . . . . . . . . . . . . . . . . . . . . . . . . . . . . .
IMPORTANT PRECAUTIONS WARNING: To reduce the risk of serious injury, read the following important precautions before using the exercise cycle. 1. Read all instructions in this manual before using the exercise cycle. Use the exercise cycle only as described. 7. Wear suitable clothing when using the exercise cycle; do not wear loose clothing that could become caught on the exercise cycle. Always wear athletic shoes. 2.
BEFORE YOU BEGIN Congratulations for selecting the new NordicTrack® SL 710 exercise cycle. Cycling is one of the most effective exercises for increasing cardiovascular fitness, building endurance, and toning the entire body. The NordicTrack® SL 710 offers an impressive array of features designed to let you enjoy this healthful exercise in the comfort and privacy of your home. Department toll-free at 1-888-825-2588, Monday through Friday, 6 a.m. until 6 p.m. Mountain Time (excluding holidays).
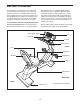
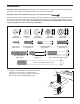
ASSEMBLY Assembly requires two persons. Place all parts of the exercise cycle in a cleared area and remove the packing materials. Do not dispose of the packing materials until assembly is completed. Assembly requires the included tools and your own adjustable wrench . Use the drawings below to identify the small parts used during assembly. The number in parenthesis below each drawing is the key number of the part, from the PART LIST on page 25.
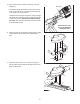
2. While another person lifts the rear of the Frame (1), attach the Rear Stabilizer (16) to the Frame with four M8 x 40mm Button Screws (54) and four M8 Split Washers (55). 2 1 16 55 55 54 54 3. While another person holds the Upright (2) in the position shown, connect the Upper Wire Harness (51) to the Lower Wire Harness (43). Gently pull the upper end of the Upper Wire Harness to remove any slack from the Wire Harnesses. Insert the Upright (2) into the Frame (1).
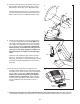
5. Have another person hold the Console (4) near the Upright (2). 5 Bookrack 4 Connect the Upper Wire Harness (51) to the wire harness on the Console (4). Connect the Pulse Wire (3) to the pulse wire on the Console. 3 Carefully insert all excess wiring down into the Upright (2). Attach the Console (4) to the Upright with four M4 x 16mm Screws (57). Be careful to avoid pinching the wires. Next, press the bookrack onto the Console in the indicated location.
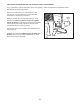
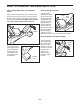
. Attach the Backrest (62) to the Backrest Frame (42) with two M6 x 20mm Button Screws (20), an M6 x 38mm Button Screw (80), and an M6 Washer (60). 8 62 Slide the Backrest Frame (42) onto the Seat Frame (7). Attach the Backrest Frame with four M8 x 25mm Button Screws (79) and four M8 Split Washers (55). 42 55 79 60 55 80 79 20 7 9. Identify the Left Pedal (22), which is marked with an “L.” Using an adjustable wrench, firmly tighten the Left Pedal counterclockwise into the Left Crank Arm (24).
INSTALLING THE RECEIVER FOR THE OPTIONAL CHEST PULSE SENSOR If you purchase the optional chest pulse sensor (see page 21), follow the steps below to install the receiver included with the chest pulse sensor. Remove the access door from the underside of the Console (4). You may need to use a small standard screwdriver to remove the access door. Slide the receiver onto the indicated plastic pin on the Console (4); make sure that the receiver is oriented exactly as shown.
HOW TO OPERATE THE EXERCISE CYCLE HOW TO MOVE AND LEVEL THE EXERCISE CYCLE Stand in back of the exercise cycle, and lift the exercise cycle until it can be moved on the front wheels. Move the exercise cycle to the desired location and carefully lower it. Due to the weight of the exercise cycle, use extreme caution while moving it. Wheel HOW TO ADJUST THE SEAT The seat can be adjusted to the posiSeat Seat tion that is the most Knob comfortable for you.
CONSOLE DIAGRAM Left Display Matrix Training Zone Bar Note: If there is a sheet of clear plastic on the face of the console, remove it before using the console. FEATURES OF THE CONSOLE The advanced console offers a selection of features designed to make your workouts more enjoyable and effective. When the manual mode of the console is selected, the resistance of the exercise cycle can be changed with the touch of a button. As you exercise, the console will provide continuous exercise feedback.
tors around the track will light in succession until the entire track is lit. The track will then darken and the indicators will again begin to light in succession. HOW TO USE THE MANUAL MODE 1 Press any button on the console or begin pedaling to turn on the console. The Training Zone bar—The Training Zone bar will show your pace and the approximate intensity level of your exercise. For example, if three or four indicators in the bar are lit, the bar shows that your pace is ideal for fat burning.
Note: The console can display speed and distance in either miles or kilometers. To find which unit of measurement is selected, you must select the console’s user mode. Hold down the Program Select button for about three seconds. The letter “E” for English miles or the letter “M” for metric kilometers will appear in the left display. To change the unit of measurement, press the + button.
setting for the cura rent segment. The lit indicators in the bar will show your actual pace. If an indicator to the right of the lit indicators is flashing b (see drawing a), increase your pace. If an indicator to the left of any lit indicator is flashing (see drawing b), decrease your pace. When no indicator is flashing, your pace matches the pace setting for the current segment. Important: The pace settings are intended only to provide motivation.
6 Turn on the fan if desired. 3 When a heart rate program is selected, the word “AGE” and the current age setting will flash in the left display. You must enter your age to use a heart rate program. If you have already entered your age, press the Enter button and go to step 4. If you have not entered your age, press the + or – button repeatedly to enter your age, and then press the Enter button. Once you have entered your age, it will be saved in memory. See step 6 on page 13.
rate setting for the a current segment. The lit indicators in the bar will show your actual pace. When you hold the handgrip pulse sensor or b wear the optional chest pulse sensor, the console will periodically compare your heart rate to the target heart rate setting for the current segment; if necessary, an indicator in the bar will then flash to prompt you to increase or decrease your pace to bring your heart rate closer to the target heart rate setting.
HOW TO CONNECT YOUR PORTABLE STEREO HOW TO CONNECT YOUR CD PLAYER, VCR, OR COMPUTER Note: If your stereo has an RCA-type AUDIO OUT jack, see instruction A below. If your stereo has a 1/8” LINE OUT jack, see instruction B. If your stereo has only a PHONES jack, see instruction C. To use iFIT.com CDs, the exercise cycle must be connected to your portable CD player, portable stereo, home stereo, or computer with CD player. See pages 17 and 18 for connecting instructions. To use iFIT.
HOW TO CONNECT YOUR HOME STEREO HOW TO CONNECT YOUR COMPUTER Note: If your stereo has an unused LINE OUT jack, see instruction A below. If the LINE OUT jack is being used, see instruction B. Note: If your computer has a 1/8” LINE OUT jack, see instruction A. If your computer has only a PHONES jack, see instruction B. A. Plug one end of the audio cable into the jack beneath the console. Plug the other end of the cable into the adapter. Plug the adapter into the LINE OUT jack on your stereo. A.
HOW TO CONNECT YOUR VCR B. Plug one end of the audio cable into the jack beneath the console. Plug the other end of the cable into the adapter. Plug the adapter into an RCA Y-adapter (available at electronics stores). Next, remove the wire that is currently plugged into the AUDIO OUT jack on your VCR and plug the wire into the unused side of the Y-adapter. Plug the Y-adapter into the AUDIO OUT jack on your VCR. Note: If your VCR has an unused AUDIO OUT jack, see instruction A below.
your workout. Simply follow your personal trainer’s instructions. HOW TO USE IFIT.COM CD AND VIDEO PROGRAMS The program will function in almost the same way as a resistance and pace program (see step 3 on page 14). However, an electronic “chirping” sound will alert you when the resistance setting and/or the pace setting is about to change. To use iFIT.com CDs or videocassettes, the exercise cycle must be connected to your portable CD player, portable stereo, home stereo, computer with CD player, or VCR.
program (see step 3 on page 14). However, an electronic “chirping” sound will alert you when the resistance setting and/or the pace setting is about to change. HOW TO USE PROGRAMS DIRECTLY FROM OUR WEB SITE Our Web site at www.iFIT.com allows you to play iFIT.com audio and video programs directly from the internet. To use programs from our Web site, the exercise cycle must be connected to your home computer. See HOW TO CONNECT YOUR COMPUTER on page 18.
MAINTENANCE AND TROUBLESHOOTING Inspect and properly tighten all parts of the exercise cycle regularly. To clean the exercise cycle, use a soft, damp cloth. Keep liquids away from the console and keep the console out of direct sunlight. Locate the Reed Switch (46). Turn the Right Crank Arm (23) until the Magnet (30) is aligned with the Reed Switch. Loosen, but do not remove, the indicated M4 x 16mm Screw (57). Slide the Reed Switch slightly closer to or away from the Magnet. Then, retighten the Screw.
EXERCISE GUIDELINES Fat Burning WARNING: To burn fat effectively, you must exercise at a relatively low intensity level for a sustained period of time. During the first few minutes of exercise, your body uses easily accessible carbohydrate calories for energy. Only after the first few minutes of exercise does your body begin to use stored fat calories for energy.
SUGGESTED STRETCHES The correct form for several basic stretches is shown at the right. Move slowly as you stretch—never bounce. 1 1. Toe Touch Stretch Stand with your knees bent slightly and slowly bend forward from your hips. Allow your back and shoulders to relax as you reach down toward your toes as far as possible. Hold for 15 counts, then relax. Repeat 3 times. Stretches: Hamstrings, back of knees and back. 2 2. Hamstring Stretch Sit with one leg extended.
PART LIST—Model No. NTC07942 Key No. Qty. 1 2 3 4 5 6 7 8 9 10 11 12 13 14 15 16 17 18 19 20 21 22 23 24 25 26 27 28 29 30 31 32 33 34 35 36 37 38 39 40 41 42 43 44 45 46 47 48 49 1 1 1 1 1 2 1 1 1 1 1 1 1 1 1 1 2 1 4 6 1 1 1 1 1 1 1 1 1 1 1 2 2 1 1 1 1 1 1 1 1 1 1 1 1 1 1 1 1 Description R0404A Key No. Qty.
EXPLODED DRAWING—Model No.
81 95 90 47 72 6 6 18 21 81 89 89 2 88 68 31 77 57 29 88 83 33 40 77 46 1 45 28 89 32 57 84 92 75 59 39 93 24 50 67 48 83 59 32 49 33 33 25 50 68 30 78 70 57 84 5 94 91 22 74 76 75 75 35 60 34 74 41 59 67 23 85 57 83 69 33 59 36 44 38 37 64 8 83 71 87 71 57 43 51 3 14 13 53 17 55 56 16 53 55 19 53 55 15 55 19 19 56 54 56 54 27 56 54 54 19
HOW TO ORDER REPLACEMENT PARTS To order replacement parts, simply call our Customer Service Department toll-free at 1-888-825-2588, Monday through Friday, 6 a.m. until 6 p.m. Mountain Time (excluding holidays).