
7200 R User's Manual

17
HOW TO USE CUSTOM PROGRAMS
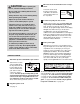
Insert the key fully into the console.
See GETTING STARTED on page 11.
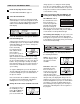
Select one of the custom programs.
When the key is inserted, the manual mode will be
selected. To select a custom program, first press
the Select Goal button repeatedly until the words
“CUSTOM PROGRAM” appear in the main dis-
play. Next, press the Select Course button repeat-
edly to select the Learn 1 or Learn 2 program.
Three seconds after a custom program is se-
lected, the name of the selected program and the
total program time will begin to scroll across the
main display.
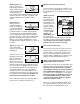
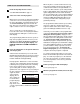
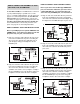
The program display will show the first speed set-
tings of the program you have selected (see the
drawing below). Note: If only three columns of
indicators are lit in the program display, see
HOW TO CREATE A CUSTOM PROGRAM on
page 16.
Press the Start button or the Speed + button to
start the program.
A moment after the button is pressed, the tread-
mill will automatically adjust to the first speed and
incline settings that you programmed previously.
Hold the handrails and begin walking.
Each program is divided into several one-minute
segments. (The main display shows both the time
remaining in the program and the time remaining
in the current segment of the program.) One
speed setting and one incline setting are pro-
grammed for each segment. The speed setting for
the first segment is shown in the flashing Current
Segment column
of the program
display. (The in-
cline settings are
not shown in the
program display.)
The speed set-
tings for the next
several segments will be shown in the columns to
the right.
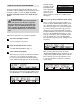
When only three seconds remain in the first seg-
ment of the program, both the Current Segment
column and the column to the right will flash, a se-
ries of tones will sound, the speed setting and the
incline setting will flash in the main display, and all
speed settings will move one column to the left.
The speed setting for the second segment will then
be shown in the flashing Current Segment column
and the treadmill will automatically adjust to the
second speed and incline settings that you pro-
grammed previously.
The program will continue until the speed setting
for the last segment is shown in the Current
Segment column and no time remains in the pro-
gram. The walking belt will then slow to a stop.
If desired, you can redefine to the program while
using it. To change the speed or incline setting
during the current segment, simply press the
Speed or Incline buttons. When the current segment
is completed, the new setting will be saved in mem-
ory. To increase the length of the program, first
wait until the program is completed. Then, press the
Start button, and program speed and incline settings
for as many additional segments as desired. When
you have added as many segments as desired,
press the Stop button twice. To decrease the
length of the program, press the Stop button twice
at any time before the program is completed.
To stop the program temporarily, press the Stop
button. The time will begin to flash in the main dis-
play. To restart the program, press the Start but-
ton or the Speed + button. To end the program,
press the Stop button, remove the key, and then
reinsert the key.
Follow your progress with the displays.
See step 5 on page 12.
When the program has ended, remove the key.
See step 7 on page 15.
5
4
3
2
1
Current Segment