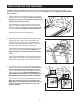
Model No. Serial No. The model number and serial number are found in the location shown below. Write the model number and serial number in the space above. Serial Number Decal QUESTIONS? At FreeMotion Fitness Inc., weʼre committed to providing complete customer satisfaction. For assistance, please contact your distributor. CAUTION Read all precautions and instructions in this manual before using this equipment. Keep this manual for future reference.
TABLE OF CONTENTS SECTION 1 SECTION 2 SECTION 3 SECTION 4 SECTION 5 Important Precautions . . . . . . . . . . . . . . . . . . . . . . . . . . . . . . . . . . . . . . . . . . . . . . . . . . . . . . . . . . . . .3 Warning Decal Placement . . . . . . . . . . . . . . . . . . . . . . . . . . . . . . . . . . . . . . . . . . . . . . . . . . . . . . . . . .5 Before You Begin . . . . . . . . . . . . . . . . . . . . . . . . . . . . . . . . . . . . . . . . . . . . . . . . . . . . . . . . . . . . . . . .
2
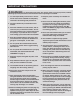
IMPORTANT PRECAUTIONS WARNING: To reduce the risk of burns, fire, electric shock, or injury to persons, read the following important precautions and information before operating the treadmill. 1. It is the responsibility of the owner to ensure that all users of the treadmill are adequately informed of all warnings and precautions. 13. Keep the power cord away from heated surfaces. 14. Never move the walking belt while the power is turned off.
22. Always remove iFIT.com CDs from your CD player when you are not using them. 25. 23. Never insert or drop any object into any opening. 24. Make sure to perform all maintenance procedures outlined in this manual. Failure to do so may result in damage to the treadmill. WARNING: DANGER: Always unplug the power cord immediately after use, before cleaning the treadmill, and before performing the maintenance and adjustment procedures described in this manual.
WARNING DECAL PLACEMENT The decals shown below are found on the treadmill. If any decal is missing or illegible, please contact your distributor to order a free replacement decal. Apply the decal in the location shown. Underside of Console HAZARDOUS VOLTAGE Disconnect power before servicing. Note: This decal is shown at 85% of actual size. : HIGH VOLTAGE Disconnect line cord from outlet before servicing.
BEFORE YOU BEGIN questions after reading the manual, please contact your distributor. Congratulations for selecting the revolutionary NordicTrack® 9600 treadmill. The NordicTrack 9600 treadmill offers an impressive array of features to make your workouts more effective and enjoyable. Before reading further, please familiarize yourself with the parts that are labeled in the drawing below. For your benefit, read this manual carefully before using the NordicTrack 9600 treadmill.
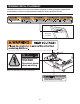
HOW TO SET UP THE TREADMILL Assembly requires two persons. Set the treadmill in a cleared area and remove all packing materials. Do not dispose of the packing materials until assembly is completed. Assembly can be completed using the included allen wrenches. 1. Slide the Right and Left Uprights (95, 97) onto the brackets near the front of the Frame (76). Make sure that the Uprights are on the correct sides; the indicated holes must be facing inward as shown.
4. Refer to step 1. While a second person holds the Uprights (95, 97), remove the two Upright Bolts (96). Slide the Uprights (95, 97) fully onto the brackets on the Frame (not shown). Be careful to avoid pinching your hands or the wires. Attach each Upright with four Upright Bolts (96) as shown. Firmly tighten all eight Upright Bolts. 4 99 99 Firmly tighten the eight Handrail Bolts (99). 97 91 99 95 96 96 5.
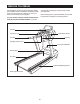
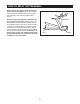
HOW TO MOVE THE TREADMILL Before moving the treadmill, make sure that the power cord is unplugged. Note: It may be necessary to disconnect the CATV cable from the treadmill, depending on how far the treadmill will be moved. Handrails Due to the size and weight of the treadmill, moving it requires two persons. While one person lifts the indicated end, firmly hold the handrails and tip the treadmill forward until it rolls on the front wheels.
HOW TO CONNECT THE TREADMILL HOW TO CONNECT THE POWER CORD 2 This product must be grounded. If it should malfunction or break down, grounding provides a path of least resistance for electric current to reduce the risk of electric shock. Note: These instructions describe how the power cord should be connected in the UK, Germany, Italy, Spain, or France. To connect the power cord in other countries, refer to the instruction sheet accompanying this manual.
HOW TO CONNECT YOUR CD PLAYER TO THE TREADMILL With the Basic console or the Workout TV console, you can connect a portable CD player to the treadmill and use iFIT.com CDs. (Refer to page 22 for instructions about using iFIT.com CDs.) HOW TO CONNECT YOUR PORTABLE CD PLAYER Plug one end of the included audio cable into the indicated jack on the left side of the console. Plug the other end of the audio cable into the PHONES jack on your CD player. Plug your headphones into the other jack on the console.
HOW TO UPGRADE YOUR CONSOLE To upgrade your console and expand the capabilities of your treadmill whenever you choose, please contact your distributor. Your treadmill has been pre-configured to operate with the Basic console or the Workout TV console (see the drawings below). For information about the features of the Basic console, refer to page 13; to learn about the state-of-theart Workout TV console, refer to page 26.
HOW TO USE THE BASIC CONSOLE Note: If there is a thin sheet of clear plastic on the face of the console, remove it. Matrix Main Display FEATURES OF THE CONSOLE workouts, and a unique fitness test program that measures your relative fitness level. Note: The pulse-driven programs and the fitness test program require the use of a Polar®-compatible chest pulse sensor (not included). The Basic console offers an impressive array of features to help you get the most from your exercise.
3 CAUTION: Before operating the console, read the following precautions. • Do not stand on the walking belt when turning on the power. • Always wear the clip (see the drawing at the right) while operating the treadmill. • The pulse sensor is not a medical device. Various factors may affect the accuracy of heart rate readings. The pulse sensor is intended only as an exercise aid in determining heart rate trends in general.
HOW TO USE THE MANUAL MODE 1 2 3 Insert the key into the console. 5 Refer to GETTING STARTED on page 14. Select the manual mode. When the key is inserted, the manual mode will automatically be selected. If a program or the iFIT.com mode has been selected, press the MODE button repeatedly until the main display appears as shown below. Press the START button or the SPEED + button to start the walking belt. A moment after the button is pressed, the walking belt will begin to move at 3 kph.
6 Calories—This section of the main display will show the approximate number of Calories you have burned. Pulse/% Max—When you are using the handgrip pulse sensor or a Polar®-compatible chest pulse sensor (not included), this section of the main display will show your heart rate (refer to step 6). When a pulse-driven program is selected, the display will show your heart rate and the corresponding percentage of your estimated maximum heart rate.
Each program is divided into several time segments of different lengths. The main display will show both the time remaining in the program and the time remaining in the current segment of the program. One speed setting and one incline setting are programmed for each segment. The CURRENT SEGMENT speed setting for the first segment is shown in the flashing CURRENT SEGMENT column of the matrix. (The incline settings are not shown in the matrix.
4 5 To stop the program, press the STOP button. The time will begin to flash in the main display. To restart the program, press the START button or the SPEED + button. The walking belt will begin to move at 3 kph. When the next segment of the program begins, the treadmill will automatically adjust to the speed and incline settings for the next segment. 6 Follow your progress with the main display. Measure your heart rate if desired. Refer to step 6 on page 16.
4 HOW TO USE PULSE-DRIVEN PROGRAMS Pulse-driven programs automatically control the speed and incline of the treadmill to keep your heart rate near a target level while you exercise. Follow the steps below to use a pulse-driven program. 1 Put on a Polar®-compatible chest pulse sensor (not included). 2 Insert the key into the console. 3 You must wear a chest pulse sensor to use a pulse-driven program. Refer to the instructions included with your chest pulse sensor. Refer to GETTING STARTED on page 14.
Each pulse-driven program is divided into oneminute segments. (The main display will show both the time remaining in the program and the time remaining in the current segment of the program.) One target heart rate setting is programmed for each segment. (During the MANUAL PULSE program, the same target heart rate setting will be programmed for all segments.) HOW TO USE THE FITNESS TEST PROGRAM The fitness test program measures your relative fitness level.
5 display and a two-minute cool-down period will begin. The speed and incline will then decrease. Press the START button or the SPEED + button to start the program. When the button is pressed, the main display will show the words LEVEL 1, indicating that the first four-minute level of the fitness test program has begun. The incline of the treadmill will then automatically adjust to 3% and the walking belt will begin to move at 2.4 kph. Hold the handrails and begin walking.
time by pressing the SPEED or INCLINE buttons on the console. However, when the next “chirp” is heard, the speed and/or incline will change to the next settings of the CD program. HOW TO USE IFIT.COM CD PROGRAMS To use iFIT.com CDs, your portable CD player must be connected to the treadmill. See HOW TO CONNECT YOUR CD PLAYER TO THE TREADMILL on page 11. To stop the walking belt at any time, press the STOP button on the console. The time will begin to flash in the main display.
+ and – buttons above the ENTER AGE/WT button. The delay time can be from 1 to 15 minutes. HOW TO USE THE MAINTENANCE MODE The console features a maintenance mode that allows you to access information and to view and change various default settings. Follow the steps below to use the maintenance mode. 1 2 3 4 5 Insert the key into the console. 6 Refer to GETTING STARTED on page 14. Hold down the ENTER AGE/WT button and the RESET button simultaneously for two seconds to select the maintenance mode.
9 Press the ENTER AGE/WT button again to check for system errors. If there are no system errors, the words NO SYSTEM ERRORS will appear in the main display. If a system error appears, please contact your distributor. Press the ENTER AGE/WT button again and 10 enable or disable the safety key. To require the use of the safety key with the console, press the + or – button above the ENTER AGE/WT button until the words SAFETY KEY ENABLED appear in the main display.
the ENTER AGE/WT button again and 14 Press delete or add TV channels. After all valid TV channels have been stored in the consoleʼs memory, you can delete unwanted channels or add other channels. To delete or add a channel, first press the CHANNEL + and – buttons until the channel appears in the main display. appear in the main display. Then, select the next channel that you want to delete or add. Repeat this process until you have finished deleting or adding channels.
HOW TO USE THE WORKOUT TV CONSOLE Note: If there is a thin sheet of clear plastic on the face of the console, remove it. Flat Screen Television Matrix Main Display FEATURES OF THE CONSOLE No matter which mode or program you select, the personal TV will allow you to watch the television program of your choice while you exercise. The state-of-the-art Workout TV console offers an impressive array of features to make your workouts more effective and enjoyable. The console also features new iFIT.
2 HOW TO USE THE WORKOUT TV CONSOLE The Workout TV console offers exactly the same features as the Basic console, but also incorporates a built-in personal TV. Note: The console has the capability to find and store in memory all of the valid TV channels in your area. You can even screen out unwanted channels. Refer to pages 23 to 25 for instructions. 3 Note: A CATV cable must be connected to the treadmill in order for cable TV stations to be viewed.
NOTES 28
PREVENTIVE MAINTENANCE Regular maintenance is necessary for optimal performance and long treadmill life. Please read and follow all instructions below. If the treadmill is not maintained as described, components may wear excessively and the treadmill may be damaged. If you have questions about maintenance, please contact your distributor. CAUTION: Make sure to remove the key and unplug the power cord before performing any maintenance procedures. WEEKLY MAINTENANCE 1.
TURNING THE WALKING PLATFORM Both sides of the walking platform are designed to be used as walking surfaces. Inspect the walking platform periodically for wear. If there is any wood showing through the phenolic coating, or if the surface is damaged, the walking platform should be turned over. The walking platform will need to be turned over after every 16,000 to 19,500 kilometres. Follow the instructions below to turn over the walking platform. 1. Remove the key and unplug the power cord.
SIX-MONTH PREVENTIVE MAINTENANCE RECORD Photocopy this form and use it to record the preventive maintenance performed on the treadmill. Each copy of the form can be used for six months (26 weeks). When maintenance is performed, write the date in the appropriate spaces. Make sure to perform each maintenance procedure as described on pages 29 and 30. If the maintenance procedures are not performed as described, components may wear excessively and the treadmill may be damaged.
SIX-MONTH PREVENTIVE MAINTENANCE RECORD Photocopy this form and use it to record the preventive maintenance performed on the treadmill. Each copy of the form can be used for six months (26 weeks). When maintenance is performed, write the date in the appropriate spaces. Make sure to perform each maintenance procedure as described on pages 29 and 30. If the maintenance procedures are not performed as described, components may wear excessively and the treadmill may be damaged.
TROUBLESHOOTING Most treadmill problems can be solved by following the steps outlined in this section. Find any symptoms that apply, and follow the steps listed. If further assistance is needed, please contact your distributor. 1. SYMPTOM: THE POWER DOES NOT TURN ON a. Make sure that the power cord is plugged into a properly grounded outlet. (Refer to page 10.) b. Make sure that the key is inserted into the console. c. Check the on/off circuit breaker located on the treadmill near the power cord.
4. SYMPTOM: THE WALKING BELT IS OFF-CENTER a. If the walking belt has shifted to the left: Remove the key and unplug the power cord. Using the included allen wrench, turn the roller adjustment bolts in the directions shown, 1/4 of a turn each. Be careful not to overtighten the walking belt. Plug in the power cord, insert the key and use the treadmill for a few minutes. Repeat until the walking belt is centered. b. If the walking belt has shifted to the right: Remove the key and unplug the power cord.
EXERCISE GUIDELINES 3 FACTORS IN A SENSIBLE DIET • Choose high-fiber, low-fat, and low-sugar foods: fruits, vegetables, and whole grains. • Eat at least five servings of fruits and vegetables daily. • Reduce red meat consumption; eat lean meat, white meat, and fish. • Choose healthful snacks; bring healthful foods with you to work or in the car. • Reduce fast food and pre-packaged meals. • Pay attention to fat content and calories. • Limit alcoholic beverages and caffeine.
3. Hamstring Stretch—Sit with one leg extended. Bring the sole of the opposite foot toward you and rest it against the inner thigh of your extended leg. Reach toward your toes as far as possible. Hold for 15 to 30 seconds, then relax. Repeat 3 times for both legs. Stretches: Hamstrings, lower back, and groin. WEIGHT LOSS TIPS At least four, 30-minute workouts per week, along with a reduced-calorie diet, are recommended if you are trying to lose weight.
Time—Beginning exercisers may wish to start with 5 to 10 minutes of aerobic activity. Those in average physical condition should exercise for 20 to 30 minutes. Highly fit people, or people who want to lose weight, should exercise for 30 to 60 minutes. The key is to maintain your target heart rate for the duration of the workout period.
Move on to the Fitness Level only when you feel ready and your heart rate has moved below your target heart rate zone. WORKOUT TIPS Full-body conditioning helps take care of many of life's aches and pains. However, it takes time for your body to adapt to any new routine. Below are some tips that will help ease you into your new NordicTrack routine. The Fitness level usually lasts 12 to 20 weeks. (It may last longer, depending on your fitness goals.
PART LIST To locate the parts listed below, refer to the EXPLODED DRAWING on pages 40 and 41. Key No. Qty.
40 37 86 118 68 60 98 107 125 103 EXPLODED DRAWING 48 102 85 59 90 89 99 63 88 97 91 99 114 44 90 124 124 96 99 44 92 122 92 96 96 117 122 44 93 R0105A 87 92 92 29 99 95 100 93 93 101 92 92 100 96 45 92 92 92 92 94
41 2 74 9 7 115 84 82 78 R0105A 83 77 5 113 120 82 110 10 78 80 11 115 6 4 81 80 74 1 9 7 74 74 120 74 77 79 74 46 6 2 74 6 75 9 7 74 123 5 11 74 46 9 7 74 6 17 76 108 105 12 13 74 74 20 74 70 15 6 24 42 9 7 74 73 21 32 66 71 74 23 33 34 72 6 50 28 67 64 116 69 25 40 65 27 26 14 30 53 112 53 55 52 35 51 7 9 108 119 74 67 9 58 106 57 28 16 109 31 8 18 66 50 77 77 78 116 64 78 19 54 77 61 65 62
HOW TO ORDER REPLACEMENT PARTS To order replacement parts, please contact your distributor. Be prepared to give the following information: • The MODEL NUMBER OF THE PRODUCT (see the front cover of this manual) • The NAME OF THE PRODUCT (NordicTrack® 9600 treadmill) • The SERIAL NUMBER OF THE PRODUCT (see the front cover of this manual for the location) • The KEY NUMBER and DESCRIPTION OF THE PART(S) (see the PART LIST and the EXPLODED DRAWING on pages 39 to 41) FreeMotion Fitness, Inc.