
Manual


8,
9,
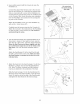
identify the Left PedaU(22), which is marked with an
"L," Using an adjustabb wrench, firmly tighten the
Left PedaUcounterclockwise into the Left Crank Arm
(24), Tighten the Right PedaU(not shown) clockwise
into the Right Crank Arm, Important: Tighten both
Pedals as firmly as possible. After using the
exercise cycle for one week, retighten the
Pedals. For best performance, the Pedals must
be kept tightened.
identify the Left PedaUStrap (25), which is marked
with an "L," Attach the Left PedaU Strap to the Left
PedaU(22), and adjust it to the desired position,
Adjust the Right PedaUStrap (not shown) in the
same way,
25
24
Make sure that all parts are properly tightened before you use the exercise cycle. Note: After assembUy is
compbted, some extra parts may be bft over, Hace a mat beneath the exercise cycle to protect the floor,
INSTALLING THE RECEIVER FOR THE OPTIONAL CHEST PULSE SENSOR
if you purchase the optional chest pulse sensor (see page 19), follow the steps below to install the receiver
included with the chest pulse sensor,
Remove the access door from the underside of the
Console (4), You may need to use a small standard
screwdriver to remove the access door,
Slide the receiver onto the indicated plastic pin on the
Console (4); make sure that the receiver is oriented
e×actly as shown. Locate the two small screws included
with the chest pulse sensor, Attach the receiver to the
Console with the two screws as shown,
Connect the wire on the receiver to the indicated wire on
the Console (4),
Reattach the access door, Make sure that no wires are
pinched. Note: The other wires included with the chest
pulse sensor may be discarded,
J
Screws
Pin
l J 7 /
Wire
Receiver
7