
Owner's Manual


9
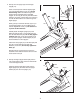
7. Slide the Right Upright Sleeve (96) up against
the console assembly. Attach the Right Upright
Sleeve with a #8 x 3/4" Screw (4) and a #8 x
3/4" Tek Screw (102) as shown.
Attach the Left Upright Sleeve (not shown) to
the console assembly as described above.
4
96
102
7
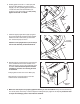
6. Partially tighten three 3/8" x 1" Bolts (64) with
three 3/8" Star Washers (90) into the Right
Upright (74). Next, partially tighten three 3/8" x
1
" Bolts with three 3/8" Star Washers (not
shown) into the Left Upright (73). Then, firmly
t
ighten the six 3/8" x 1" Bolts.
73
74
64
64
90
90
6
Console
Assembly
9. Make sure that all parts are properly tightened before you use the treadmill. Keep the included hex key
in a secure place; the hex key is used to adjust the walking belt (see pages 25 and 26). To protect the floor
or carpet from damage, place a mat under the treadmill.
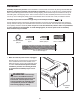
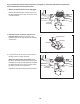
8. With the help of a second person, raise the front
of the treadmill and insert the crossbar on the
Base (83) into the cutout in the cardboard stand
as shown. Have the second person hold the
treadmill to prevent it from moving forward
or backward.
Firmly tighten the four 3/8" x 3 3/4" Bolts (53).
With the help of a second person, lower the
treadmill off the cardboard stand.
Cardboard
Stand
53
83
53
8