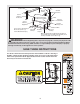
Model No. NTL14905.0 Serial No. USER'S MANUAL Find the serial number in the location shown below. Write the serial number in the space above for reference. Serial Number Decal QUESTIONS? As a manufacturer, we are committed to providing complete customer satisfaction. If you have questions, or if parts are damaged or missing, PLEASE CONTACT OUR CUSTOMER SERVICE DEPARTMENT DIRECTLY. CALL TOLL-FREE: 1-888-825-2588 Mon.–Fri., 6 a.m.–6 p.m. MST ON THE WEB: www.nordictrackservice.
TABLE OF CONTENTS IMPORTANT PRECAUTIONS . . . . . . . . . . . . . . . . . . . . . . . . . . . . . . . . . . . . . . . . . . . . . . . . . . . . . . . . . . . . . . . . .3 BEFORE YOU BEGIN . . . . . . . . . . . . . . . . . . . . . . . . . . . . . . . . . . . . . . . . . . . . . . . . . . . . . . . . . . . . . . . . . . . . . . .6 ASSEMBLY . . . . . . . . . . . . . . . . . . . . . . . . . . . . . . . . . . . . . . . . . . . . . . . . . . . . . . . . . . . . . . . . . . . . . . . . . . . . . . .
IMPORTANT PRECAUTIONS WARNING: To reduce the risk of burns, fire, electric shock, or injury to persons, read the following important precautions and information before operating the treadmill. 1. It is the responsibility of the owner to ensure that all users of this treadmill are adequately informed of all warnings and precautions. 12. Failure to use a properly functioning surge suppressor could result in damage to the control system of the treadmill.
21. Do not change the incline of the treadmill by placing objects under the treadmill. vides information with respect to proper grounding of the mast and supporting structure, grounding of the lead-in wire to an antenna discharge unit, size of grounding conductors, location of antenna discharge unit, connection to grounding electrodes, and requirements for the grounding electrode. 22. When folding or moving the treadmill, make sure that the frame is held securely by the pin on the latch knob. 23.
Power Lines Ground Clamp Service Entrance Conductors Standoff Insulators Mast To External Antenna Terminal of Treadmill Service Entrance Equipment Power Service Grounding Electrode System (e.g. Interior Metal Water Pipe) Antenna Lead-in Wire Ground Wire Antenna Discharge Unit Ground Wire Ground Clamps Bonding Jumper Ground Clamps Optional Antenna Grounding Electrode Driven 8 Feet (2.44m) Into The Earth (If Required By Local Codes). See NEC Section 810–21 (f).
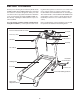
BEFORE YOU BEGIN Thank you for selecting the revolutionary NordicTrack® C2800 treadmill. The C2800 treadmill offers an impressive selection of features designed to make your workouts at home more enjoyable and effective. And when you’re not exercising, the unique C2800 treadmill can be folded up, requiring less than half the floor space of other treadmills. ing this manual, please see the front cover of this manual.
ASSEMBLY Assembly requires two persons. Set the treadmill in a cleared area and remove all packing materials. Do not dispose of the packing materials until assembly is completed. Note: The underside of the treadmill walking belt is coated with high-performance lubricant. During shipping, a small amount of lubricant may be transferred to the top of the walking belt or the shipping carton. This is a normal condition and does not affect treadmill performance.
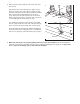
2. Attach the four Base Pads (81) (only three are shown) to the base of the Uprights (85) with four 1” Tek Screws (82) and four Plastic Spacers (101). Note: One replacement Base Pad may be included. Use the Base Pad to replace any Base Pad that becomes worn. 2 101 81 82 101 With the help of a second person, carefully tip the treadmill down so the four Base Pads (81) are resting on the floor and the Uprights (85) are in a vertical position. 85 55 101 81 82 3.
5. With the help of a second person, set the console assembly on the right Upright (85) and the left Upright (not shown). Make sure that no wires are pinched. Attach the console assembly with four Console Bolts (72) and four Star Washers (67) (only one side is shown). Start all four Console Bolts before tightening any of them. 5 85 67 Console Assembly 72 6. Remove the knob from the pin. Make sure that the collar and the spring are on the pin.
8. Remove the Shock Pin (108) from the lower end of the Shock (114). 8 55 114 Plug in the power cord as described on page 13, and then turn on the power as described on page 15. Next, press the Incline increase and decrease buttons until the ball on the bracket is aligned with end of the Shock (114). Then, press the end of the Shock onto the ball. Note: It may be necessary to press the end of the Shock onto the ball while the Frame (55) is moving. See drawing 8a.
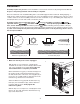
Before the personal television can be used, you must connect an antenna, a 75 ohm CATV cable, or a VCR to the 75 ohm antenna terminal on the treadmill frame. Note: No antenna, cable, or adapter is included. HOW TO CONNECT AN ANTENNA 300 Ohm Flat Wire Indoor Antenna 1. See the drawing near the bottom of this page. Connect the 300 ohm flat wire from the antenna to a 300 ohm to 75 ohm adapter. 1. Place a VHF antenna in the desired location.
If you purchase the optional chest pulse sensor (see page 31), follow the steps below to install the receiver included with the chest pulse sensor. 1. Make sure that the power cord is unplugged. Remove the indicated Screws (99) and the two Console Screws (32) from the Console Base (98). 1 98 99 99 99 32 99 2. Have a second person carefully lift the pulse plates and the Console Base (98). Be careful not to pull any wires.
OPERATION AND ADJUSTMENT THE PRE-LUBRICATED WALKING BELT Your treadmill features a walking belt coated with highperformance lubricant. IMPORTANT: Never apply silicone spray or other substances to the walking belt or the walking platform. Such substances will deteriorate the walking belt and cause excessive wear. HOW TO PLUG IN THE POWER CORD DANGER: Improper connection of the equipment-grounding conductor can result in an increased risk of electric shock.
Note: If there is a sheet of clear plastic on the console, peel off the clear plastic. FEATURES OF THE CONSOLE The treadmill console offers an impressive array of features designed to make your workouts more effective and enjoyable. When the manual mode of the console is selected, the speed and incline of the treadmill can be changed with the touch of a button. As you exercise, the console will display continuous exercise feedback.
To highlight options within the main menu, press the up and down arrow buttons beside the Menu button. HOW TO TURN ON THE POWER 1 2 Plug in the power cord (see page 13). Next, Reset locate the reset/off cirPosition cuit breaker on the treadmill frame near the power cord. Make sure that the circuit breaker is in the reset position. To view the odometer, see step 2. To designate yourself as User 1 or User 2, see step 3. To enter user information, see step 4. To change console settings, see step 5.
4 Enter user information. HOW TO USE THE MANUAL MODE Highlight the words USER SETUP in the main menu and then press the Enter button. 1 To enter your weight, first make sure that you have identified yourself as User 1 or User 2 (see step 3 on page 15). Next, highlight ENTER WEIGHT and press the Enter button. Next, press the up and down arrow buttons to enter your weight. Then, press the Enter button. Insert the key into the console. See HOW TO TURN ON THE POWER on page 15.
5 When the manual mode is selected, the console offers eight display modes. The display mode that you select will determine which workout information is shown. For example, the first display mode shows only the elapsed time and the distance that you have walked or run. Press the Display button repeatedly to select the desired display mode. Change the incline of the treadmill as desired.
7 the button a second time. To turn on the fan at high speed, press the button a third time. To select the auto fan mode, press the button a fourth time. When the auto fan mode is selected, the speed of the fan will automatically increase or decrease as the speed of the walking belt increases or decreases. Measure your heart rate if desired. Note: If you use the handgrip pulse sensor and the optional chest pulse sensor at the same time, the display will not show your heart rate accurately.
If the first or second display mode is selected, a graph of the speed settings of the program will appear in the display. A small arrow below the graph will indicate your progress. HOW TO USE A PRESET PROGRAM 1 Insert the key into the console. See HOW TO TURN ON THE POWER on page 15. 2 Use the main menu to enter or change settings if desired. See HOW TO USE THE MAIN MENU on page 15. 3 At the end of the first one-minute segment of the program, a series of tones will sound.
If the speed or incline setting for the current segment is too high or too low, you can override the setting by pressing the Speed or Incline buttons; however, when the next segment begins, the treadmill will automatically adjust to the speed and incline settings for the next segment. 3 To select a Custom program, press the Custom button once or twice. If the Custom program has not yet been defined, the display will show a program time of three minutes.
5 HOW TO USE A CUSTOM PROGRAM 1 Insert the key into the console. The Custom program will function in the same way as a preset program (see step 5 on page 19). See HOW TO TURN ON THE POWER on page 15. 2 If desired, you can redefine to the program while using it. To change the speed or incline setting for the current segment, simply press the Speed or Incline buttons. When the current segment ends, the new setting will be saved in memory.
ment. Note: The same target heart rate setting may be programmed for two or more consecutive segments. HOW TO USE A HEART RATE PROGRAM CAUTION: If you have heart prob- 5 lems, or if you are over 60 years of age and have been inactive, do not use the heart rate programs. If you are taking medication regularly, consult your physician to find whether the medication will affect your exercise heart rate.
If the speed or incline setting for the current segment is too high or too low, you can override the setting by pressing the Speed or Incline buttons; however, when the console compares your heart rate to the current target heart rate setting, the speed or incline of the treadmill may automatically change. button. If Heart Rate program 2, 3, or 4 is selected, the program will continue until the small arrow reaches the right end of the graph. The walking belt will then slow to a stop.
HOW TO CONNECT YOUR PORTABLE STEREO HOW TO CONNECT THE TREADMILL TO USE IFIT PROGRAMS Note: If your stereo has an RCA-type AUDIO OUT jack, see instruction A below. If your stereo has a 3.5 mm LINE OUT jack, see instruction B. If your stereo has only a PHONES jack, see instruction C. To use iFIT MP3 or CD programs, the treadmill must be connected to your MP3 player, CD player, portable stereo, home stereo, or computer. See pages 24 and 25 for connecting instructions.
HOW TO CONNECT YOUR HOME STEREO HOW TO CONNECT YOUR COMPUTER Note: If your stereo has an unused LINE OUT jack, see instruction A below. If the LINE OUT jack is being used, see instruction B. A. Plug one end of a long 3.5 mm to 3.5 mm stereo audio cable (available at electronics stores) into the input jack on the console. Plug the other end of the cable into the LINE OUT jack on your computer.
HOW TO CONNECT YOUR VCR Note: If your VCR has an unused AUDIO OUT jack, see instruction A below. If the AUDIO OUT jack is being used, see instruction B. If you have a TV with a built-in VCR, see instruction B. If your VCR is connected to your home stereo, see HOW TO CONNECT YOUR HOME STEREO on page 25. A. Plug one end of a long 3.5 mm to RCA stereo audio cable (available at electronics stores) into the input jack on the console. Plug the other end of the cable into the AUDIO OUT jack on your VCR.
5 Note: If the speed and/or incline of the treadmill does not change when a “chirp” is heard: Select a display mode and monitor your progress with the display and the intensity level bar. • Make sure that the iFIT logo appears in the display and that the display is not paused. If the display is paused, press the Start button on the console. When the iFIT mode is selected, the console offers eight display modes (see step 6 on page 17).
9 HOW TO USE AN IFIT PROGRAM DIRECTLY FROM OUR WEB SITE When the iFIT mode is selected, the console offers eight display modes (see step 6 on page 17). Press the Display button repeatedly to select the desired display mode. Our Web site at www.iFIT.com allows you to access programs directly from the internet. To use a program from our Web site, the treadmill must be connected to your home computer. See HOW TO CONNECT YOUR COMPUTER on page 25.
a different channel, press the Channel buttons. The selected channel number will appear on the screen for a few seconds. Note: The television is equipped with a channel memorizing function that allows you to go directly from the current channel to the next channel saved in memory. Before channels can be selected in this way, they must be saved in the television’s memory. See HOW TO USE THE INFORMATION MODE on page 30.
5 on this page), you can manually add channels or delete unwanted channels. HOW TO USE THE INFORMATION MODE The console features an information mode that allows you to view treadmill usage information, select a system of measurement for the console, and turn on and turn off the demo mode. The information mode also allows you to adjust the settings of the television and to save channels into the television’s memory.
HOW TO ADJUST THE CUSHIONING SYSTEM THE OPTIONAL CHEST PULSE SENSOR The treadmill features a cushioning system that reduces the impact as you walk or run on the treadmill. To increase the firmness of the walking platform, step off the treadmill and slide the cushion adjusters toward the front of the treadmill. To decrease the firmness, slide the cushion adjusters toward the back of the treadmill. Note: It may be helpful to lift on the walking platform as you slide the adjusters.
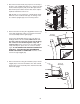
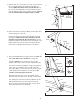
HOW TO FOLD AND MOVE THE TREADMILL HOW TO FOLD THE TREADMILL FOR STORAGE Before folding the treadmill, adjust the incline to the lowest position. If this is not done, the treadmill may become permanently damaged. Remove the key and unplug the power cord. CAUTION: You must be able to safely lift 45 pounds (20 kg) to raise, lower, or move the treadmill. 1. Hold the metal frame firmly in the location shown by the arrow at the right.
HOW TO LOWER THE TREADMILL FOR USE 1. Hold the upper end of the treadmill with your right hand as shown. Using your left hand, pull the latch knob to the left and hold it. Pivot the treadmill down until the frame is past the pin on the latch knob. Knob 2. Hold the metal frame firmly with both hands, and lower the frame to the floor. CAUTION: To decrease the possibility of injury, do not lower the frame by gripping only the plastic foot rails. Do not drop the frame to the floor.
TROUBLESHOOTING Most treadmill problems can be solved by following the steps below. Find the symptom that applies, and follow the steps listed. If further assistance is needed, see the front cover of this manual. PROBLEM: The power does not turn on SOLUTION: a. Make sure that the power cord is plugged into a surge suppressor, and that the surge suppressor is plugged into a properly grounded outlet (see page 13).
Locate the Reed Switch (22) and the Magnet (18) on the left side of the Pulley (17). Turn the Pulley until the Magnet is aligned with the Reed Switch. Make sure that the gap between the Magnet and the Reed Switch is about 1/8”. If necessary, move the Reed Switch slightly using a slotted screwdriver. Reattach the Motor Hood (33), making sure that the 3/4” Screws (7) are inserted into the same holes from which they were removed. Then, run the treadmill for a few minutes to check for a correct speed reading.
PROBLEM: The incline of the treadmill does not change correctly SOLUTION: a. With the key in the console, press one of the Incline buttons. While the incline is changing, remove the key. After a few seconds, re-insert the key. The treadmill will automatically rise to the maximum incline level and then return to the minimum level. This will recalibrate the incline system. PROBLEM: Television reception is poor SOLUTION: a. For the television to operate properly, good reception is necessary.
CONDITIONING GUIDELINES WARNING: Before beginning this or any exercise program, consult your physician. This is especially important for individuals over the age of 35 or individuals with preexisting health problems. The pulse sensor is not a medical device. Various factors, including your movement, may affect the accuracy of heart rate readings. The sensor is intended only as an exercise aid in determining heart rate trends in general. The following guidelines will help you to plan your exercise program.
PART LIST—Model No. NTL14905.0 R1005B To locate the parts listed below, see the EXPLODED DRAWING attached in the center of this manual. Key No. Qty. 1 2 3 4 5 6 7 8 9 10 11 12 13 14 15 16 17 18 19 20 21 22 23 24 25 26 27 28 29 30 31 32 33 34 35 36 37 38 39 40 41 42 43 44 45 46 47 48 49 50 51 1 8 2 2 2 1 16 10 1 2 2 2 4 2 1 1 1 1 2 5 1 1 10 4 1 1 4 1 1 2 2 2 1 3 1 1 2 1 4 1 1 1 1 6 1 1 1 1 1 1 1 Description Key No. Qty.
Key No. Qty. 103 104 105 106 107 108 109 110 111 112 113 114 115 1 1 1 4 4 2 2 1 2 1 2 1 1 Description Key No. Qty.
49 2 27 61 29 62 61 60 111 3 2 5 57 24 4 39 6 2 62 8 39 28 9 61 7 24 64 8 111 61 60 8 1 2 5 12 57 13 27 15 10 109 11 14 2 16 69 59 55 18 112 74 3 2 17 19 66 68 4 20 13 12 102 58 75 26 8 11 20 22 8 21 8 37 53 EXPLODED DRAWING—Model No. NTL14905.
78 100 70 83 83 99 86 32 78 99 46 105 32 99 115 99 99 99 95 83 99 98 99 7 93 107 103 89 88 107 84 20 76 97 EXPLODED DRAWING—Model No. NTL14905.
LIMITED WARRANTY WHAT IS COVERED—The entire NordicTrack VIEWPOINT 2800 treadmill (“Product”) is warranted to be free of all defects in material and workmanship. WHO IS COVERED—The original purchaser or any person receiving the Product as a gift from the original purchaser. HOW LONG IS IT COVERED—ICON Health & Fitness, Inc. (“ICON”), warrants the drive motor for life. Parts and labor are warranted for one year from the date of purchase.