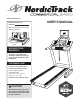
www.nordictrack.com Model No. NTL19112.1 Serial No. Write the serial number in the space above for reference. Serial Number Decal ACTIVATE YOUR WARRANTY To register your product and activate your warranty today, go to www.nordictrackservice.com/ registration. CUSTOMER CARE For service at any time, go to www.nordictrackservice.com. Or call 1-800-TO-BE-FIT (1-800-862-3348) Mon.–Fri. 6 a.m.–6 p.m. MT Sat. 8 a.m.–4 p.m. MT Please do not contact the store.
TABLE OF CONTENTS WARNING DECAL PLACEMENT . . . . . . . . . . . . . . . . . . . . . . . . . . . . . . . . . . . . . . . . . . . . . . . . . . . . . . . . . . . . . . . 2 IMPORTANT PRECAUTIONS . . . . . . . . . . . . . . . . . . . . . . . . . . . . . . . . . . . . . . . . . . . . . . . . . . . . . . . . . . . . . . . . . . 3 BEFORE YOU BEGIN. . . . . . . . . . . . . . . . . . . . . . . . . . . . . . . . . . . . . . . . . . . . . . . . . . . . . . . . . . . . . . . . . . . . . . . .
IMPORTANT PRECAUTIONS WARNING: To reduce the risk of burns, fire, electric shock, or injury to persons, read all important precautions and instructions in this manual and all warnings on your treadmill before using your treadmill. ICON assumes no responsibility for personal injury or property damage sustained by or through the use of this product. 1. It is the responsibility of the owner to ensure that all users of this treadmill are adequately informed of all warnings and precautions. 12.
20. The heart rate monitor is not a medical device. Various factors, including the user’s movement, may affect the accuracy of heart rate readings. The heart rate monitor is intended only as an exercise aid in determining heart rate trends in general. 28. Over exercising may result in serious injury or death. If you feel faint or if you experience pain while exercising, stop immediately and cool down. 29. Do not store the television in temperatures below -40° F (-40° C) or above 140° F (60° C).
34. Upon completion of any service or repairs to the treadmill or the television, ask the service technician to perform safety checks to confirm that the unit is in proper operating condition. 38. Use a jumper wire not smaller than No. 6 AWG (13.3 mm2) copper, or the equivalent, when a separate antenna-grounding electrode is used. See NEC Section 810-21 (j) or your local codes and ordinances. 35. Use No. 10 AWG (5.3 mm2) copper, No. 8 AWG (8.4 mm2) aluminum, No. 17 AWG (1.
STANDARD SERVICE PLANS all 7
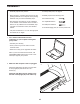
BEFORE YOU BEGIN Thank you for selecting the revolutionary NORDICTRACK® COMMERCIAL 2450 treadmill. The COMMERCIAL 2450 treadmill offers an impressive selection of features designed to make your workouts at home more enjoyable and effective. And when you’re not exercising, the unique treadmill can be folded up, requiring less than half the oor space of other treadmills. reading this manual, please see the front cover of this manual.
PART IDENTIFICATION CHART Use the drawings below to identify small parts used for assembly. The number in parentheses below each drawing is the key number of the part, from the PART LIST near the end of this manual. The number following the key number is the quantity used for assembly. Note: If a part is not in the hardware kit, check to see if it is preattached. Extra parts may be included.
ASSEMBLY • Assembly requires two persons. • To identify small parts, see page 9. • Place all parts in a cleared area and remove the packing materials. Do not dispose of the packing materials until you nish all assembly steps. • Assembly requires the following tools: the included hex key • After shipping, there may be an oily substance on the exterior of the treadmill. This is normal. If there is an oily substance on the treadmill, wipe it off with a soft cloth and a mild, non-abrasive cleaner.
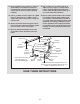
3. Identify the Left and Right Base Covers (90, 97). 3 Slide the Left Base Cover (90) onto the left Upright (93). Slide the Right Base Cover (97) onto the right Upright. 93 90 Then, press the Left and Right Base Covers (90, 97) downward until they snap into place. 4. With the help of a second person, hold the console assembly near the right Upright (93). 97 4 Console Assembly Connect the Upright Wire (88) to the console wire. See the inset drawing.
5. Insert the wires and cable into the Upright (93) as you set the console assembly on the Upright. Be careful not to pinch the Upright Wire (88) or the Upright Coaxial Cable (114). 5 Console Assembly Attach the console assembly with four 5/16" x 1 1/2" Screws (3) and four 5/16" Star Washers (9). Start all four Screws, and then tighten them. 3 9 114 3 93 9 88 93 6. Identify the Right Handrail (86). Slide the Right Handrail between the console assembly and the pulse assembly.
7. Hold the TV assembly near the console assembly, and connect the wires. Insert the excess wires into the bracket on the TV assembly. 7 Attach the TV assembly to the back of the console assembly with four 1/4" x 1 1/4" Screws (7). Make sure not to pinch any wires. Start all four Screws, and then tighten them. TV Assembly Console Assembly Wires 7 7 8. Raise the Frame (66) to the position shown. Have a second person hold the Frame until step 9 is completed.
9. Attach the upper end of the Storage Latch (68) to the Frame (66) with a 3/8" x 1 3/4" Bolt (6) and a 3/8" Nut (10). Note: It may be necessary to move the Frame back and forth to align the Storage Latch with the Frame. 9 Attach the two Rear Foot Pads (71) to the bottom of the crossbar on the Frame (66) with four #8 x 3/4" Tek Screws (11). Be careful not to overtighten the Screws. Place the treadmill near the coaxial cable from your wall (or device).
THE CHEST HEART RATE MONITOR HOW TO PUT ON THE HEART RATE MONITOR The heart rate monitor consists of a chest strap and a sensor. Insert the tab on one end of the chest strap into the hole in one end of the sensor as shown. Then, press the end of the sensor under the buckle on the chest strap. The tab should be flush with the front of the sensor.
OPERATION AND ADJUSTMENT HOW TO CONNECT THE POWER CORD nominal 120-volt circuit capable of carrying 15 or more amps. To avoid overloading the circuit, do not plug other electrical devices, except for lowpower devices such as cell phone chargers, into the surge suppressor or into an outlet on the same circuit. IMPORTANT: The treadmill is not compatible with GFCI-equipped outlets and may not be compatible with AFCI-equipped outlets.
Before operating the TV, you must connect an antenna or a 75 ohm CATV cable to the 75 ohm terminal, an AV cable to the audio/video input jack, or an HDMI cable to the HDMI input jack. Note: Use a CATV cable to connect to an external source such as a cable box, satellite TV box, VCR, or analog cable. No CATV cable, antenna, or adapter; AV cable; or HDMI cable is included. HOW TO CONNECT AN ANTENNA Place an indoor VHF antenna or an outdoor combination VHF/UHF antenna in the desired location.
HOW TO CONNECT A VCR, DVD PLAYER, OR OTHER DEVICE USING AN AV CABLE HOW TO CONNECT A DVD OR BLU-RAY PLAYER OR OTHER DEVICE USING AN HDMI CABLE 1. Connect the three-pronged end of an RCA AV Cable to your VCR, DVD player, or other device. 1. Connect one end of an HDMI Cable to your DVD or Blu-ray player or other device. 2. Plug in the power cord of your device. See your VCR, DVD player, or other device’s user’s manual for proper grounding instructions. 2. Plug in the power cord of your device.
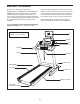
CONSOLE DIAGRAM MAKE YOUR FITNESS GOALS A REALITY WITH IFIT.COM FEATURES OF THE CONSOLE The advanced treadmill console offers an array of features designed to make your workouts more effective and enjoyable. With your new iFit-compatible fitness equipment, you can use an array of features on iFit.com to make your fitness goals a reality: When you use the manual mode, you can change the speed and incline of the treadmill with the touch of a button.
HOW TO TURN ON THE POWER HOW TO USE THE TOUCH SCREEN IMPORTANT: If the treadmill has been exposed to cold temperatures, allow it to warm to room temperature before you turn on the power. If you do not do this, you may damage the console display or other electrical components. The console features a tablet with a full-color touch screen. The following information will help you become familiar with the tablet’s advanced technology: Plug in the power cord (see page 16).
HOW TO SET UP THE CONSOLE The console is now ready for you to begin working out. The following pages explain the various workouts and other features that the console offers. Before using the treadmill for the first time, set up the console. To use the manual mode, see page 22. To use an onboard workout, see page 24. To use a set-a-goal workout, see page 25. To use an iFit workout, see page 26. 1. Connect to your wireless network.
HOW TO USE THE MANUAL MODE Each time you press one of the buttons, the incline will gradually change until it reaches the selected incline setting. 1. Insert the key into the console. See HOW TO TURN ON THE POWER on page 20. Note: It may take a minute for the console to be ready for use. Note: The first time you adjust the incline, you must first calibrate the incline system (see step 4 on page 29). 2. Select the main menu. 5. Monitor your progress with the displays.
If desired, adjust the volume by pressing the Vol increase and decrease buttons on the console near the TV controls. 7. Turn on the fan if desired. The fan features several speed settings and an auto mode. When the auto mode is selected, the speed of the fan will automatically increase and decrease as the speed of the walking belt increases and decreases. To pause the workout, touch one of the menu buttons or press the Stop button on the console.
HOW TO USE AN ONBOARD WORKOUT If the speed and/or incline settings are too high or too low at any time during the workout, you can override the settings by pressing the Speed or Incline buttons. If you press a Speed button, you can then manually control the speed (see step 3 on page 22). If you press an Incline button, you can then manually control the incline (see step 4 on page 22). To return to the programmed speed and/or incline settings of the workout, rst, view the prole.
HOW TO USE A SET-A-GOAL WORKOUT The workout will function in the same way as the manual mode (see pages 22 and 23). 1. Insert the key into the console. The workout will continue until you reach the goal that you set. The walking belt will then slow to a stop, and a workout summary will appear on the screen. After you view the workout summary, touch the Finish button to return to the main menu. You may also be able to either save or publish your results using one of the options on the screen.
HOW TO USE AN IFIT WORKOUT Before some workouts will download, you must add them to your schedule on iFit.com. Note: To use an iFit workout, you must have access to a wireless network (see HOW TO USE THE WIRELESS NETWORK MODE on page 30). An iFit account is also required. For more information about the iFit workouts, please see www.iFit.com. When you select an iFit workout, the screen will show the name, duration, and distance of the workout.
HOW TO USE THE EQUIPMENT SETTINGS MODE IMPORTANT: You must still unplug the power cord after using the treadmill. Set the update time for a time when you normally use the treadmill and will be available to unplug the power cord after an update. 1. Select the settings main menu. Insert the key into the console (see HOW TO TURN ON THE POWER on page 20). Next, select the main menu (see step 2 on page 22). Then, touch the gears button near the lowerright corner of the screen to select the settings main menu.
11. Enable or disable a passcode. 12. Set a safety screen timeout. The console features a child-safety passcode, designed to prevent unauthorized users from using the treadmill. The console features an automatic screen reset; if no buttons are touched or pressed and the walking belt does not move for a set amount of time, the console will automatically reset. Touch the Passcode button. To enable a passcode, touch the Enable checkbox. Then, enter a 4-digit passcode of your choice.
HOW TO USE THE MAINTENANCE MODE 4. Calibrate the incline system of the treadmill. 1. Select the settings main menu. Touch the Calibrate Incline button. Then, touch the Begin button to calibrate the incline system. The treadmill will automatically rise to the maximum incline level, lower to the minimum incline level, and then return to the starting position. This will calibrate the incline system. Press the Cancel button to return to the maintenance mode.
HOW TO USE THE WIRELESS NETWORK MODE An information box will ask if you want to connect to the wireless network. Touch the Connect button to connect to the network or touch the Cancel button to return to the list of networks. If the network has a password, touch the password entry box. A keyboard will appear on the screen. To view the password as you type it, touch the Show Password checkbox. The console features a wireless network mode that allows you to set up a wireless network connection. 1.
HOW TO USE THE STEREO SOUND SYSTEM HOW TO ADJUST THE CUSHIONING SYSTEM To play music or audio books through the console’s speakers, you must connect your MP3 player, CD player, or other personal audio player to the console. Remove the key from the console and unplug the power cord. The treadmill features a cushioning system that reduces the impact as you walk or run on the treadmill. Plug one end of your audio cable into the audio jack on the console.
HOW TO OPERATE THE TV 5. Mute the TV if desired. The TV can be controlled using the control buttons found on the treadmill console, the buttons located on the top of the TV, or with the remote control (see page 33). Press the Mute button to silence the TV’s audio output. Press the button again or adjust the volume to turn the TV off of mute. 6. Use closed captioning. 1. Turn the TV on.
HOW TO USE THE REMOTE CONTROL Press the Display button to view information about the current program and the broadcast or cable signal. The first time you use the remote control, insert batteries (see HOW TO REPLACE THE BATTERIES IN THE REMOTE CONTROL at the right). Press the CC button repeatedly to turn on or turn off closed captioning. See step 6 on page 35 to adjust closed captioning settings. Next, stand on the treadmill and hold the remote control near the TV.
HOW TO ADJUST THE TV SETTINGS 4. Adjust the channel settings. The TV has a menu that allows you to adjust and personalize television settings. The Channel menu allows you to save channels in the TV memory and select settings for channels. Note: You can only access this menu if TV is selected as the input source. Press the Menu button on the remote control, on top of the TV, or the on-screen control (see HOW TO USE THE ENTERTAINMENT MODE on page 32) to enter the main menu or to return to a previous menu.
5. Adjust the parental control settings. Select Menu Language to change the language used in the menus. The Parental menu allows you to block or allow various settings on the TV. Select Clock to adjust the TV clock’s time zone, auto setting, time setting, day of the week setting, and daylight saving time setting. First, enter the Lock Parental Code password, which is a 4-digit PIN. Note: The default password is 0000. Once the password has been entered, the Parental menu will be unlocked. 7.
HOW TO FOLD AND MOVE THE TREADMILL HOW TO FOLD THE TREADMILL HOW TO MOVE THE TREADMILL To avoid damaging the treadmill, adjust the incline to zero percent before you fold the treadmill. Then, remove the key and unplug the power cord. CAUTION: You must be able to safely lift 45 lbs. (20 kg) to raise, lower, or move the treadmill. Before moving the treadmill, fold it as described at the left. CAUTION: Make sure that the latch knob is locked in the storage position.
TROUBLESHOOTING Most treadmill problems can be solved by following the simple steps below. Find the symptom that applies, and follow the steps listed. If further assistance is needed, see the front cover of this manual. d. If the treadmill still will not run, please see the front cover of this manual. SYMPTOM: The console displays remain lit when you remove the key from the console SYMPTOM: The power does not turn on a.
SYMPTOM: The walking belt slows when walked on SYMPTOM: The walking belt is off-center or slips when walked on a. Use only a surge suppressor that meets all of the specifications described on page 16. a. If the walking belt is off-center, first remove the key and UNPLUG THE POWER CORD.
SYMPTOM: The television is not receiving a signal c. Check for the problems listed below and follow the applicable instructions. a. Make sure that the correct TV or AV source is selected. See step 2 on page 32 to select a television source. • Ignition (black spots or horizontal streaks that appear or a picture that flutters or drifts)—Usually this is caused by interference from automobile ignition systems, neon lamps, electric drifts, or other electric appliances.
EXERCISE GUIDELINES Burning Fat—To burn fat effectively, you must exercise at a low intensity level for a sustained period of time. During the first few minutes of exercise, your body uses carbohydrate calories for energy. Only after the first few minutes of exercise does your body begin to use stored fat calories for energy. If your goal is to burn fat, adjust the intensity of your exercise until your heart rate is near the lowest number in your training zone.
SUGGESTED STRETCHES The correct form for several basic stretches is shown at the right. Move slowly as you stretch—never bounce. 1. Toe Touch Stretch Stand with your knees bent slightly and slowly bend forward from your hips. Allow your back and shoulders to relax as you reach down toward your toes as far as possible. Hold for 15 counts, then relax. Repeat 3 times. Stretches: Hamstrings, back of knees and back. 1 2. Hamstring Stretch Sit with one leg extended.
PART LIST Key No. Qty. 1 2 3 4 5 6 7 8 9 10 11 12 13 14 15 16 17 18 19 20 21 22 23 24 25 26 27 28 29 30 31 32 33 34 35 36 37 38 39 40 41 42 43 44 45 46 47 48 49 50 48 4 4 4 2 1 4 1 4 2 32 1 3 4 8 4 2 2 1 1 1 2 5 2 4 2 2 2 2 6 4 1 2 1 2 2 4 16 2 3 2 2 2 2 2 4 4 1 1 3 Model No. NTL19112.1 R0113A Description Key No. Qty.
Key No. Qty. 101 102 103 104 105 106 107 108 109 110 4 1 1 1 2 1 1 1 1 1 Description Key No. Qty. Plastic Stand-off Mounting Bracket Console Fan Assembly Handrail Spacer Console Frame Pulse Bar Top Pulse Bar Bottom Pulse Ground Wire Key/Clip 111 112 113 114 115 116 117 118 * 4 1 1 1 1 1 1 4 – Description Cable Tie TV Bracket Cover TV Trim Upright Coaxial Cable TV TV Remote Control TV Bracket M4 x 12mm User’s Manual Note: Specifications are subject to change without notice.
15 15 18 14 30 1 47 11 36 41 28 48 31 38 72 49 43 42 38 15 50 30 46 38 45 11 18 51 46 44 38 54 36 38 15 38 28 50 53 1 38 30 11 41 52 55 47 14 11 52 11 56 1 11 71 10 38 25 57 11 46 11 38 58 11 6 50 29 11 55 11 56 53 1 63 59 64 62 60 1 61 70 31 11 46 29 26 68 11 57 25 69 67 11 32 34 44 43 38 11 58 10 38 8 38 45 42 23 66 101 100 65 EXPLODED DRAWING A Model No. NTL19112.
EXPLODED DRAWING B Model No. NTL19112.
EXPLODED DRAWING C Model No. NTL19112.
EXPLODED DRAWING D Model No. NTL19112.
ORDERING REPLACEMENT PARTS To order replacement parts, please see the front cover of this manual.