
User Manual


14
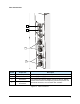
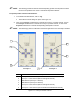
3. Conveyor 1 position controls operate as follows:
! On the X-Y control panel, the arrows pointing to the Left move the Conveyor 1 belt to the
left and the arrows pointing to the Right move it to the right.
! On the X-Y control panel, the arrows pointing Up move the Conveyor 1 rear rail toward
the back of the dispensing area and the arrows pointing Down move the rear rail toward
the front of the dispensing area.
4. Conveyor 2 position controls operate as follows:
! On the X-Y control panel, the arrows pointing to the Left move the Conveyor 2 belt to the
left and the arrows pointing to the Right move it to the right.
! On the X-Y control panel, the arrows pointing Up move the Conveyor 2 rear rail toward
the back of the dispensing area and the arrows pointing Down move the rear rail toward
the front of the dispensing area.
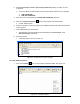
" NOTE The single arrows and double arrows
move the conveyor rail or belt different
distances per mouse click.
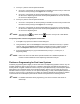
To operate position controls using Keyboard commands:
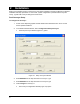
1. Press [Ctrl + J] to open the Position Controls dialog box.
2. Using the Mouse, click on the Conveyor 1 radio button to activate the Conveyor 1 position
controls, click on the Conveyor 2 radio button to activate Conveyor 2 position controls, or
click on the Dispenser radio button to activate the Dispensing Head position controls.
3. Press the appropriate keys to jog the selected device (Conveyor 1, Conveyor 2, or
Dispensing Head).
" NOTE Refer to the Axiom X-1000 Series Operations Manual for a detailed explanation of
Position Control Commands for the Dispensing Head and Conveyors.
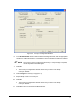
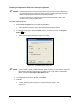
Fluidmove Programming for Dual Lane Systems
Fluidmove programming differs slightly for the X-1022 Dual Lane Dispensing Systems. There is only one
program (workpiece) origin for both conveyors. In addition, all program commands must be placed in a
Conveyor Block. Program commands for both conveyors may be placed directly in the Workpiece pattern.
When placing the commands directly in the Workpiece pattern, there is only one origin and one set of
fiducials for both conveyors. However, for more precise dispensing, you may create separate patterns for
Conveyor 1 and Conveyor 2. This allows you to define an origin and fiducials for each pattern in addition
to those defined for the Workpiece pattern. Both methods are explained in the following sections.
" NOTE For detailed information about programming, refer to the Fluidmove User Guide or
Online Help.