
Manual

Operation 3-7
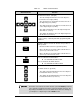
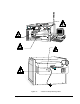
Table 3-3 Motion Control Functions
Button/Indicator Function
The X/Y-Axis Controls. (left/right)
•
The left and right arrow buttons move the dispense
head to the left or right (X-Axis).
•
The up arrow moves the dispense head to the rear of
the dispensing area (Y-Axis).
•
The down arrow moves the dispense head to the front
of the dispensing area (Y-Axis).
•
The single arrow buttons move the dispensing head
25.4 mm/sec (1 in/sec).
•
The double arrow buttons move the dispensing head
50-75 mm/sec (2-3 in/sec)
.
TEACH
Teaches (enters) a desired point while programming with
Fluidmove.
FIND
HOME
Sends the dispense head to its absolute zero position or
Home position:
•
Finds the Z-Axis Home first. (up/down position)
•
Moves the dispense head in Y-Axis at 50-75 mm/sec
(2-3 in/sec) to the Home sensor.
•
Moves the dispense head in X-Axis at 50-75 mm/sec
(2-3 in/sec) to the front left corner.
ENABLE
Press to activate the Z-Axis buttons.
The LED indicator will turn ON.
Press to deactivate the Z-Axis buttons.
The LED indicator will turn OFF.
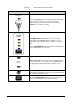
The Z-Axis Controls. (up/down)
•
The single arrow up/down buttons move the dispense
head at 25.4 mm/sec (1 in/sec).
•
The double arrow up/down buttons move the dispense
head at 50-75 mm/sec (2-3 in/sec)
.
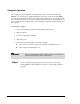
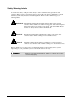
Remember to deactivate the Z-Axis Controls (turn OFF
Enable
) and move
to the uppermost height position before using the X/Y-Axis Controls. The
dispensing head will also move in the Z-Axis and could cause damage to
your workpiece or dispensing needle if
Enable
is ON.