
Manual


Programming 5-33
5.13.2 Creating Images
The Graphic Display supports JPEG and BMP formats only. Image files can be created with a digital
camera or exported from CAD programs. Bitmap resolutions of 640 x 480 or 800 x 600 are sufficient for
most purposes. Higher resolutions result in larger file sizes, which could cause slow refresh rates in
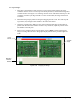
ECXP. If you use a digital camera to create board images, place the boards on a light background before
taking pictures. If the camera has a zoom lens, use the lens to zoom in instead of moving the camera
closer to the boards. Board images MUST be oriented in the same direction that they will be placed on the
conveyor or pallet. There is no way to rotate the images after importing them into ECXP. You can use a
bitmap editor to crop or rotate images before importing them.
NOTE If the boards you are coating will be mounted on a pallet, you should create an image of
the pallet with the boards mounted on it.
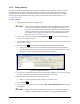
5.13.3 Importing Images
To select an image:
1. Create a new product program or open an existing product program.
2. Enter the length and width of the product.
The image will not display unless the product length and width has been entered.
3. In the ECXP Edit Screen, click on
File > Import Board Image.
4. Select First Side or Second Side. The first side is the side that will enter the workcell first.
The Open Board Image dialog box opens.
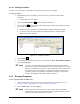
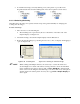
5. Select the image file you want to import.
The selected image is displayed in the small window on the right. To see a preview of
the image, click on the
Preview button. Click on the Close button at the top
right of the Preview window to close it.
6. Click on
Open to import the image.
The Board Image Screen opens (Figure 5-35).
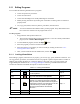
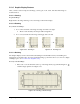
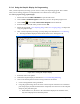
5.13.4 Cropping Images
The Board Image Screen is used to crop borders from the board image and to remove any distortions. The
uncropped image is displayed in the left window. The red squares in the left pane are handles that you
drag to crop the image. The cursor will turn into a crosshair when it is over a handle. The small crosshair
window below displays a magnified view of the portion of the image under the handle. The cropped
image is displayed in the right window.
NOTE If you crop the image in a bitmap editor such as Windows Paint before importing it, you
can skip the following steps. Click on
Done to finish importing your image.