
Manual


Setup and Configuration 6-33
> If no suction is detected, contact Asymtek Technical Support.
17. Click on Next.
> The Operator Name dialog box opens.
18. Type in your name.
19. Click on Next.
> A dialog box opens asking if you intend to install a new syringe. If you answer
“Yes”, proceed to the next step. If you answer “No”, skip to Step 27.
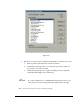
20. Fill in all of the requested fluid information.
> Consult the documentation that is packaged with the fluid for Thaw Time and
Lot Number information.
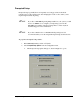
21. If your system is equipped with a low fluid sensor, activate the Enable Low Fluid
Check feature.
> Boards After Low Fluid Sense is the estimated number of boards that can
completed before the run is paused and the syringe is changed. Consult the
On-line Help for more complete information.
22. Click on OK.
The dispensing head will move after your response.
> The dispensing head moves to the front center of the dispensing area for
syringe installation.
23. Press Pause on the Dispenser Control Panel.
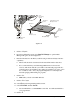
24. Change the syringe.
> Refer to the manual specific to your valve for syringe replacement
instructions.
25. Press Pause on the Dispenser Control Panel again to release the pause.
26. Click on Next.
The dispensing head will move after your response.
27. The dispensing head moves to the Purge Station and prepares for a Flow Rate
Calibration.
28. Follow the on-screen prompts.
This concludes the tutorial on Prompted Setup.