
Manual

Programming Basics and Setup 5-31
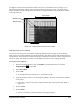
2. Choose Two fiducials.
3. Click on
OK.
!A Teach Window opens asking you to teach the first point-defining axis. This will define
the Workpiece Alignment.
Teaching Workpiece Alignment
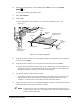
1. Use the Position Controls to move the Dispensing Head to the start of one of the Basic Lines
near the top of the Tutorial Board.
2. Center the crosshairs on the line and click on
Teach.
3. Use the Position Controls to move the Dispensing Head to the end of the same line and click
on
Teach.
!You have just defined the workpiece alignment.
!The Teach Window changes, asking you to teach the workpiece origin.
Teaching Workpiece Origin
1. Use the Position Controls to move the Dispensing Head to the dot in the lower left-hand
corner (LLHC) of the Tutorial Board.
2. Center the crosshairs on the dot and click on
Teach.
3. Click on
Done.
!The Teach Window changes again and you are asked to select a method for teaching the
first fiducial.
Teaching Fiducials
1. Select
Model Finder.
2. Click on
Next.
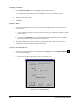
3. Teach the first fiducial in the same location where you taught the origin.
!You should not need to reposition the Dispensing Head unless it was moved after teaching
the workpiece origin.
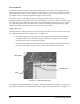
!If the dot does not fit entirely inside of the square overlay in the video display, you will
need to adjust the size of the Model Window.
4. Click on the up arrows next to the
Width and Height text boxes to adjust the size of the Model
Window until the square is larger than the dot.
5. Click on
Teach.