
User Manual

Parts Replacement 9-5
9.8 Replacing Conveyor Chains
Checking the condition of the conveyor chains should be part of the routine maintenance schedule for the
coating system. Worn or broken chains should be replaced immediately. Refer to Appendix C for a parts
list of conveyor components.
Tools and Materials Needed:
• Pliers • Phillips Head Screwdriver
• 3/32-inch Hex Key • Removable Thread Locker (P/N 40-0019)
• Isopropyl Alcohol • Roller Chain, #25, NP (P/N 193721)
• Soft Cloth and Cotton Swabs • Master Link, #25 Chain (P/N 193722)
To replace the conveyor chains:
1. Perform a service shutdown as described in 5.11.2.4 Service Shutdown.
2. Move the dispensing head to the rear of the machine.
3. Use the manual width adjust to move the rear conveyor rail to achieve an approximate
eight-inch space between the front and rear conveyor rails.
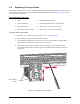
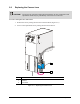
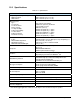
4. Create slack in the chain by loosening the four mounting screws on the back of the
motor bracket and moving the bracket up and down until the desired slack is achieved
(Figure 9-3).
Figure 9-3 Creating Slack in the Chain
Motor Bracket
Screws